
2D and 3D Shear Wall Configurations
In ETABS, you can define both 2D and 3D shear walls. As shown in Figure 15, the shear
walls on the bottom two floors have been assigned pier and spandrel labels. This 2D
shear wall configuration can be taken into an embedded utility in ETABS called Section
Designer. Section Designer allows the user to define the reinforcement bar sizes and
location within any shear wall.
For example, in Figure 15, you can see that the first floor contains two shear walls with a
pier label P2. Go to Design>Shear Wall Design>Define Pier Sections for Checking and
click on Add Pier Section. Click on ‘Start from Existing Wall Pier’ and select the
story(2nd) and wall pier label(P2) from the drop-down boxes in the "Add Pier" area of the
form so that ETABS knows which existing pier geometry to use. In cases where the top
and bottom geometry of the pier are different, ETABS uses the geometry at the bottom of
the pier. Click the Section Designer button to enter the Section Designer utility. The
geometry of the pier is immediately displayed. See Figure 25.
Figure 25 Section Designer Form
Modify the geometry of the section. Also add rebar to the pier using the Draw menu
commands. Right-click on the rebar to change the bar spacing and bar cover.
When the pier has been drawn, close section designer (click the Done button in the lower
right-hand corner) and return to the Pier Section Data form and click the OK button to
complete definition of the pier.
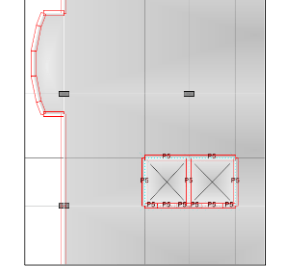
You can do the same thing for a 3D shear wall configuration. We must first assign new
pier labels for define this 3D wall. Go to the plan view of the 12th story of the structure.
Zoom in to the elevator core located at the south end of the building. Make sure the ‘One
Story’ option has been enabled in the bottom right hand corner of the screen. Select all of
the shear walls around the opening. Go to Assign>Shell/Area>Pier Labels and assign a
pier label of P5 the walls and click OK. Next, we can view this wall in Section Designer. Go to Design>Shear Wall Design
>Define Pier Sections for Checking and click on Add Pier Section. Click on ‘Start from
Existing Wall Pier’ and select the story(12th) and wall pier label(P5). See Figure 27.
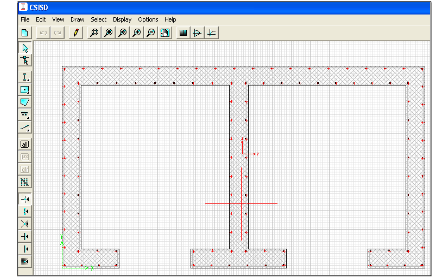
Figure 27 3-D Shear Wall in Section Designer
Section Designer is a powerful utility that allows design of simple and complex cross
sections of beams, columns and shear walls. Section properties, interaction surfaces and
moment-curvature relationships can be displayed using the buttons on the top of the
Section Designer screen.


