
Concrete Frame/ Shear Wall Design
The design codes for the concrete frame and shear walls have already been defined. After
running the analysis, the design portion of the program can be performed. You can choose
to design for any one design code in any one design run. You cannot design some
beams for one code and others for a different code in the same design run. You can
however perform different design runs using different design codes without rerunning the
analysis.
The analysis is based on these section properties, and thus, the design forces are based on
these analysis section properties. The shear wall design section is completely separate
from the analysis section. Piers can be assigned by selecting the pier element and then
Design->Shear Wall Design->Assign Pier Sections for Checking. Three types of pier
design sections are available. They are:
Uniform Reinforcing Section:
The Uniform Reinforcing Section pier may be planar or it may be three-
dimensional. For shear design and boundary zone checks, the program
automatically) breaks the analysis section pier up into planar legs and then
performs the design on each leg separately and reports the results
separately for each leg.
General Reinforcing Section:
For flexural designs and/or checks, the user defines the pier geometry and
the reinforcing in the Section Designer utility. For shear design and
boundary zone checks, the program automatically breaks the analysis
section pier up into planar legs and then performs the design on each leg
separately and reports the results separately for each leg.
Simplified T and C Pier Section:
The simplified section is defined by a length and a thickness. The length is
in the pier 2-axis direction and the thickness is in the pier 3-axis direction.
You cannot specify reinforcing in a simplified section. Thus, the simplified
section can only be used for design, not for checking user-
specified sections.
To run the shear wall design, go to Design>Shear Wall Design>Start Design/Check of
Structure. After you complete the Shear Wall Design portion of the program you can
view the results in many different ways. Use the Design menu > Shear Wall Design >
Display Design Info command to display on-screen output plotted directly on the model.
All Shear Wall design output can be printed under File->Print Tables->Shear Wall
Design. If desired, the screen graphics can then be printed using the File menu > Print
Graphics command. Listed below are some of the design output options one can view:
Simplified pier longitudinal reinforcing
Simplified pier edge members
Section Designer pier reinforcing ratios
Section Designer pier D/C ratios
Spandrel longitudinal reinforcing
Shear reinforcing
Pier demand/capacity ratios
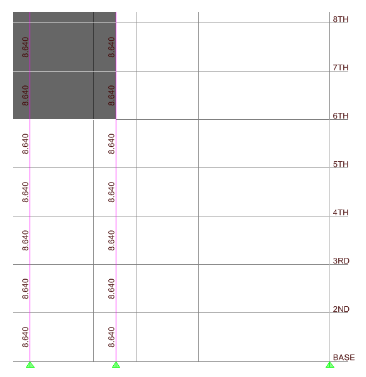
When displaying design output information on the screen, right-click on the pier/spandrel
to view more detailed information. See Figure 28:
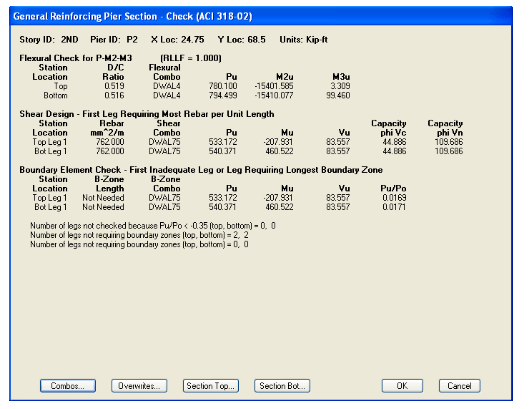
Figure 28 3-D Shear Wall in Section Designer
Click on the Overwrites button to change the section from a General Pier section to either
a Simplified T and C section or to a Uniform Reinforcing section.
The next step is to perform the concrete frame design. Use the Design menu > Concrete
Frame Design > Start Design/Check of Structure. After the concrete frame design is
completed, you can view many design results. These include:
Longitudinal Reinforcing
Shear Reinforcing
Column P-M-M Interaction Ratios
Joint Shear Capacity Ratios
Rebar Percentage
Torsion Reinforcing
Go to elevation 1 to view the concrete column design output:
Figure 29 Concrete Frame Design Screen Output
By right clicking on any column element while viewing the design results, you can view
specific details about the design. You can get information regarding the flexural design,
shear design, interaction diagrams and joint shear. Click on the Summary button to get
design values. See Figure 30:
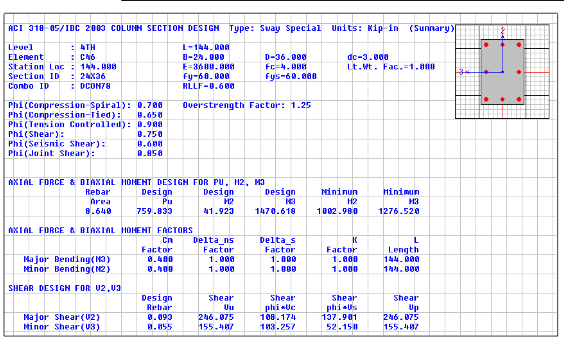
Figure 30 Concrete Frame Detail Summary


