
Setting up the Interior Camera Views
In this part of the tutorial you will setup interior camera views of different rooms in the house. From these views, you will choose the best ones to create high- resolution renderings.
Before beginning this part of the tutorial create a folder on your local drive called Renderings. This will be where you save your rendered files after they are created.
You will also need to set up the materials for the Kitchen Cabinets and Counter Tops.
- Open the RL6-2 file. Save the file as RL6-3.
- Click on the Object Styles tool in the Manage tab, Settings panel.

Object Styles Tool
- In the Object Styles dialog box, click on the “+” sign next to the Casework category. Change the material for the Cabinet subcategory to Oak, White and the Counter Top subcategory to Marble.
Both materials will need to be loaded from the Autodesk Materials folder. Set the Shading to Use Render Appearance for both materials.

Object Styles Dialog Box
- Click OK to close the dialog box.
Now the materials will be assigned to the cabinets and counter tops.
- Before beginning the process of setting up the camera views, you will add people to some of the rooms in the house.
Add people to the Garage, Kitchen, Living Room, and Family Room.
- Open the First Floor – Furniture Plan view.
- Zoom in on the Living Room area.
- Click on the Camera tool in the View tab, Create panel, 3D View tool.
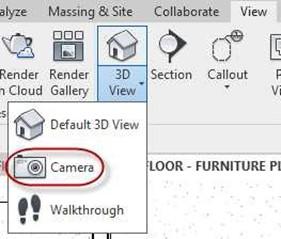
Camera Tool
- Position the camera at the southwest corner of the room and drag up and to the right towards the fireplace.
You may wish to add people to the interior of the rooms. The blue lines represent the center and edges of the view.
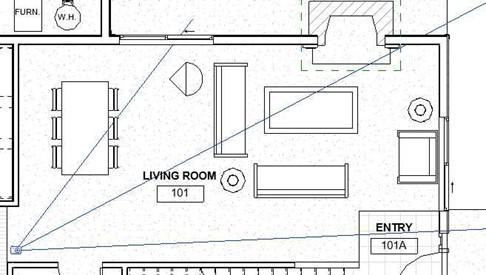
Camera Position
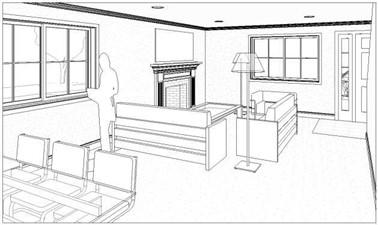
- The perspective camera view opens.
Right-click on the new 3D View and rename it Living Room – 1.
Set the Detail Level to Fine so the window muntins will be visible.
Drag the edges of the view until you are satisfied with the results.

Original Camera View
Adjusted Camera View
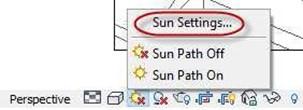
- Turn on the Shaded Visual Style and the shadows. Click on the Sun path tool and select Sun Settings…
Sun Settings
- Set the Sun Settings to the following settings. The Relative to View checkbox is unchecked.
The azimuth setting is in a clockwise direction so the 90° setting will cause the sun to originate from the right side of the house. The 0° setting originates from the north, 180° from the south, and 270° from the east.
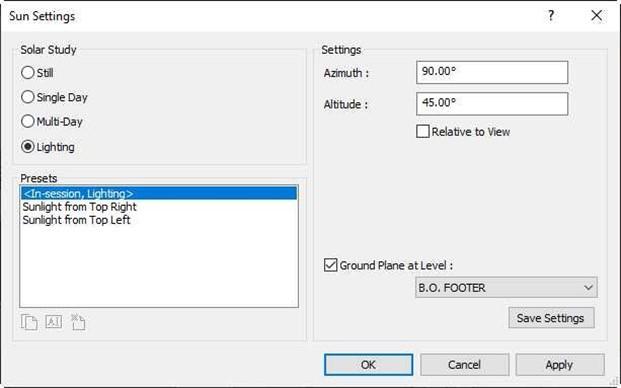
Sun Settings Dialog Box
- To check the rendering setup, click on the Render tool in the View Control Bar.
 The Rendering dialog box opens.
Render Tool
Set the Quality to Draft and the Lighting Scheme to Interior: Sun and Artificial.

Rendering Dialog
- Click the Render button at the top of the dialog box to start the rendering.
Depending on the speed of your computer, it will take a few minutes to render the view.
A Rendering Progress dialog box will open.

Rendering Progress Dialog
- Once the rendering is complete, adjust the settings as needed.
When the rendering is setup properly, render the view in Medium or High quality.
Due to the higher resolution of the image, this may take an hour or longer.

Draft Rendering of Living Room
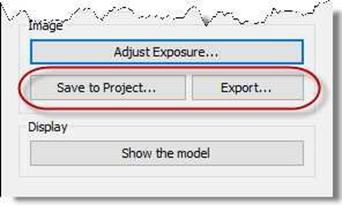
- Click on the Adjust Exposure… button to change the exposure
settings of your rendering if needed.
(Your settings may be different than the image shown.)
Note: The exposure settings can be changed after the initial rendering but must occur before the rendering is saved to a file or to the project

Exposure Control Dialog Box
- Click on the Save to Project… button to save the rendering in the Project Brower. Save the rendering as Living Room – 1.
A new category will be created called Renderings.
- Click on the Export… button to save the rendering to your Renderings folder.
You can return to the rendered view anytime by opening the 3D camera view and pressing the Show the rendering button.
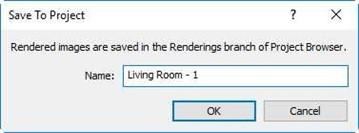
Save to Project Dialog Box
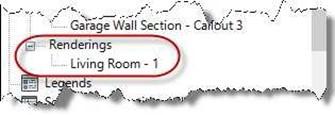
Rendering Category
Save to Project… and Export… Buttons
Using Cloud Rendering with Autodesk® Rendering
Autodesk Rendering is a service provided by Autodesk. This will allow you to render your project on their website rather than using your own computer. Not only is this method quicker (approx. 30 times faster) but it will not tie up your computer while your file is rendered.
To use this free service, you will need to have an Autodesk Student Community account. If you do not have an account and are a current college or high school student you may visit the Autodesk website to create one. If you are not a current student, you may sign up at the Autodesk Rendering site for a free trial.
- To begin the process of rendering the view using the Autodesk Cloud Rendering service, click on the Render in Cloud tool in the Create panel.

Render in Cloud Tool
- After clicking on the tool, the Render in Cloud dialog box opens.
This box tells you the steps for rendering using the Autodesk Cloud service. Click Continue.
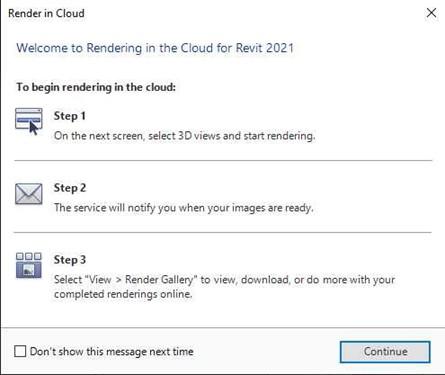
Render in Cloud Dialog Box
- The next dialog box opens.
This dialog contains fields to set up the rendering.
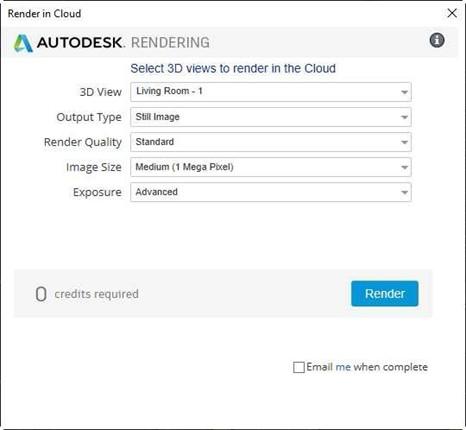
Settings for Cloud Rendering
- Set up the rendering.
- 3D View – You may render one or multiple views by clicking the checkbox next to the view name.
- Output Type – Still Image, Panorama, Stereo Panorama, or Illuminance
- Render Quality – Standard or Final
- Image Size – Small, Medium, Large, Extra Large, or Maximum
- Exposure – Advanced or Native
- Check the “Email me when complete” checkbox if desired.
- Click to Start Rendering button to begin.
Note: Depending on the quality of the rendering, a certain number of cloud credits are needed. If you are using a student account, you should have unlimited cloud credits.
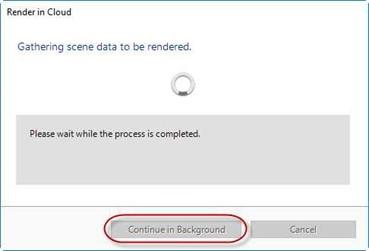
- Another Render in Cloud dialog opens.
Once the file information is uploaded to the cloud, click on the Continue in Background.
This will close the box and you will be able to continue working on your project.
Render in Cloud Dialog Box
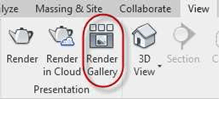
- Click on the Render Gallery tool. When the webpage opens, click on the box with the filename below it to open the image and see your progress.
The rendering time will vary depending on how busy the network is.

Autodesk Rendering Webpage (Google Chrome Browser)
- Once the rendering is complete, click on the thumbnail to view a larger view.
You may also re-render the view, create a panorama, stereo panorama, solar study, change the illuminance and turntable, adjust the exposure, download, and delete the file.

Rendering Tools on Webpage
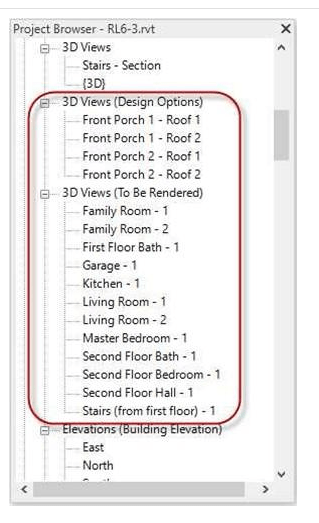
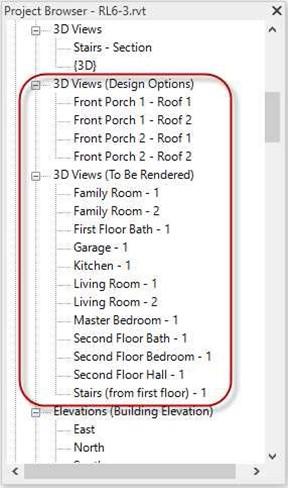
- Set up views in the following areas of the house:
- Family Room – 2 views
- First Floor Bath – 1 view
- Garage – 1 view
- Kitchen – 1 view
- Living Room – 2 views
- Master Bedroom – 1 view
- Second Floor Bath – 1 view
- Second Floor Bedroom – 1 view
- Second Floor Hall – 1 view
- Stairs (from first floor) – 1 view
Note: You will also need to set up the lighting scheme, time of day, and sun direction for each view.
- After creating the views, create a view category for the different types of renderings.
- For one of these views, you may create a Panorama. This will create a view that will enable panning around the room.
For this rendering type it is best to place the camera in the center of the room.
3D View Categories Created
- This is the end of Part 3. Save your file as RL6-3.


