Financial Modeling in Excel Using Scenario Manager to Model Loan Calculations
Using Scenario Manager to Model Loan Calculations
Scenario Manager is grouped together with Goal Seek and Data Tables in the What-If Analysis section of the Data tab. Being grouped with other tools that are so useful would lead you to believe that Scenario Manager is also a critical tool to know. However, despite its useful-sounding name and the good company it keeps, Scenario Manager is quite limited in its functionality and is as helpful as the name suggests! It’s therefore not frequently used by expert financial modelers; how- ever, for the sake of completeness, I cover it here very briefly.
To demonstrate how to use Scenario Manager, let’s apply it to a simple loan cal- culation model. The theory behind loan calculations is quite complex, but fortu- nately, Excel handles loans quite easily. For more information on modeling loans, interest amounts, and amortization schedules in financial models, see Chapter 6.
In the example shown in Figure 8-14, I’ve created an interest rate calculator upon which you can test the sensitivity of monthly repayments to changes in interest rates and loan terms. Follow these steps:
- Download File 0801.xlsx at www.dummies.com/go/financialmodeling inexcelfd, open it, and select the tab labeled 8-14, or simply set up the model with hard-coded input assumptions as shown in Figure 8-14.
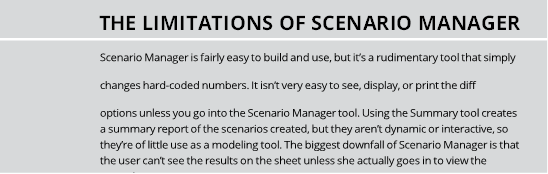
- In cell B11, type =PMT( and press Ctrl+A.
The Function Arguments dialog box appears.
The PMT function requires the following inputs:
- Rate: The interest rate.
- Nper: The number of periods over the life of the loan.
- Pv: The present value of the loan (the amount borrowed).
-
Fv: The amount left at the end of the loan period. (In most cases, you want
to pay the entire amount back during the loan period, so you can leave this
blank.)
-
Type: Whether you want the payments to occur at the beginning or the end of the period. (You can leave this blank for the purposes of this
exercise.)
- Rate: The interest rate.
-
Link the fi in the Function Arguments dialog box to the inputs in your
model.
Setting up the PMT function to calculate monthly loan repayments.

 The PMT function returns the annual repayment amount. Because you want to calculate the monthly repayment amount, you could simply divide the entire formula by 12, but because the interest is compounding, it’s more accurate to divide each fi by 12 within the formula. So, the rate in the fi fi is converted to a monthly rate, and the number of periods in the second fi is also converted to a monthly rate.
-
Click OK.
The formula is =PMT(B7/12,B9*12,B5).
This function returns a negative value because this is an expense. For our purposes, change it to a positive by preceding the function with the minus sign.
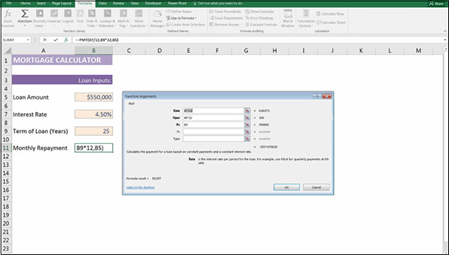
Now you can use Scenario Manager to add some scenarios. You want to know the impact of changes in inputs on your monthly repayments. Follow these steps:
-
On the Data tab, in the Forecast section of the Ribbon, click the What-if Analysis icon, and select Scenario Manager from the drop-down list.
The Scenario Manager dialog box appears.
-
Click the Add button to create a new scenario.
The Add Scenario dialog box, shown in Figure 8-15, appears.
- Enter a name for the fi scenario in the Scenario Name box (for exam- ple, Scenario One).
-
Enter the cell references for the variable cells in the Changing Cells box, as shown in Figure 8-15.
Separate each reference with a comma (if there is more than one), but don’t use spaces. You can also hold down the Ctrl key and click each cell in the spreadsheet to insert the references into the box.
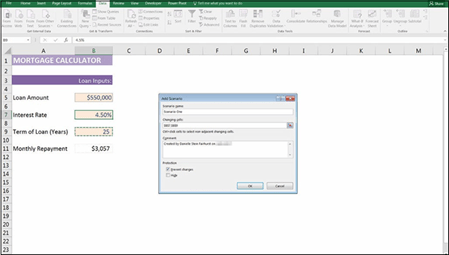 FIGURE 8-15:
Building the scenario using
Scenario Manager.
-
Click OK.
The Scenario Values dialog box appears with the existing values (0.045 for the interest rate and 25 for the years).
- Click OK to accept these values as Scenario One.
-
Click Add to add another scenario.
The Add Scenario dialog box appears again.
- Enter a name for the second scenario in the Scenario Name box (for example, Scenario Two).
-
Click OK.
The Scenario Values dialog box appears again.
- Enter the variables’ values for this scenario (for example, 0.05 for the interest rate and 30 for the years, as shown in Figure 8-16).
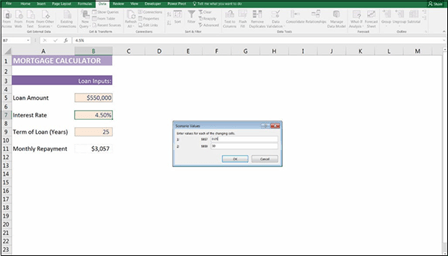 FIGURE 8-16:
Entering scenario values using Scenario Manager.
-
Click OK.
You’re returned to the Scenario Manager dialog box.
- Follow Steps 7 through 9 again to create additional scenarios.
-
After you’ve created all the scenarios, you can use the Scenario Manager to view each scenario, as shown in Figure 8-17, by clicking the Show button at the bottom.
The inputs are automatically changed to show the scenarios.

 Scenarios are sheet-specific, meaning they only exist in the sheet where you created them. So when you’re looking for the scenarios you’ve created, you have to select the correct sheet in the model.
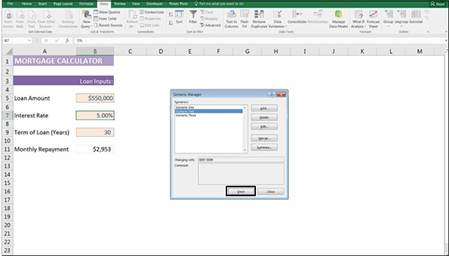 FIGURE 8-17:
The completed
Scenario Manager.