
General Modeling
Description
This is a thirteen-story concrete shear wall building that contains elevator cores at its
north and south ends. A parking garage is located within the bottom five floors of the
structure. Each parking floor is connected to the adjacent floors using ramp elements.
The building is subjected to vertical static loading and computer-generated earthquake
loading per the 2003 International Building Code. Automated wind loads are also applied
to the structure per the ASCE 7-02 code. The building consists of concrete beams and
columns along with a concrete deck on every level. Please refer to Figure 1 for a three
dimensional view of the structure.
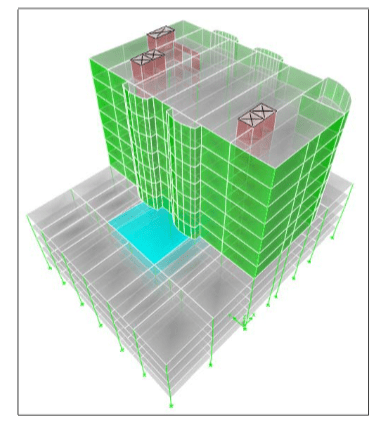
Figure 1 3-D View of Structure
Import Grid and Floors using DXF File
The grid definition for this model contains both Cartesian and cylindrical coordinates
systems. The grid spacing in the X and Y directions are non-uniform. In this case, it is
easiest to import an architectural grid from a .DXF file.
Click the File menu > Import > DXF File of Architecture Grid command to access the
DXF Import form. Locate the filename/path of the .DXF file to be imported and click the
Open button.
Use the drop-down boxes to select the DXF layer names that contains the lines and
insertion points in the DXF file as the ETABS corresponding elements. For this model,
we select the GRIDS layer and click OK. ETABS then imports the lines from any layer
in the DXF file as ETABS grid lines. Note: Make sure that the gridlines are drawn as
a part of the GRIDS layer in the AutoCAD .dxf file. In the Coordinate System box,
choose the GLOBAL coordinate system for importing the file. Also select the units as
Kip-Ft. Your grid system should look like Figure 2. If you want to import multiple grid
systems, you could do so by reimporting another grid system to the same model.
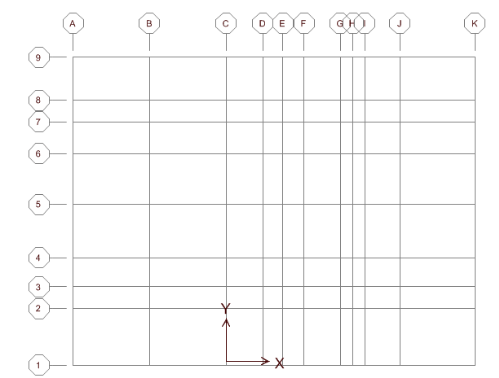
Figure 2 Architectural Grid
Next, add the cylindrical coordinate system under Edit>Edit Grid Data>Edit Grid. Click
the Add New System button and select the cylindrical option. Enter the values shown in
Figure 3:
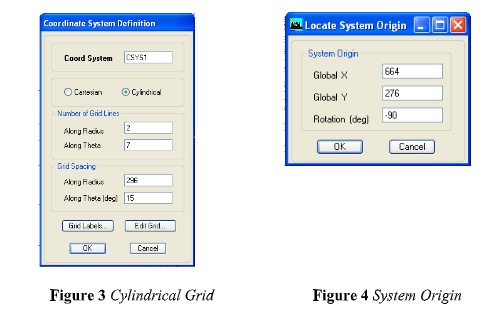
Click the Edit Grid button, then the Locate System Origin button. Enter the values
shown in Figure 4. Click OK three times. Note: Change the Grid ID’s to match Figure
5.
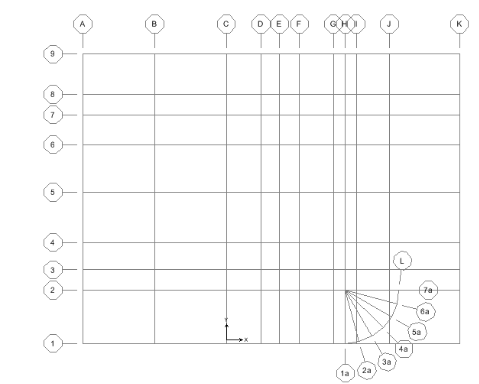
Figure 5 Cartesian and Cylindrical Coordinate System-
Right now, the model consists of a single story. To insert the additional 11 stories needed
for the completion of the grid, go to Edit>Edit Story Data>Insert Story. Enter the New
Story Data and New Story Location as shown in Figure 6:
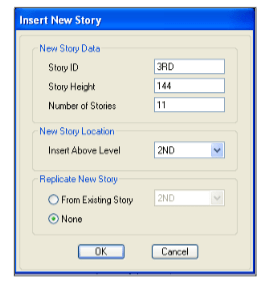
Figure 6 Insert New Story Dialogue Box
Your model now contains 12 total stories. As you can see in Figure 1, stories 7-12 are
identical to each other; just as stories 6 are identical to each other. In this case, it would
be beneficial to use the ‘Similar Stories’ option in ETABS. This means when you draw
an object in plan, this object will be drawn on all stories that have been designated to be
similar to that story. An assignment made to an object in a plan view also occurs at all
levels designated as similar to the story. When an object is selected in plan view, objects
of the same type in the same location at different story levels that are designated as
similar to the story where the selection is actually made are also selected. If desired,
change the similarity option in the drop-down box in the status bar at any time in a plan
view. When you are in an elevation view or a three-dimensional view, the similar stories
drop-down box displays the word "Inactive" to remind you that the feature is inactive in
these views. When you switch from plan view to an elevation or three-dimensional view
and then back to a plan view, ETABS will retain the similarity option that it last had in
the drop-down box in the status bar for the previous plan view. To activate the Similar
Stories option, go to Edit>Edit Story Data>Edit Story. Make changes as shown in Figure
7:
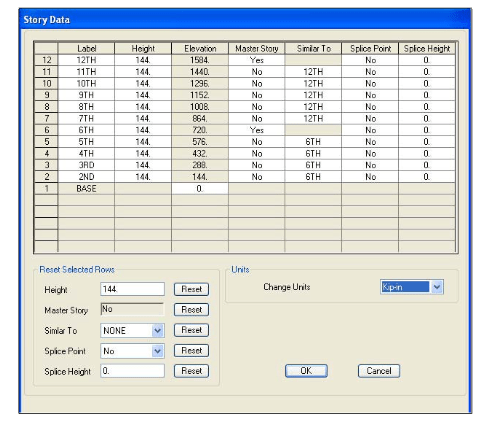
Figure 7 Insert New Story Dialogue Box


