
PROBLEMS
2.1 Leaving a gap of 1-in from the top border line, draw guide lines for five lettering lines maintaining height of letters equal to 3/B-in and gap in between two lettering lines equal to 1/2-in. Write each of the letters I, H, T, L, E, F, N, 2, Y, V, A, M, W, and X, four times in pencil strictly according to the standard procedure. For the first line, gap in between similar letters may be kept roughly equal to 1/lb-in, while, gap between two different letters may be kept roughly equal to 1/4-in. From the second line, adjust the spacing properly so that no space is left on the sides and also no letter is to be ommited. Write problem numbers in the top 1-in spaces provided for the purpose after completing first three problems.
2.2 Leave a gap after the first problem for writing the problem number and repeat the
procedure of Prob. 2.1 for the letters O, Q, C, G, D, U, J, B, P, R, S, and &.
2.3 Draw guide lines for three lettering lines with height of letters equal to 3/8-in and gap in
between as 7/8-in after providing 1-in gap at the top. Add two guide lines at top and at
bottom c-f each lettering line at a distance equal to 3/16-in. Write the figures 3, 8, 6, 9, 2, 5,
7, 1/2, 3/4, 5/8, 11/l6 and 2.98.
2.4 Letter the following specification using height of letter as 1/4″ and gap in between
lettering lines as 3/8″.
THICK BRICK TILES LAID IN (1:3) C/S MORTAR OVER
1″ THICK PROPERLY SLOPPED MUD PLASTER
OVER
3″ THICK EARTH INSULATION OVER
so GMS./SQ.M. POLYTHENE SHEET
OVER 2 COATS OF HOT BITUMEN OVER
R.C.C. STRUCTURAL SLAB
2.5 Same as Prob. 2.4 for the following specification.
THICK FLOOR FINISH OF (1:2:4) P.C.C. OVER
4″ THICK (1:4:8) P.C.C. OVER
4″ SAND FILLING OVER
WELL COMPACTED EARTH
2.6 Design a title for your department/college and draw it properly.
2.7 Redraw the figure provided. Divide the sheet symmetrically for the assigned
problems and find center of space for the fir.st problem. Draw horizontal and vertical
construction lines from the center of space, measure 2 1/4-in on all the four sides, draw
horizontal construction lines from top and bottom marks and vertical construction
lines from the left and the right marks to make a 4 1/2-in square. Divide lower side into seven equal parts with the help of the divider having screw in between the two arms. With the same opening of the divider as in the last try, divide the left side also into seven equal parts.
Draw horizontal and vertical construction lines inside the square through the marked
points. Looking at the pattern shown in the figure, erase the parts not needed. Draw firm lines in the required portions showing good linework.

Prob. 2.7
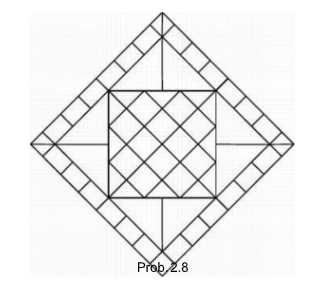
2.8 Draw two intersecting 45° diagonals in the form of construction lines through the
center c-f space. Measure 36mm on any diagonal starting from the center and draw
horizontal and vertical construction lines from the marked point. From the points
obtained on the other diagonals, draw horizontal and vertical lines to form a square. With the scale, lay off 12mm spaces along these diagonals and draw 45 lines from all the marked points. Add a 72mm square and a border 6mm wide as shown. Remove extra lines and complete the pattern by projecting the corners of the inner 12mm squares.
2.9 Draw construction lines for the 45 ° diagonals an vertical and horizontal center- lines
of a 4-in square with its center- located exactly at the center of the space available
for the problem. Draw a 7/8- diameter construction circle and remove
diagonals outside this circle nearly upto the corners. Complete the star-shape as
shown in the figure using firm lines. Draw a 2 1/2-in and a 3 3/8-in circle using firm
lines only in the required portions. Make the required construction of lines firm and
complete the design.

2.10 The purpose of this problem is to practice for drawing circles of exact radii
using compass with due consideration to the linework. Draw horizontal and vertical
lines from the center of space, measure 3-mm on all the sides and draw horizontal and
vertical construction lines from these points as shown in the figure. Check whether
the central square is exactly 6-mm square or not. From top right corner as center, draw
two arcs with radii 6-mm and (2 x 6)-mm in the top left quadrant. Shift the center to the
lower right corner and draw curves of radii (2 x 6)-mm and (3 x 6)- mm in the top right
quadrant. In the same way, move the compass around the square in a clockwise
direction drawing two arcs from each center, one of radius equal to that for the
previous center and the other of radius obtained by adding 6- mm to the previous
radius. Complete three turns, two of which are shown in the figure.

Prob. 2.10
2.11 Find out the approximate height ‘h’ and length ‘l’ of the bell crank between
centers of the circular ends Subtract the height ‘h’ from the height of the space ‘H
available on the paper and divide the answer by 2 to obtain the height ‘y’ of the
lowermost center from the bottom of the space. In the same way a distance ‘x’ equal to
(L – 1)/2 should be left horizontally to find the same center; where, ‘L’ is the length of
space reserved for the problem. Locate the center and draw a center-line at an angle
of 45° with the horizontal using the 45°-triangle. Measure 2.74-in on this line and
locate the center of the middle circle. From this point, draw a vertical construction
line, cut it at a distance equal to 3.14-in, draw a horizontal construction line, measure
4.18-in on this line and locate the center for the right circular part. Draw a center-line
making an angle of 15° with the horizontal on the lower left side arid complete center-
line for the figure.
Add construction lines to indicate width of the bell crank, parallel to the centerline at a
distance equal to 0.26-in on both the sides. Find center for the smooth curve
present at the bend in the body of the crank and draw firm circles and curves in the
required portions. Make lines firm, write dimensions and complete the figure.

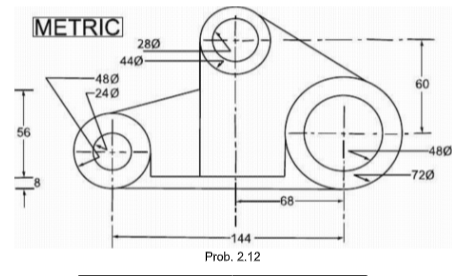
2.12 Redraw the figure provided:


