Creating and Managing Online Meetings
Many working environments have altered in one way or another over the past 2 years with a focus on remote working, so the aspects of this chapter are very relevant and being enhanced within the workplace and industry.
This chapter will introduce you to all the significant features you can use to communicate and collaborate using online tools such as Microsoft Teams and Zoom. We will learn how to set up meetings within the Outlook 2021 environment, as well as how to join and
manage meetings. We will also learn about the different ways to present content using the
Share icon within Teams and Zoom, as well as the best way to work with meeting notes.
In addition, we will discover the Teams app and point out useful features and top tips for creating and managing Channels. We will also look at brilliant tools such as OneNote and Tasks by Planner, as well as learn how to collaborate in real time. Finally, we will introduce the Bookings and Approvals app.
In this chapter, we will cover the following topics:
- Adding remote meetings to Outlook
- Creating and managing Channels
Technical requirements
Prior knowledge of the Teams/Zoom environment is not necessary. It is, however, imperative that you have the relevant software available to practice and work through this chapter. It is advantageous to have prior knowledge of the Outlook 2021 email application and be familiar with creating appointments in the Calendar view. The examples for this chapter can be found in this book’s GitHub repository at https://github.com/
PacktPublishing/Learn-Microsoft-Office-2021-Second-Edition.
Adding remote meetings to Outlook
Remote meeting tools are available as add-ins if you have access to Microsoft 365 and your business supports a meeting platform, such as Teams or Zoom. The primary user must ensure that at least one Exchange mailbox has been set up in their Outlook profile to schedule Teams meetings or Zoom meetings using the add-in (the client needs to have Exchange set up in the background).

IMAP ensures that all your mail is available on all your devices when it’s accessed through the Outlook client. For example, if I download an email through Outlook on my laptop, then it will be available on my phone too. IMAP talks back and forth with the mail server to sync data. Emails are always kept on the mail server.
POP, on the other hand, accesses mail from the server and downloads it to the client (Outlook 2021 on your laptop) only. POP does not make the downloaded mail available through accounts on your devices automatically (no data syncing happens).
The Skype Meeting add-in for Microsoft Office, although not as popular as Teams and Zoom today, is also available by going to File | Options | Add-ins in Outlook 2021. If you would like to use this tool, make sure it is enabled in this area.
The Zoom and Teams add-ins can be deployed to users in a business via an admin user through the Microsoft 365 admin center. The add-ins that are deployed to users can be selected from either the store or as a custom add-in. This setting can take up to 12 hours to deploy:
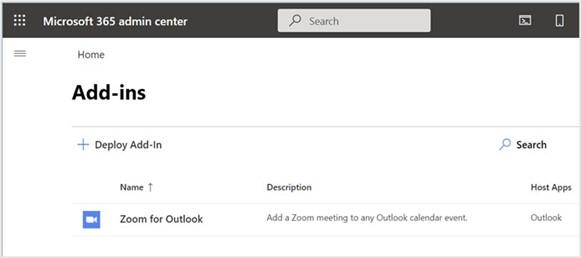
Figure 16.1 – Zoom for Outlook deployed through the Microsoft 365 admin center
If your mail hasn’t been configured through Exchange but you wish to use the Outlook app, you can deploy the Zoom for Outlook add-in by visiting the Microsoft Store, after which you can sign in using your Outlook credentials.
The following screenshot shows a new remote meeting in Outlook on the web showing the Teams meeting location as the default, with the option to Add a Zoom Meeting from the ribbon:
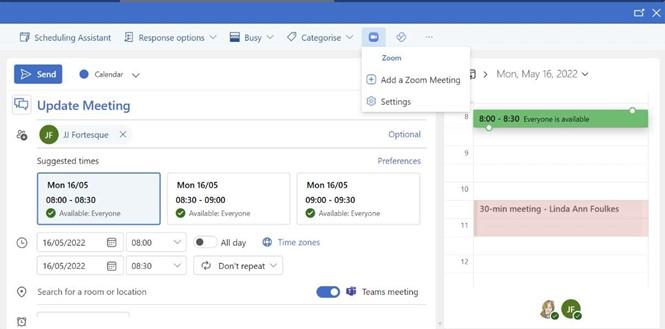
Figure 16.2 – The Add a Zoom Meeting button
Microsoft Teams is configured and customized through the Microsoft 365 admin center if it is part of the plan you have purchased. You may need to download Teams on the client if it’s not already installed.
Learning about Teams and Zoom meeting add-ins
In this section, we will discuss both the Zoom and Teams meeting add-ins and learn how to create Team and Zoom meetings. We will also discuss a few troubleshooting tips.
Creating meetings using the Zoom meeting add-in
Adding a Zoom meeting to an appointment in Outlook is a simple process. Follow these steps:
- Open the Outlook 2021 application.
- Double-click on the Calendar icon to create a new meeting.
- Locate the Add a Zoom Meeting icon at the end of the ribbon:
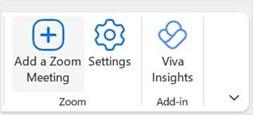
Figure 16.3 – Add a Zoom Meeting
- Sign in to your Zoom account or sign up for the Zoom service. If you prefer, before creating Zoom meetings within Outlook 2021, you can sign up for the service at http://zoom.us.
-
Once you have signed into Zoom, the meeting’s details will appear in the meeting body in Outlook. Note that the details here are dependent on the type of plan you have signed up for with Zoom as you would not receive audio conference dial-in via phone audio with a Basic Plan. The Basic Plan is a free plan that allows for
40-minute meetings to take place.
- Enter the meeting’s details, invite attendees, and check the date and time. The meeting link is included in the body of the message detail, along with the Meeting ID and Passcode:
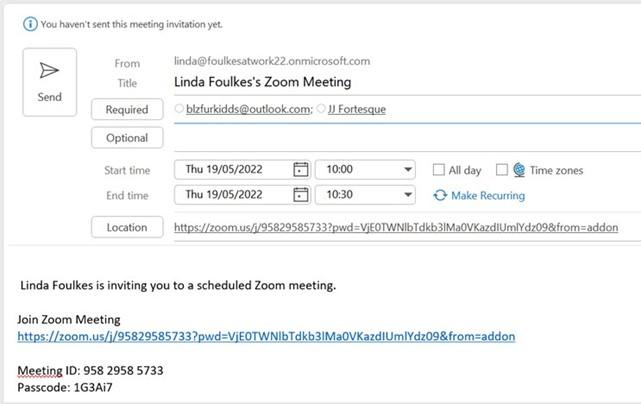
Figure 16.4 – Zoom meeting details in a calendar appointment
- Click on the Send button to forward the remote meeting to recipients.

In addition to the Zoom add-in, the Zoom plugin can be downloaded, which provides a different set of online meeting icons on the Outlook ribbon. Let’s investigate this option next.
Zoom Outlook plugin
After signing up for a Zoom account online, the option to download the Microsoft Office plugin for Zoom becomes available. Follow these steps:
- Click the Download link to install the plugin for Outlook:

Figure 16.5 – Microsoft Outlook Plugin
- This will enable the Zoom group in the Outlook ribbon, along with the Schedule a Meeting and Start Instant Meeting buttons:

Figure 16.6 – The Schedule a Meeting and Start Instant Meeting buttons
- Click the Schedule a Meeting icon to create a remote meeting.
- The Zoom – Schedule Meeting dialog box will populate, allowing you to set various meeting options. Options such as setting the Participants video to On, and whether you wish to only allow users that have been admitted by the host to join the meeting, are just a few settings here. The number of options also depends on which Zoom plan you have signed up for:
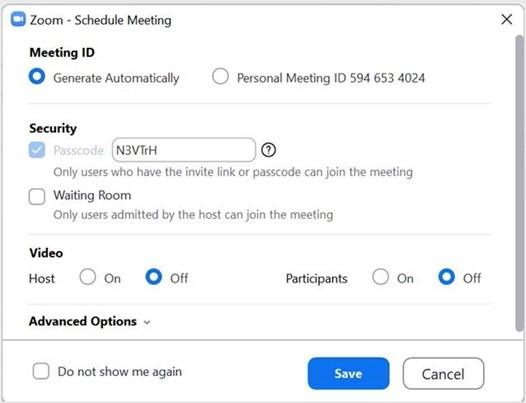
Figure 16.7 – The Zoom – Schedule Meeting dialog box
- Click the drop-down arrow to the right of the Advanced Options heading for further settings. A useful option to remember in this area would be the ability to add additional hosts to take over the meeting if the original host is unavailable at the time to take the meeting. This option is only available on paid plans.
Zoom’s buttons and settings are very similar to those in the Teams platform. Now, let’s learn how to create a Teams meeting.
Teams meeting add-in
It is important to investigate whether you are signed into Microsoft Teams on your desktop before creating any remote meetings in the calendar. This ensures that the New Team Meeting icon is visible in the calendar. If this icon is missing, the first thing to check is that you are signed into Microsoft Teams.
Let’s create a meeting within the Outlook 2021 calendar:
- Open Outlook 2021, then use the navigation pane to open the Calendar.
- A New Teams Meeting icon, along with the Meet Now icon, will be visible on the Calendar ribbon, as well as the Teams Meeting icon within the appointment screen:

Figure 16.8 – The New Teams Meeting and Meet Now icons on the Calendar ribbon
- Click on the New Teams Meeting icon to create a new remote appointment for a future date and time or use the Meet Now icon to meet immediately with others.

- Fill out the details for the meeting by entering the Required participants into the relevant field, adding a Title, and checking the Start time and End time details.
- Note that the Microsoft Teams meeting detail to join the meeting is automatically added to the body of the email. You can navigate to the web using the Meeting options link below the Microsoft Teams meeting detail in the body of the message to customize the meeting options (you will need to authenticate your account using the Authenticator app or method of your choice). The same set of options is available on the Meeting Options ribbon, which is located in the Teams Meeting group:
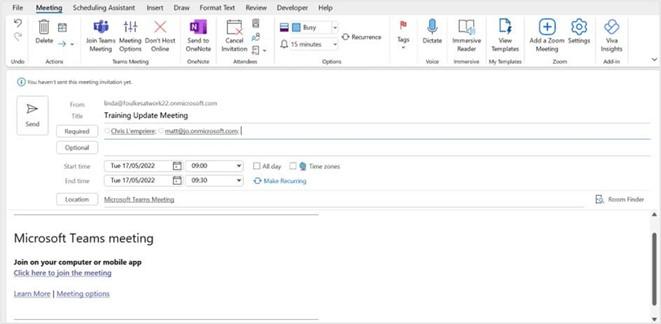
Figure 16.9 – Microsoft Teams meeting detail
- Once all the details have been added to the Meeting tab, click the Send button. The recipients can then accept or decline the meeting.
Now, let’s look at a few troubleshooting tips you should run through, should you have trouble trying to connect the Teams and Zoom apps to the Outlook 2021 environment.
Troubleshooting the Teams Meeting icon
There are a handful of reasons why the Teams Meeting icon may not be visible in the Outlook 2021 calendar. The first troubleshooting tip would be to log out of the Teams app and Outlook 2021, then restart Teams before Outlook. This should enable the Teams Meeting icon in the Outlook calendar. Let’s look at a few further troubleshooting techniques.
Registering Teams as a Chat app
Follow these steps:
- Open the Microsoft Teams app on your desktop.
- Click on the ellipsis to the left of the profile image at the top of the screen.
- Click on Settings:
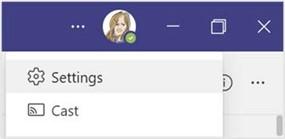
Figure 16.10 – The Settings icon in the Teams app
- The General options are visible by default. Scroll down to access the Application heading, then ensure that Register Teams as the Chat app for Office (requires restarting office applications) is selected:
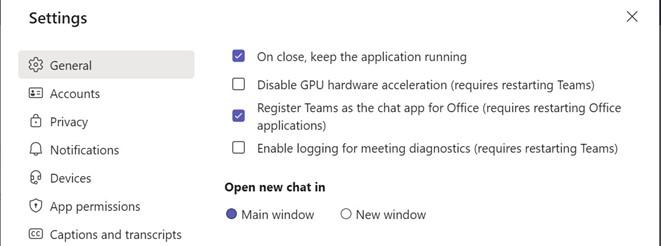
Figure 16.11 – Registering Teams as the chat app for Office
- Exit Microsoft Teams, then right-click on the Teams icon on the status bar and select Quit:
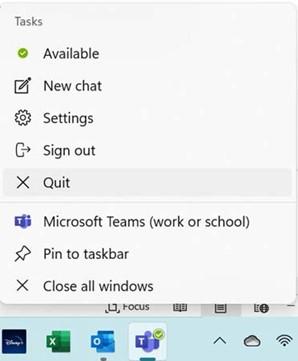
Figure 16.12 – The Quit option after clicking the Teams icon
- Open Microsoft Teams, then exit Outlook 2021 and open it again.
If the Teams icons are still missing from Outlook, try one of the options provided in the next few sections.
Checking for updates
Always ensure that you have the latest updates for Microsoft Office and Windows installed as this could attribute to not seeing the Teams Meeting icon in the Outlook calendar.
Another resource to check would be the Teams Meeting policy in the Microsoft 365 admin center to Allow Outlook Add-ins if you’re rolling Teams out to your business.
Enabling add-ins
Both the Zoom and Teams platforms require the relevant add-in to be installed in the Outlook 2021 application. If these add-ins are not enabled, it could cause the icon not to display in the Outlook Calendar.
To enable the add-in, follow these steps:
- Go to File | Options.
- Click the Add-ins category.
-
In the following screenshot, Microsoft Teams Meeting add-in for Microsoft Office
has been enabled, as well as Zoom Outlook Plugin:
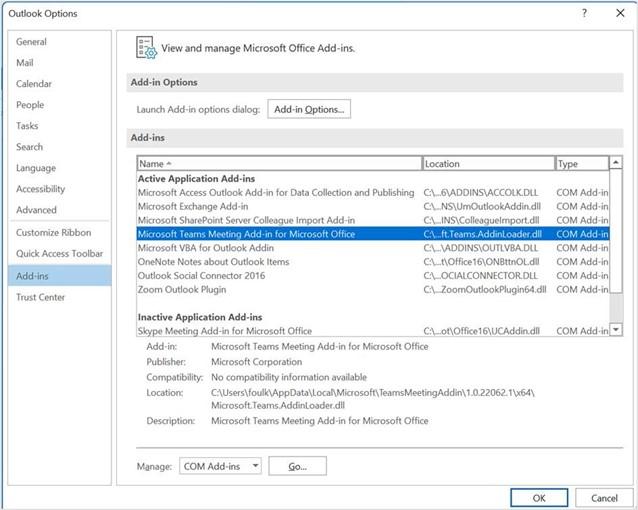
Figure 16.13 – Outlook Options dialog box showing add-ins
- If an add-in is not enabled, go to COM Add-ins drop-down list and select Disabled Items. Click the Go… button to see a list of available disabled items. Select the item that is disabled, then click the Enable button at the bottom left of the dialog box to add it:

Figure 16.14 – The Disabled Items drop-down list
We hope that these troubleshooting tips come in handy when meeting add-ins are missing from your Outlook 2021 ribbon. In the next section, you will learn how to join and leave meetings.
Joining and leaving meetings
In this section, you will learn how to access a meeting and leave once the meeting is complete. There are numerous ways to access Zoom and Teams meetings. Here is a list of a few of those methods:
- Via the Calendar Teams app (Zoom and Teams meetings)
- By using the Zoom app within the Teams app
- From your Outlook 2021 calendar
- Via Webmail calendar access via the browser
- Using the Zoom app
- From the meeting notification on your Windows environment
- Using a device, such as a tablet or your mobile phone
One thing to consider would be where you access online meetings on your computer or laptop. Often, organizations will make use of local desktop and/or remote desktop
protocol (RDP) connections. RDP connections generally have issues connecting to video in online meetings, and similarly, the audio could be affected. The reason for this is that it loses the ability to recognize the peripheral device.
Normally, a notification will pop up on-screen when your meeting is about to start. You can join directly from this link. This would, of course, depend on whether you have Zoom and Teams notifications set up in your Windows environment:
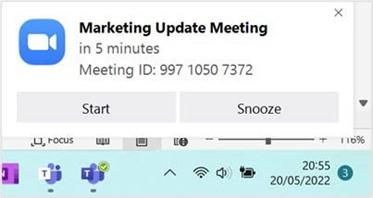
Figure 16.15 – Joining a Zoom meeting from the desktop
Other than Windows notifications, the most common way to access meetings would be through the Teams app. Once launched, the Teams app consists of several apps down the left-hand side of the window. Whether you can access these apps would depend on the plan you have purchased, or whether you have been granted permission to certain apps through the Microsoft 365 admin center.
The following screenshot shows an example of the Teams app when signed in with a business account (work or school account). This account has a host of features compared to that of a free account or standalone version of the Office 2021 suite:
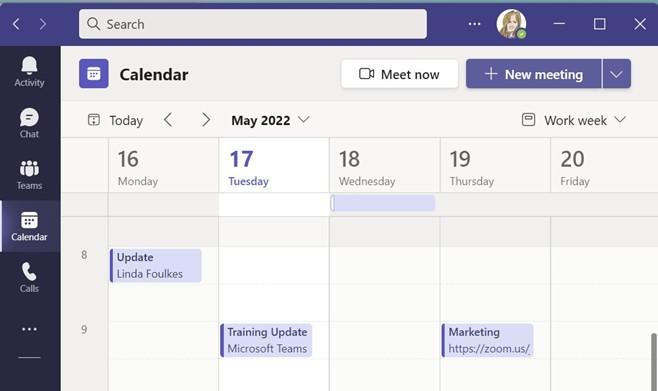
Figure 16.16 – The Microsoft Teams app (business account)
Here is an example of the Teams app signed in with a free account or a Microsoft Office 2021 standalone plan:
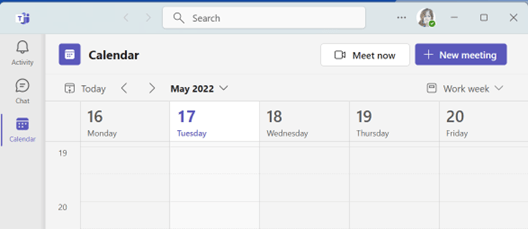
Figure 16.17 – The Microsoft Teams app
Now, let’s learn how to join meetings once the invite has been accepted.
Joining meetings
Once you have accepted a calendar invite, the meeting will appear in your Outlook 2021 calendar. The meeting will include the join meeting link, which you can click on to join the meeting through the calendar.
There are many ways to join a meeting, as outlined in the previous section. The most common way would be through the Microsoft Teams app. We can join Teams and Zoom meetings directly from within the Teams Calendar app. Follow these steps:
- Open the Microsoft Teams app on your desktop or through your Microsoft 365 online account.
- Click the Calendar app on the left-hand side of the window.
- If the meeting you are joining is a Teams meeting, you can simply click the calendar invite and select Join to connect to the meeting. Note that you can also chat with participants before the start of the meeting using the Chat with participants link. This is handy if you are the host and need to let the participants know that you will be 2 minutes late, for instance.
- If the meeting you are joining is a Zoom meeting, double-click to open the calendar invite, then click the meeting link to connect to the meeting:
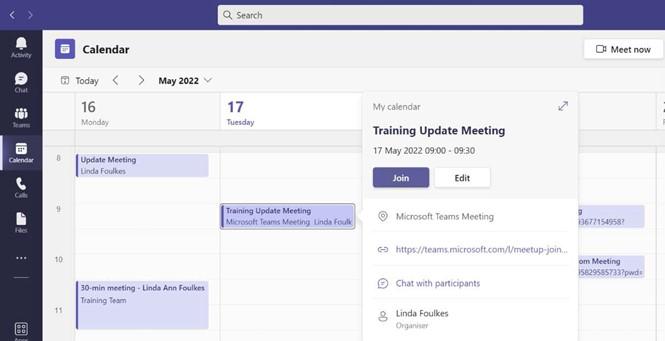
Figure 16.18 – The Microsoft Teams Calendar app showing the Join button
- Once we click the Join button or click on the link, the meeting will load on the desktop. Th s screen allows you to check your video and audio settings before entering the meeting. If you are using a headset, the settings should automatically update:
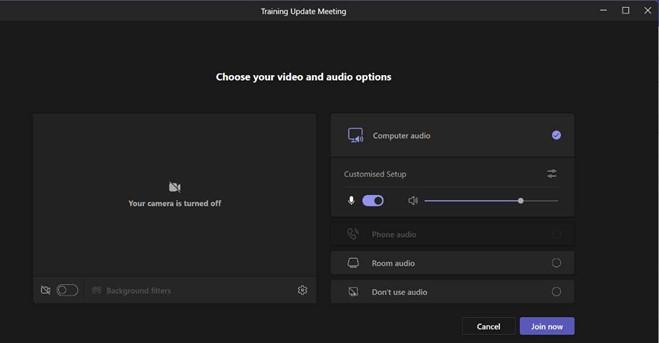
Figure 16.19 – Joining a Teams meeting
-
Click the video slider at the bottom left-hand corner of the window to activate the video. You will now see your video on the screen. If you prefer to hide your video background, the Background filters options are a great alternative to peruse.
- Click on the Join now button to enter the meeting.
Later in this chapter, we will explore the Teams meeting options. Now, let’s learn how to join a Zoom meeting:
- When we join Zoom meetings from the Teams app, we must click on the meeting in the calendar. The popup screen comprises a meeting link, which you can copy and paste into a browser to join the meeting:
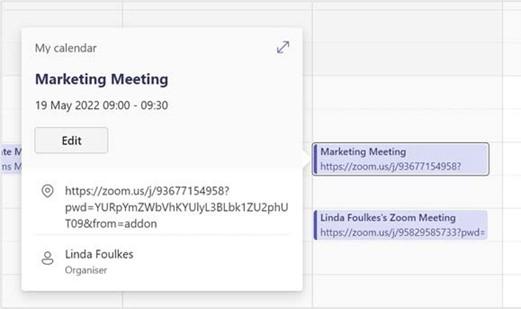
Figure 16.20 – Zoom meeting popup detail
- Alternatively, click the Edit button to open the meeting detail, then click the link to populate the Zoom meeting:

Figure 16.21 – Zoom meeting link
- The Zoom popup notification screen will appear over the browser. Click the Open button to join the meeting. You may be asked to sign in to your Zoom account if you have not done so already:

Figure 16.22 – Zoom notification popup
- The Zoom meeting will launch. If your video is turned off at the start of the meeting, you can click the Start Video button to activate it:

Figure 16.23 – Using the Start Video button to activate your video
- The Zoom meeting options will be discussed later in this chapter.
When you are in a Teams meeting, the Teams app will indicate this via a red circle to the top right of the Teams icon on the Windows taskbar:

Figure 16.24 – The Teams app icon on the Windows taskbar
The Teams app will also indicate that you are busy by placing a red dot on your profile image at the top of the window:

Figure 16.25 – Teams profile picture showing that you’re busy
Now, let’s learn how to exit meetings.
Leaving or ending meetings
When the meeting is over, you can click on the Leave button or the End Meeting button at the top-right corner of the Teams meeting. These buttons will differ, depending on whether you are an attendee or the host. If you leave the meeting, the other participants will remain in the meeting. When you are the host and have indicated to all participants that the meeting is over, you can use the End Meeting button to exit the meeting for everyone involved. This ensures that the meeting, as well as all the participants, are disconnected from the call. The host is the only participant who will see the End Meeting button in the meeting:

Figure 16.26 – The Leave and End meeting buttons in Teams
The Zoom meeting controls are at the bottom right of the meeting window, which is the opposite of the Teams meeting environment:
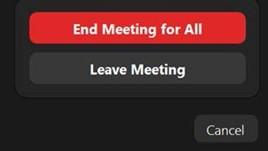
Figure 16.27 – The Leave Meeting and End Meeting for All buttons in Zoom
Click the Leave Meeting button to leave the meeting (the other participants will remain in the meeting) or use the End Meeting for All button to end the meeting for everyone.
There are numerous options to explore in the Teams and Zoom apps. Let’s investigate a few next.
Customizing meeting options
Teams and Zoom are very similar in terms of their meeting options, as shown here:
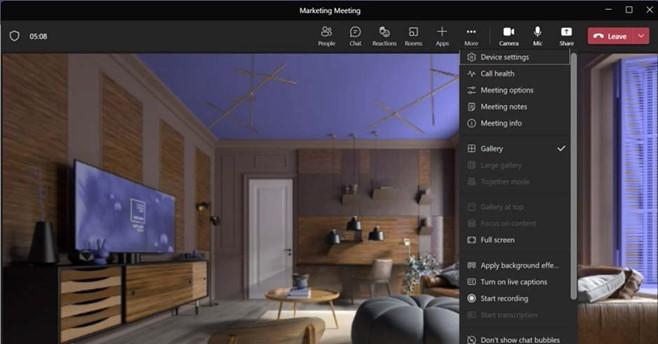
Figure 16.28 – Teams meeting options
Let’s look at the different features that are available and explain them:
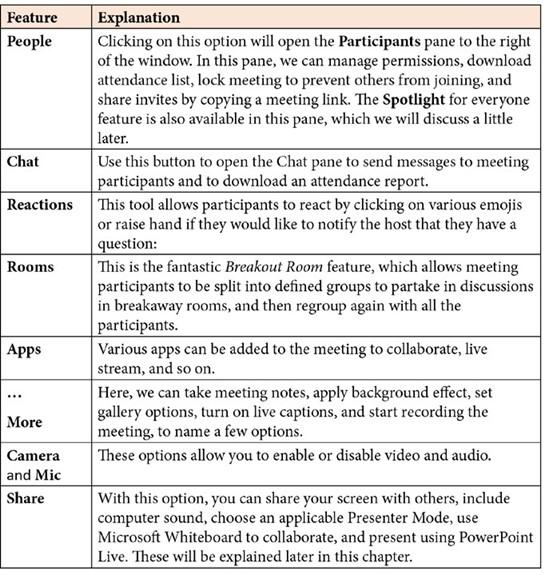
Table 16.1 – Teams meeting options
As mentioned in a previous section, the Zoom and Teams meeting functionality is very similar. In terms of Zoom, the buttons are located at the bottom of the Zoom window instead:

Figure 16.29 – Zoom options
Click the arrow at the right-top corner of the Start Video button to navigate to Video Settings… and customize the Video Settings…, Choose Virtual Background…, and Choose Video Filter… options
Zoom has additional functionality, named Zoom Studio Effects, which is a separate bar along the bottom of your screen for adding touch-ups to facial features and applying filters:

Figure 16.30 – Zoom Studio Effects
We can have a lot of fun with the different effects as well as the share screen options, which we will explore later in this chapter.
When we work with the Teams app, we may find it easier to create teams. Let’s investigate the teams side of the Teams app.


