
Calendar Objects, Tasks, Notes, and Journal Entries
In this chapter, you will learn how to work with calendars, appointments, and events, as well as how to set up meeting response options and arrange calendars and calendar groups. Additionally, you will learn how to work with tasks and how to assign them to other Outlook users and track them via the status report tool.
This chapter also includes a section on journal entries, which you can use to create and track items such as telephone calls, tasks, and documents relating to a specific client on a timeline. This is particularly useful if you need to record the time spent on certain tasks in Outlook.
In this chapter, we will cover the following topics:
- Working with the calendar, appointments, and events
- Modifying meeting requests and manipulating the calendar pane
- Creating and managing tasks
- Creating and manipulating notes and journal entries
- Setting out-of-office options
Technical requirements
To work through this chapter, you need to have prior knowledge of the Outlook 2021 interface and settings options. In addition, you need to be confident in creating and sending mail and managing the mail environment. You should be able to insert, format, and attach items to elements within the interface. All of the examples used in this chapter can be accessed at https://github.com/PacktPublishing/Learn-
Microsoft-Office-2021-Second-Edition.
Working with the calendar, appointments, meetings, and events
This section will cover the process of setting up appointments (including events and meetings) and options, forwarding and printing appointments, scheduling a meeting with a message sender, and sharing a calendar.
Difference between meetings, events, and
appointments
Let’s outline the differences between meetings, events, and appointments so that you understand the use of each within the calendar:
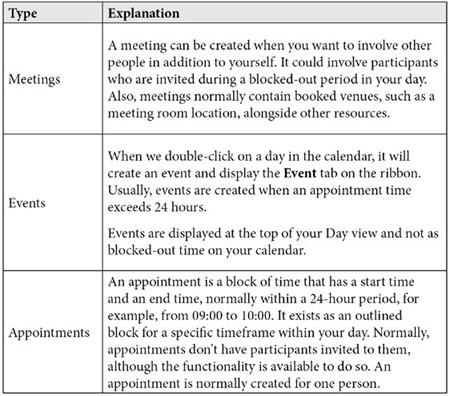
Table 15.1 – The differences between meetings, appointments, and events
We hope that you understand the differences between the three elements, as compared in the preceding table.
Creating and manipulating appointments or meetings
In this section, we will look at how to set up an appointment and use the Recurring Appointment option. Additionally, we will learn how to print your appointment details, invite participants, and forward an appointment to another recipient.
Setting the appointment options
- Locate the Calendar icon in the peek bar at the bottom of the Navigation Pane. As you place your mouse pointer over the Calendar icon, you will see the calendar peek detailing any meetings you have scheduled for the rest of the day:
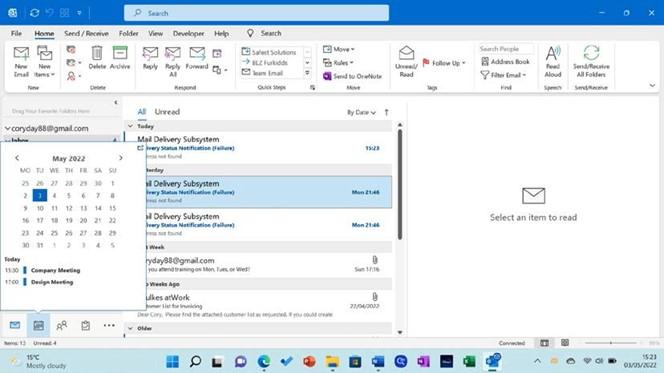
Figure 15.1 – The Calendar button
-
From the Home tab, locate the New group. Click on New Appointment. Note that you can right-click or double-click directly on a day in the calendar to create a new appointment. If you are creating a meeting, click on New Meeting.
- To enter the start time and the end time of the appointment, make sure that All day event is not active (remove the tick from the option). Be careful to watch the A.M. and P.M. time slots, as you could end up setting your appointment to the wrong hour of the day. If your appointment will occur at the same time on certain days of the week for a certain period of time, then the recurring appointment option is perfect.
- Click on Recurrence on the Appointment tab to set the recurring appointment options. Click on OK to confirm the changes:
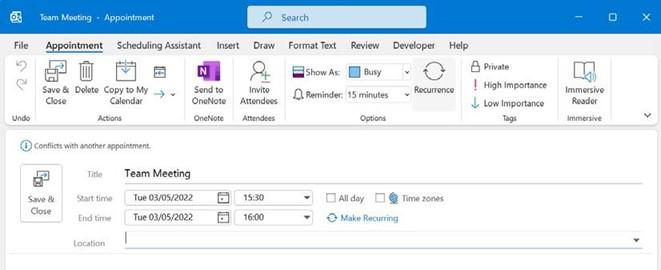
Figure 15.2 – Creating appointments
-
To remove a recurring appointment, you need to open an appointment where the recurrence occurs. From the Appointment tab, select the Recurrence icon. At the bottom of the dialog box, choose Remove Recurrence.
- For Reminders, you will receive a pop-up reminder 15 minutes before an appointment begins. Th s reminder can be turned off or set for a longer period of time. You would probably miss someone’s birthday party if you only have 15 minutes to get there or buy a gift Additionally, you can assign a sound to your reminders.
- To format appointments, take a look at the Format Text tab when you create an appointment. All the options from the Word 2021 environment that you are used to can be accessed from here. WordArt can be inserted alongside files, Outlook items, tables, charts, pictures, clip art, SmartArt, screenshots, textboxes, drop caps, and objects. In addition, the horizontal line icon is available here. Remember to click inside the body of the email message prior to clicking on the Format Text tab.
- Note that at the end of the Appointment ribbon, there is a button named View Templates. This button is a great feature to formulate and house quick email responses (templates) to add to appointments or meetings, saving you lots of time:
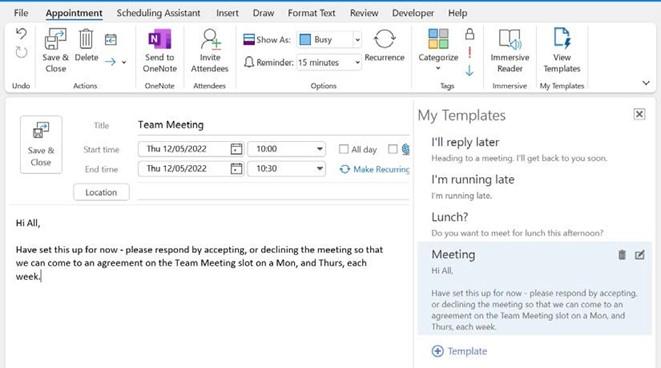
Figure 15.3 – Viewing templates
-
Simply click on the template you would like to apply to the body of the appointment or meeting. The template is added to the message body. Note this is useful if you are using the Inviting Attendees option for the meeting or appointment.
- Click on Save & Close to add the appointment to the calendar.
Inviting participants to a meeting or appointment
- Open an existing meeting or appointment in your calendar or create a new appointment or a new meeting.
- Make sure you are in the Appointment tab, then click on Invite Attendees, after which the appointment will turn into a meeting. If you are creating a meeting, you can simply add the participants into the Required or Optional fields.
- As you start to enter the participants’ names, the application will try to complete the names for you. This is especially useful if the participants already exist in your address book. To check whether the names you have typed into the field are correct, click on the Check Names icon, which is located in the Attendees group:
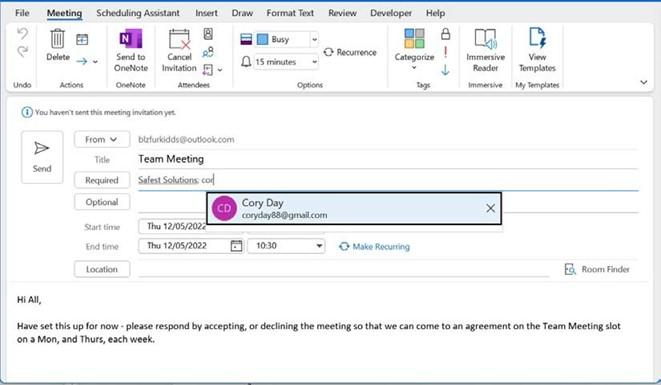
Figure 15.4 – Adding attendees
- Once you have filled in all the required fields, you can click on the Send button to send the meeting request to the attendees. The meeting request will arrive in their mailbox along with several buttons (Accept, Decline, Tentative, or reply to Propose New Time). It will also appear in their personal calendar:
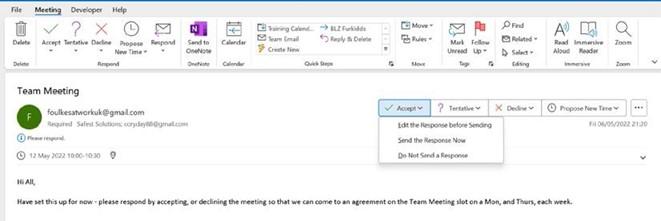
Figure 15.5 – Responding to a new meeting request
- When we add attendees to our meeting, we can use the Scheduling Assistant tab to view the availability of all the attendees to find an available time slot during which to hold the meeting.
- The Scheduling Assistant tab contains a number of buttons to Add Rooms (resources), Add Attendees, and various categories along the bottom of the window detailing the different categories and color-coding settings:
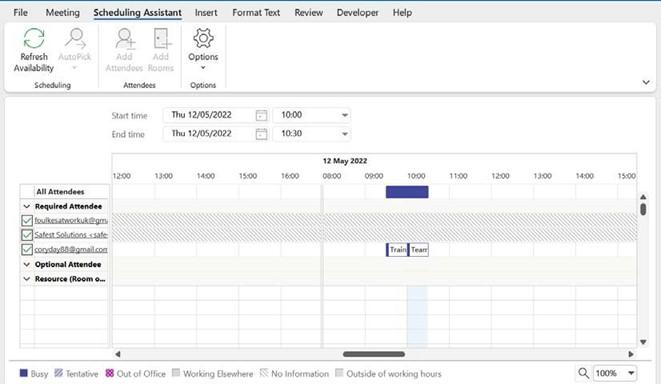
Figure 15.6 – The Scheduling Assistant screen
In the next section, we will learn how to forward an appointment to others.
Forwarding an appointment
If you have been invited to a meeting, and think a co-worker can benefit from attending, it can be forwarded to others:
- Navigate to the calendar. Then, click on an appointment to select it.
- From the Appointment tab, click on the Forward icon:
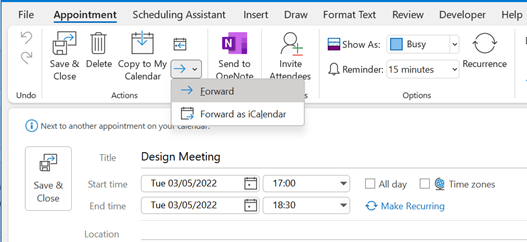
Figure 15.7 – Forwarding appointments
- A new email will open, listing all the information about the meeting:
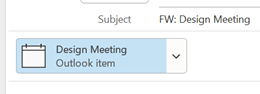
Figure 15.8 – Adding the meeting as an attachment to forward to others
-
Enter a recipient in the To: text area. Click on the Send icon to forward the message.
When we are creating a new meeting using Microsoft 365 or Outlook for the web, we can stop the forwarding of meetings to others.
- Create New Meeting and then click on Allow forwarding to deselect it and stop the recipients of the meeting from forwarding it on.
- Complete the meeting details and then Send the meeting as usual:
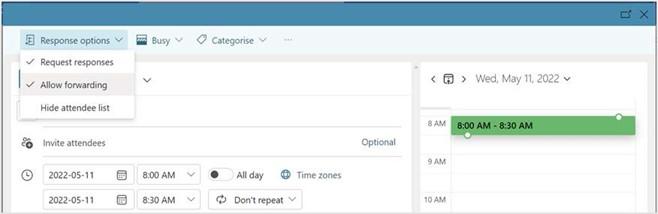
Figure 15.9 – The Office 365 Outlook meeting detailing Response options
In the next section, we will run through the steps for printing the appointment details if required.
Printing the appointment details
Although we can print the appointment details, this might not be something that is encouraged in a business or at home. Today, we have so many opportunities to work online, using our mobile phones, and gain access to remote meetings on the go when we travel or are at the office:
- Double-click on an appointment to view its details.
- From the File tab, choose the Print menu item.
- The appointment is displayed in Memo Style. Look at the preview pane to see the appointment details.
- Check that you are happy with the print settings and always check that you have the correct printer selected. A business could make use of specific printer software, such as PaperCut, to manage the print process. Click on the Print icon to send it to the printer.
Scheduling a meeting with someone who sent a message
- If you receive an email message from someone, for example, asking you for a coffee catch-up, you can create a meeting directly from the message. Double-click on the message to open it.
- On the Home tab, click on the Reply with Meeting icon to create an appointment in your calendar:
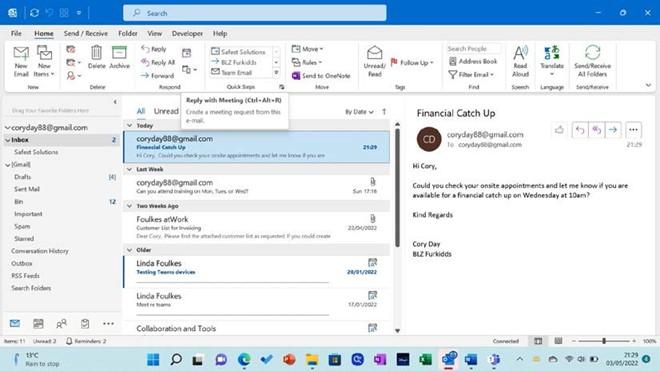
Figure 15.10 – The Reply with Meeting button
-
The name of the recipient will automatically be inserted into the To: text area. Click on Send to add the appointment to your diary and send the meeting request to the recipient (that is, the person who sent you the email message in the first place).
Sharing a calendar
It is possible to share your calendar with other contacts and ask permission to gain access to their calendars. When sharing a calendar, we can choose to only share certain
details, such as the Availability Only, Limited Details, or Full Calendar details. Outlook accounts can share calendars, but not IMAP accounts. This is only achieved if the account is added as a Microsoft Exchange account to Outlook:
- Open the calendar by clicking on the Calendar icon at the bottom of the Navigation Pane.
- Click on Share Calendar in the ribbon.
- Enter the name of the contact that you would like to grant access to your calendar:
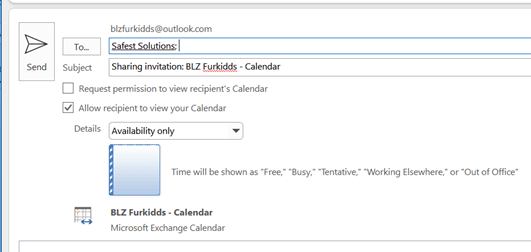
Figure 15.11 – Sharing Outlook calendars
- Choose a sharing option from the Details drop-down list—either Availability Only, Limited Details, or Full Details access. For this example, we will choose Availability Only.
- When you have finished, click on Send:
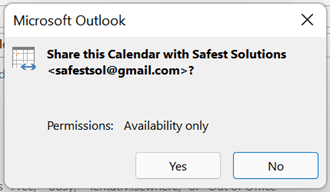
Figure 15.12 – Clicking on Yes to share your calendar
- A notification will pop up on the screen asking whether you are sure you want to share the calendar with the permissions you have granted. Click on Yes to continue.
Scheduling remote meetings
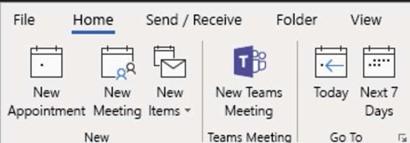
In the past couple of years, working remotely has escalated with many businesses choosing a blend of office and home working. We have the ability to schedule Zoom, Teams, and Skype meetings through our Outlook calendars. Currently, Microsoft Teams and Zoom are the two most popular tools available. Skype could be the default in your application, depending on whether you have this enabled or disabled if you are using the Microsoft 365 environment.
Outlook will display the Teams and/or Zoom meeting icons on the calendar’s Home tab and in the New Appointment screen you are creating. If you do not see the New Teams Meeting icon in your Outlook environment, it could be that you are not signed into the Teams app on your desktop or the Teams add-in for Outlook has not been installed correctly:
Figure 15.13 – The New Teams Meeting icon on the Home tab
In the next section, we will concentrate on meeting options and responses.


