
Creating contact information and groups
In this section, you will learn how to create a contact business card and modify it. You will also learn how to forward and update a contact in the Outlook address book. We will
look at creating contact groups and how to manage the contact group’s membership, show notes about a contact group, and delete a contact group. In addition, we will look at the search features that are available to search for a specific contact or group to send a meeting to that contact or group.
Modifying a default business card
A business card provides contact information for a contact within Outlook. Follow these steps to learn how to modify a default business card:
- From the Navigation pane, select the People icon located on the Peek bar.
- Double-click on an existing business card to edit it. Edit the business card by clicking in the relevant text area to type new information or edit existing information.
- Click on Save & Close when you’re finished.
Forwarding a contact
- Click the People icon on the Peek bar at the bottom of the Navigation pane.
- Locate the Share group on the Home tab, then select Forward Contact, as shown in the following screenshot:
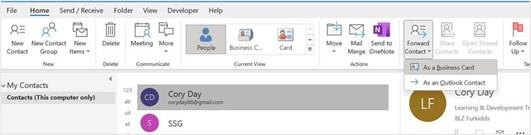
Figure 14.21 – Forwarding a contact as a business card
- Choose the relevant option from the drop-down list, as follows:
- The As a Business Card forwarding option will insert the business card into a new mail message and attach a *.vcf file to the email.
- The As an Outlook Contact forwarding option will attach the business card to the message.
- You can also Share Contacts using the icon on the Share group. This option grants other users access to your contact list in Outlook and/or permission to access other people’s contact lists.
Creating and manipulating contact groups
When emailing contacts regularly for a specific purpose – such as conference attendees, a list of parents, or a list of meeting attendees – it is much simpler when you have a group of contacts set up. That way, when you’re emailing all of the contacts, you can just use the group name as the recipient, and each contact listed in the group will receive the email message that’s been sent.
Creating a contact group
Let’s create a contact group using the People icon, as follows:
- At the bottom of the Navigation pane, locate the People icon.
- Click on New Contact Group from the Home tab, as shown in the following screenshot:
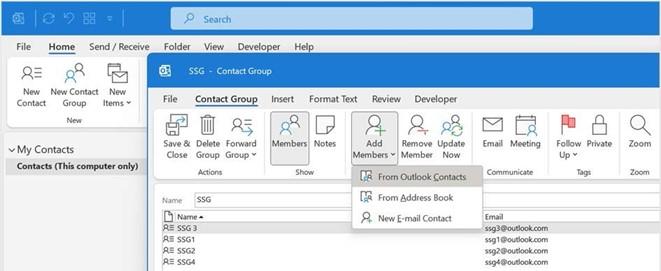
Figure 14.22 –New Contact Group
- In the dialog box, name your new contact group in the Name text area. For this example, let’s create an SSG group.
- To add the email addresses of all the members of the group, click on the Add Members icon.
- Choose New E-mail Contact, From Address Book, or From Outlook Contacts
- For this example, we will use New E-mail Contact. In the dialog box, enter a display name in the text area, and type the contact’s email address in the space provided. Click on OK.
- Keep on adding contacts in this way until all the required members are in the group. Click on Save & Close when you’re done.
- In the Contacts window, the new group called SSG (in the case of this exercise) should be visible.
Managing contact group membership
You can manage a group with ease by using the ribbon. All the relevant icons are displayed for ease of use. Using these ribbon options, you can do the following:
- Add new members using the Add Members icon (members can be added from emails, the address book, or the Outlook contact list).
- Remove any member from the list by clicking on their display name and then choosing Remove Member from the ribbon.
- Update the group by clicking on Update Now, if you have made changes.
- Add Notes about the distribution list.
- Categorize your group according to a specific category and color.
- Use the Private lock at the end of the ribbon to mark the group as private so that no one else can see the details thereof.
- Set a Follow Up reminder to remember to do something related to the contact group. Now, let’s learn how to work with the Notes feature.
Showing notes about a contact group
- In the People contacts window, locate the contact group that you want to create a note for.
- Double-click on the group’s name to open it. We will open SSG, which we created earlier in this chapter, for this example.
- On the Contact Group tab, click inside the Notes area of the contact. Add a note for the current group by typing text into the notes area. We will add a note that states This client is one of our acquisitions for September, as shown in the following screenshot:
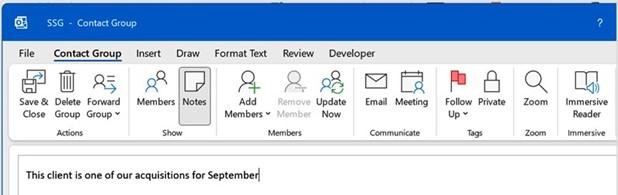
Figure 14.23 – The Notes button on the Contact Group tab
- Click on Members to return to the contact group email list. To view the notes for the group, click on the Notes icon again.
- Click on Save & Close when you’re finished.
Deleting a contact group
- Open the contact group, as shown in the preceding subsection. From the Contact Group tab, click on the Delete Group icon to move it from the list.
- A dialog box will ask if you are sure you want to delete the group.
- Click on Yes to confirm this.
Sending a meeting to a contact group
- At the bottom of the Navigation pane, click People.
- Locate the contact group you would like to invite to a meeting. Open the contact group by double-clicking on it.
- Locate the Meeting icon on the Contact Group tab
- A new meeting request will be opened, where you can confirm the date(s) and time of the meeting request, as shown in the following screenshot:
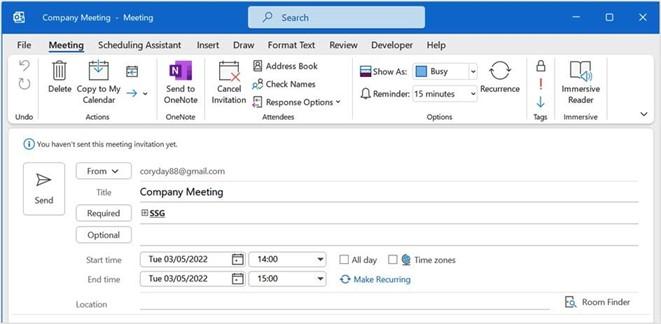
Figure 14.24 – Creating a meeting
- Fill in the details, then click on Send.
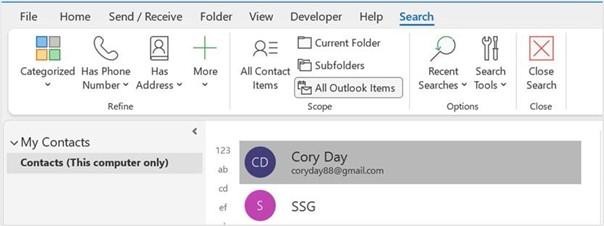
Searching for a contact
- Navigate to People from the bottom of the Navigation pane.
- Locate the search box at the top of the contacts list. Type the name of the contact you wish to find in the search text area:
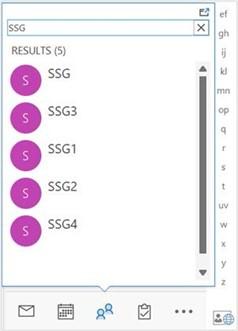
Figure 14.25 – Search facility on the People pane
- Note that you can also click on the People peek to navigate directly to the Contacts area, then select the search facility at the top of the screen to open the Search tab and view the relevant options.
- Click on All Outlook Items to view the drop-down list of search destinations, as shown in the following screenshot:
Figure 14.26 – The Search tab showing All Outlook Items on the Scope group
- The search will return the results from the criteria you entered. Note that the ribbon contains several search options, including a list of Recent Searches, as well as Search Tools to investigate. When you have finished searching, click on Close Search at the end of the ribbon, or click on the X button located at the end of the search entry text area.
Summary
In this chapter, you learned how to keep your mailbox clean, where to check your mailbox’s size, and how to add messages to the safe senders or blocked senders list. You can now set and manage rules on your mailbox and folders and work with the various junk mail options. You have also mastered how to set up signatures when sending
new email messages, as well as when replying to and forwarding emails. Specifying font options for new HTML messages, as well as setting up fonts when replying to and forwarding emails, are also skills you have acquired. In addition, you can set up a theme for all HTML messages and work with contact groups in Outlook 2021.
In the next chapter, we will work with calendars, appointments, and events. We’ll learn how to set meeting response options and arrange calendars and calendar groups. We will also learn how to create tasks and assign them to other Outlook users, as well as track them via the Status Report tool. We will also cover Journal, where we will learn how to create items such as telephone calls and use this method to record the time particular tasks took to complete using Outlook 2021.


