

Creating and sending email messages
In this section, you will learn how to specify a message theme, and understand the use of the Bcc field when sending mail. We will delve into configuring message delivery options. We will look at how to set voting and tracking options, and also proofing and sorting mail messages.
Specifying a message theme
A theme helps you create professional-looking emails. When themes are applied to documents, their fonts, styles, backgrounds, colors, tables, hyperlink colors, and graphics are all affected. Here’s how to specify a message theme:
- Click on the New Email icon to create a new message. On the Options tab, select the Th mes group to apply to the email message, or set the Colors, Fonts, and Eff cts types yourself by using the relevant icons, as illustrated in the following screenshot:
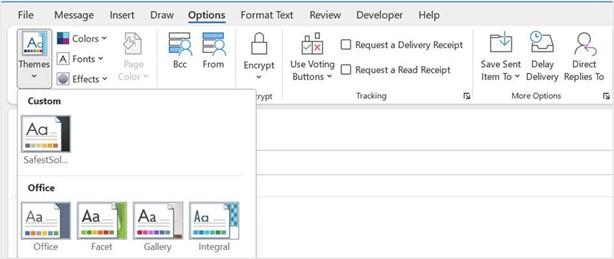
Figure 13.31 – Themes drop-down list
- The Page Color type is also changeable via the drop-down arrow. You would need to click into the body of the message (the white-space area under the Subject of the email message) to activate the Page Color button.
Showing/hiding the From and Bcc fields
The To and Cc fields are displayed on a new mail message by default. The Bcc field is not part of an email message by default. This option needs to be activated to appear in email headings. The Bcc field is located by clicking on the Options tab in the new mail message dialog box. This applies to the From field as well as the Bcc field. To show/hide these fields, proceed as follows:
-
Click on the Bcc field to send a copy of the email to the person specified in the Bcc field without the main recipient of the email knowing, as illustrated in the following screenshot:
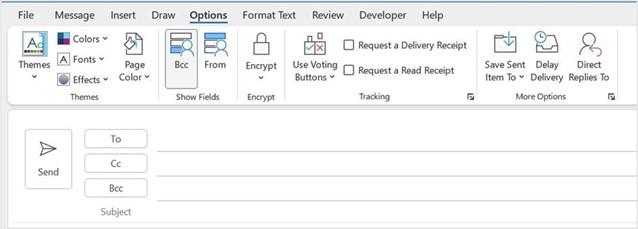
Figure 13.32 – Options tab showing Bcc and From fields
- Click on the From field icon to select the email address of the person you would like to send the email to. This only works if you have delegated access to that person’s account.
Configuring message delivery options
In this topic, we will learn how to set the importance option for an email message to highlight to a recipient that the message is urgent.
Setting the level of importance
Setting the level of importance of a mail message identifies to the recipient, when receiving the message in the Inbox, how important the contents of the message are and how promptly they are expected to respond to the message. The example in the screenshot indicates that the message is of high importance (with a red exclamation mark). This also helps to sort email messages by importance in the message list.
To set this option, follow these steps:
- Click on the New Email option to create a new message. Select the Message tab and locate the Tags group.
- Click on High Importance to set the level.
- The red exclamation mark indicating that the email is of high importance will be visible in the Inbox or Sent Items folders, as illustrated in the following screenshot:
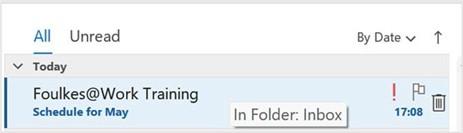
Figure 13.33 – Email message showing high importance as a red exclamation point
- You can also set a delivery receipt to show when a recipient has read or received your email. Use the Options tab to set this in the Tracking group.
- Click on Request a Read Receipt to request a notification when the message has been read by the recipient.
Configuring voting and tracking options
Creating a poll in Outlook 2021 is a stunning feature that allows you to quickly gather replies to a question sent to recipients via an email message. It is, however, always best to make sure that all recipients are using the same version of Office as you are. Here’s how you can use this feature:
- Click on the New Email message icon. From the Options tab, select the Use Voting Buttons icon from the Tracking group.
- Select one of the default tracking buttons or click on Custom… to create your own, as illustrated in the following screenshot:
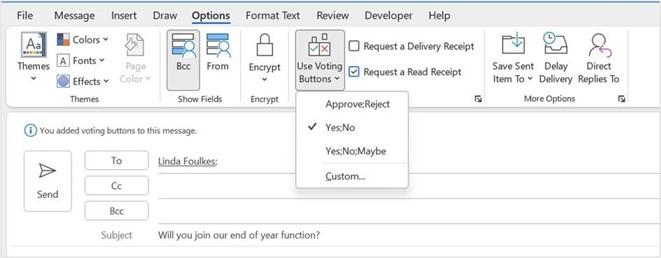
Figure 13.34 – Use Voting Buttons feature
- In the Properties dialog box, make sure you have located the Voting and Tracking options heading. Click on the Use Voting Buttons checkbox to make it active.
- Type your own custom text into the space provided. In the following example, I have used Mon; Tues; Wed as I would like to obtain a poll on when colleagues could attend a training session. Remember to put a semicolon in between each voting choice and not a comma, as illustrated in the following screenshot. Click on Close to confirm:
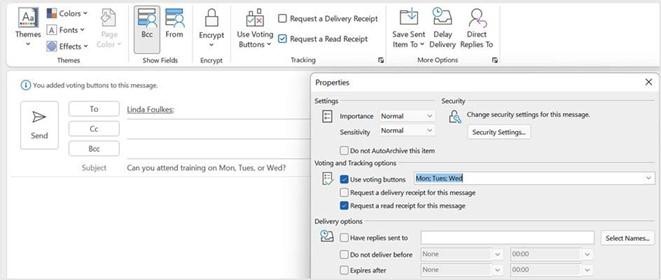
Figure 13.35 – Using custom voting options
- Your email header will now display an information bar with the text You added voting buttons to this message.
- The recipient will receive an email with voting buttons in the message header, on which they will click to select a day that suits them for the training, as illustrated in the following screenshot:
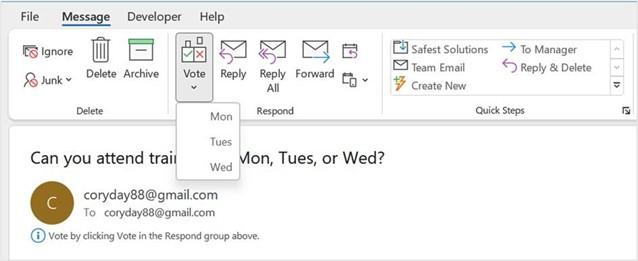
Figure 13.36 – Replying to a voting email using the Vote drop-down list
- A response is then sent to the sender.
Sending a message to a contact group
To send a message to a contact group, proceed as follows:
- Click the New Email icon to create a new message.
- In the message header, click on the To icon to access the address list, or type the contact group name into the To text area. From the Address Book drop-down list, select Contacts. Click on OK to add group information to the email message.
- A group is identified by a two-people icon and will display a bold attribute, as illustrated in the following screenshot:
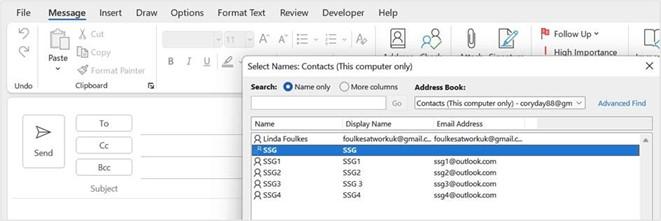
Figure 13.37 – Adding contacts to an email message
- Select a group to send the email to by double-clicking on the group name—for example, SSG, as in the preceding screenshot.
- The group name will appear at the bottom of the dialog box in the To heading. Once you have added all your recipients, click on the OK button to return to your email message.
- A contact group will also display a + sign next to the contact’s name in the email address area, indicating that it is a group.
Moving, copying, and deleting email messages
Copying or moving information from one email to another is exactly the same concept as in any other Microsoft Offi application. Select an element to cut or copy, then use the right-click method over the selected element to cut or copy. Move to the destination email message and right-click once again to paste the information into the email. To delete an email from your Inbox, simply click on the email and press the Delete key on the keyboard.
Replying to and forwarding email messages
To reply to and forward an email message, proceed as follows:
- Select an email message in the Inbox. Click on the Reply, Reply All, or Forward
options to respond to the message you have received, as follows:
- Reply: To only the person who sent you the email
- Reply All: To the sender and all other recipients in the message
- Forward: To send the email message to someone else for them to action
- Edit the subject, if necessary, and then send the email.
Creating and managing Quick Steps
You will be proficient at performing Quick Steps by creating, editing, deleting, and duplicating Quick Steps after completing this topic. Quick Steps help you to quickly manage your mailbox by selecting multiple options to apply to mail messages at once. An example would be if you frequently send emails to certain folders or forward emails to a certain person regularly. You are also able to formulate and customize your own Quick Steps for actions that need to be done quickly. There are some default Quick Steps available to get you started. Here’s how to proceed with this:
- Locate the Quick Steps group on the Home tab.
- There are a number of default Quick Steps, some of which are outlined here:
- Move to Folder… moves a new mail message to another folder and then marks the message as read.
- To Manager will forward an email to the manager specified in the dialog box that populates.
- Team Email moves the message to a specified folder and marks it as read and complete.
- Reply & Delete opens a reply to the selected message and deletes the original message.
Some of the aforementioned options can be seen in the following screenshot, with the addition of a custom Quick Step named Safest Solutions, which moves the selected read email to the Safest Solutions folder:
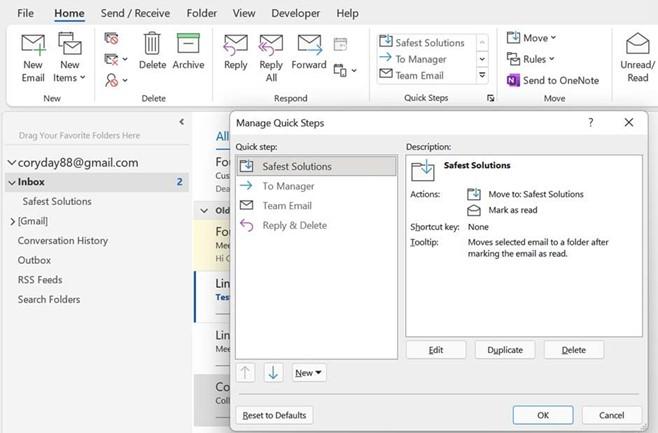
Figure 13.38 – Manage Quick Steps dialog box
- Be careful of the Reply & Delete option. It happens so fast that you hardly see it and realize it’s deleted the original
- To apply a Quick Step, click on the mail message to apply the step to. The first time you use a Quick Step, it will ask you to enter the details to set up the Quick Step. Thereafter, it will not prompt you again until you right-click and edit the step.
- Enter the name of the manager you wish to use as the Quick Step. In this case, we will enter the manager’s name as BLZ Furkidds.
- Click on Save, as illustrated in the following screenshot:
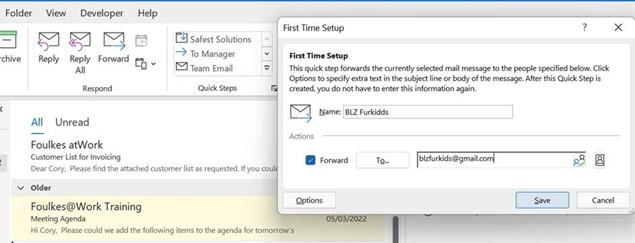
Figure 13.39 – First Time Setup dialog box for the To Manager Quick Step
- Once the Quick Step has been edited, you will notice that the item has been updated in the Quick Steps group, as illustrated in the following screenshot:

Figure 13.40 – BLZ Furkidds Quick Step
- When you next use the Quick Step, simply click on the BLZ Furkidds Quick Step to forward the selected email to this manager.


