
VLOOKUP AND MATCH
The VLOOKUPMATCH worksheet consists of a Vet Service Report table listing services provided by each salesperson in cells A6:F13. Instead of taking the time to run along rows, columns, and salespersons, we would like to choose the service provided for a particular salesperson and return the value for that service.
In the following screenshot, you will see the completed worksheet:
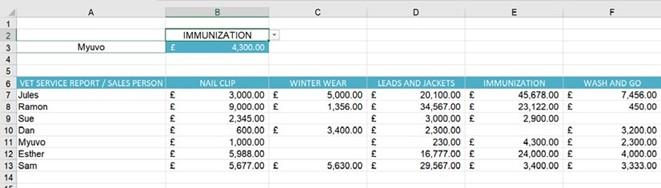
Figure 10.18 – Completed VLOOKUPMATCH worksheet
Let’s get started!
- Firstly, create a drop-down list, a validation rule for the services in cell B2 so that when a service is selected, it will display the relevant salespersons and a service total. Click into cell B2, visit Data | Data Validation | List, and then add B6:F6 as the Source range.
-
In cell B3, construct the following formula:
=VLOOKUP(A3,A6:F13,MATCH(B2,A6:F6,0),FALSE).
-
The formula will look up the salesperson entered in cell A3, within the table range, and then match the service entered in cell B2 within the table range and return an exact match.
- Test the function by entering the name of another salesperson in cell A3 and then choosing another service from the drop-down list in B2 to update the result in cell B3.
We will now explore the new LOOKUP functions that are packaged in the Office 2021 offering.
Exploring XLOOKUP
The new XLOOKUP function is a step up from the VLOOKUP function we all know so well. Instead of having to use LOOKUP, VLOOKUP, and HLOOKUP depending on the type of function required, we can now use one single function to meet all our requirements. XLOOKUP replaces the need to use the INDEX MATCH functions, as well as IFERROR. XLOOKUP looks up values in a range, or an array, and then returns the matching values from that range/array.
XLOOKUP caters for the following:
- The return of lookup data to either the right or left of lookup values. This is an important advantage over previous lookup functions.
- No restrictions on returning just one value anymore, but the ability to generate entire rows or columns as a result.
- Exact and approximate matching – the function will return an exact match as a default when constructing the formula, so you do not need to input that detail. The previous VLOOKUP function always returned the approximate match as a default.
- The use of wildcard characters for partial matching, as well as the performance of reverse searches.
- The ability to encompass vertical and horizontal ranges and return multiple results.
Constructing XLOOKUP (syntax)
Firstly, let’s explore and understand the XLOOKUP syntax, after which we will build a formula and look at some real-life examples.
When we construct the VLOOKUP syntax, we will need to provide input in a certain way. The syntax is as follows: =XLOOKUP (lookup, lookup_array, return_array, [not_found], [match_mode], [search_mode]).
Here is a snapshot of the XLOOKUP formula in practice. We will use this example to discuss what is required for each argument of the formula so that the explanation in the subsequent table makes sense.
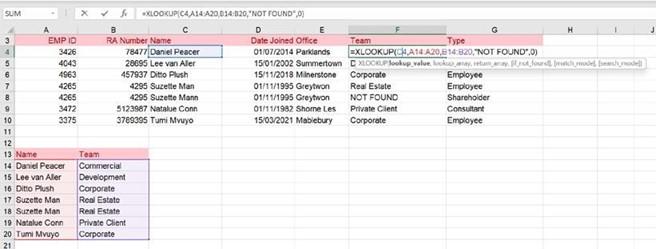
Figure 10.19 – XLOOKUP formula construction
Referring to the previous screenshot example, we will now understand how each of the different elements blend together.

Table 10.2 – Syntax arguments and explanations
Now that you have had a run-through of syntax and understand the XLOOKUP function, it is important to look at possible error returns when working with the formula.
Looking at general error returns
In the following table, we outline some of the cell errors you may come across and an explanation of the reasons why certain errors may report when using the XLOOKUP function.
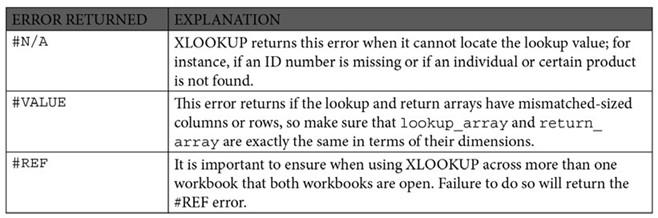
Table 10.3 – Error values and explanations
Let’s walk through the XLOOKUP formula:
- Open the workbook named LOOKUP.xlsx.
- The XLOOKUP worksheet contains employee details in cells A3:G10, and a list of employees and teams they belong to in cells A13:B20. Column F is missing the matching team information. We can pull this information by using the XLOOKUP function, either from a location within the same workbook or from a separate workbook.
- Click into cell F4.
- Press = to start the formula and then type XLOOKUP( to open the formula arguments.
- Enter the following arguments: C4,A13:A20,B13:B20,”not found”,0).
- Press Enter to confirm the formula and see the first result.
- Use AutoFill to complete the results down the column. You will notice that cell F8 returns the text NOT FOUND as the employee cannot be located in the lookup table.
XLOOKUP can also be used to analyze the two lists of data to determine which customers are in the first table, but not in the second table, for instance. Using the XLOOKUP function instead of VLOOKUP eliminates several steps. Click on the LOOKUP sheet to work through the following example:
-
Ensure that you have the LOOKUP.xlsx workbook open and have clicked on the
LOOKUP sheet.
- We have two tables on this worksheet. To find out which customers are in the first table but not in the second table, we could use the XLOOKUP function. Click into cell M3.
- Type the following formula: =XLOOKUP(A3,$A$33:$A$57,$A$33:$A$57, “NOT FOUND”,0).
- The formula will look up the code to see whether it returns matching codes from the second table. If it does not locate a match, the words NO MATCH will appear in Column M of the worksheet.
- Don’t forget to use AutoFill to fill the formula through cells M4:M29.
- The last step would be to highlight the entire row where the formula is met so that those not found are accentuated visually on the worksheet – do you know how to do this?
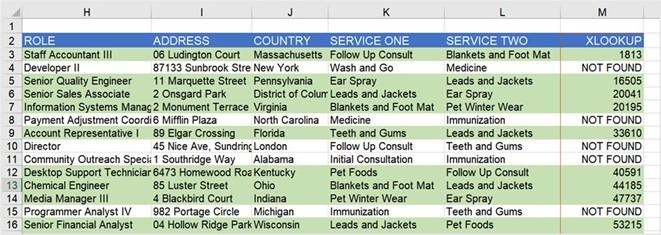
- Select the range A3:M29 and then apply a conditional formula formatting rule to highlight the row with a light green fill color. To see the completed workbook, open the file named LOOKUP-C.xlsx. The following screenshot displays a portion of the result:
Figure 10.20 – Result of the XLOOKUP function showing conditional formatting on rows
Another new function of Office 2021 is the XMATCH function. We will explore this in the following topic.


