
Building IFS functions
The IFS function was first introduced in Office 2016, so it is not a new function. It is so much easier to construct and evaluate multiple IF conditions instead of using the old clunky nested IF formula.
The IFS syntax is extremely simple: =IFS(logical_test1,value_if_ true1,[logical_test2,value_if_true2], and so on up to 127 conditions.
As there is no default value that the function can use to ascertain as true when all conditions are false, we have to add a true condition as the final test. Note that each logical test could return a true or a false value.
Here is an example. In the workbook named IFS.xlsx, we will see the data range is related to different pet services offered in columns J and L. For each service, we would like to assign a code so that this data populates automatically for each service type displayed in the column. Any service that is not assigned a code should report the true condition as NOT DEFINED.
The IFS function is a perfect logical function to utilize in this instance:
-
Click into cell K2, and construct the following formula, making sure that the final condition is entered either as 1=1,”NOT DEFINED” or TRUE,”NOT DEFINED”:
=IFS(J2=”Initial Consultation”,”IC234″,J2=”Wash and Go”,”WGO123″,J2=”Follow Up Consult”,”FUC873″, J2=”Pet Foods”,”PEF972″,J2=”Pet Winter Wear”, “PWW443″,J2=”Ear Spray”,”ERS021″,J2=”Leads and
Jackets”,”L&J23″,J2=”Blankets and Foot Mat”, “BFM654″,J2=”Teeth and Gums”,”TEG823″,
J2=”Immunisation”,”IMM768″,J2=”Medicine”, “MED321″,1=1,”NOT DEFINED”).
- The following screenshot displays the result of the IFS function on the worksheet:
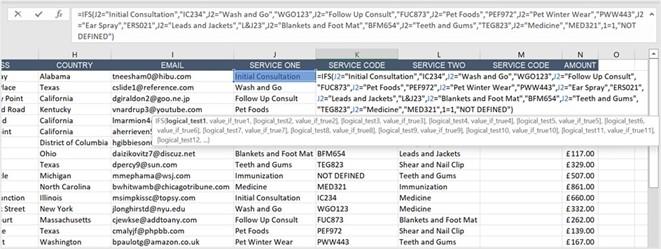
Figure 10.12 – IFS function result
- Notice that two columns require the service code in order to populate. Ensure that you copy the function from K2 to M2 and update the cell reference to reflect cell L2.
Now that you have mastered the IFS function, let’s take a brief look at the SUMIFS function. The SUMIFS function is part of the Math and Trig function libraries in Excel. This function simply adds all of the arguments in the dataset that meet certain criteria. We will continue to work with the IFS.xlsx workbook. You
will notice a list of services provided in Column Q of the SUMIFS worksheet. The main dataset contains a list of services and amounts for each. Let’s use the SUMIFS function to generate the amount for each service.
- Click into cell P2 as this is where we will construct a formula to arrive at a total if the service is equal to a certain service type.
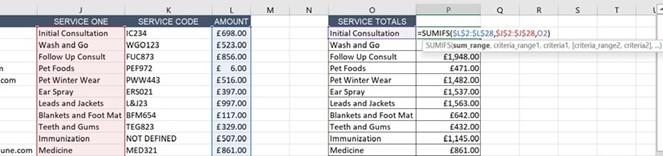
Figure 10.13 – SUMIFS function result and formula arguments for SERVICE
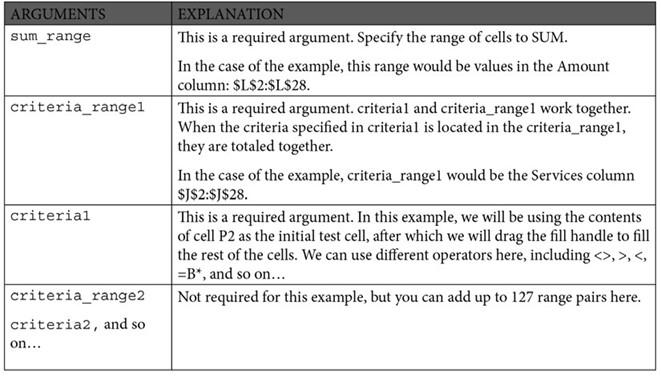
- The syntax of the SUMIFS function is really simple. Let’s take a look:
Table 10.1 – Arguments and explanations of the SUMIFS function
-
Type the following formula into cell P2, or use the mouse pointer to collect the relevant arguments you require from the worksheet:
=SUMIFS($L$2:$L$28,$J$2:$J$28,O2).
- Press Enter to see the result of the formula and then fill it down to the rest of the column.
We have mastered the IFS and SUMIFS functions, so hope that you have added to the Excel skillset. Next, we will concentrate on expanding our LOOKUP function knowledge.


