
Adding the Camera tool
Another quick tip would be to add the Camera tool to the QAT so that you can take a snapshot of worksheet data, then update the data in the source sheet so that it updates the snapshot.
- Open the workbook named Population.xlsx. Add the Camera tool to the QAT using the drop-down list at the end of the QAT. Follow the steps in the previous section if you need assistance.
-
Before we use the Camera feature, we need to ascertain where we will be adding the photo after the Camera tool has taken the snapshot. Either open a new workbook or open an existing workbook.
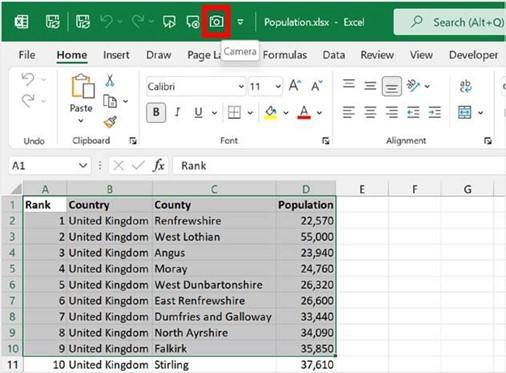
- Select a range of cells in the worksheet area, then click the Camera icon on the QAT to take a snapshot of the data:
Figure 9.8 – Camera tool on QAT to snapshot data on the worksheet
-
Move to the open or existing workbook, then click with your mouse pointer to paste the snapshot. You will notice that the mouse pointer icon displays a crosshair pointer.
- If you update the data in the source worksheet, it will update in the snapshot. Similarly, if you close the workbook that contains the snapshot and then update the source worksheet, it will automatically open with the new changes the next time it is opened.
-
Notice that the linked formula (formula bar) for the live image is referenced in the workbook as the source data. This is fantastic as you don’t have to worry when you need to move the live image to another sheet or range:
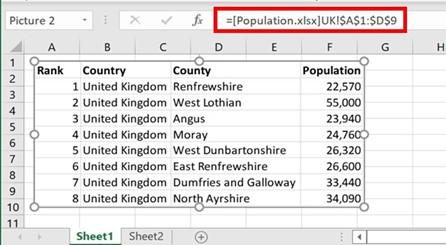
Figure 9.9 – Formula bar showing the live image formula link
This feature is great for adding a simple dashboard to your workbook, especially when it’s accessed by others and you don’t want your underlying data to be tampered with. The Camera tool creates a live image of data that cannot be amended as they are live images.
Flash Fill
In the previous edition of this book, we touched on the Fill feature. We will broaden this skill by presenting Flash Fill. To follow these steps, open the file named FlashFill. xlsx:
-
On Sheet 1, you will notice data in column A and column B. We can use Flash Fill to combine bits of data into one column. To combine the name with the surname, simply type the full name of the first person, Shirley Dandrow, into cell C3.
- Press Enter on your keyboard.
-
Hold down the Ctrl key, then press E on your keyboard. The full names of the rest of the individuals will appear in the relevant cells. Note that you can also use
delimiters to separate bits of data – for instance, you can use a comma between the name and surname.
-
To go one step further, we can populate the email addresses of each person, without typing the addresses separately into each cell. Type the address of the first person to form a pattern as you would like it to appear; for example, shirley.dandrow@me.you. Press Enter, then use Ctrl + E to fill in the email addresses:
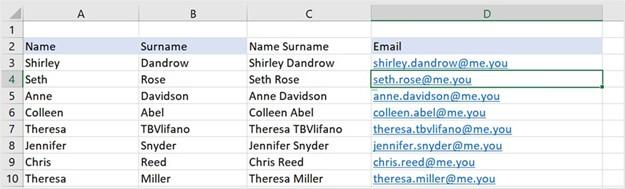
Figure 9.10 – Using Flash Fill to populate data
- There are so many uses for this stunning feature. Can you think of a few more? Now, let’s use Flash Fill to combine and extract data.
- Select the Combine sheet. Click on cell D3, then type in the data for the first row, as follows:
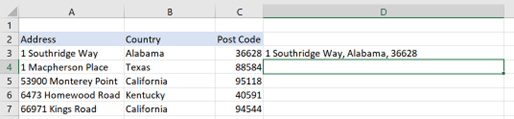
Figure 9.11 – Type the full address into cell D3, separated by commas
- Press Ctrl + E to fill in the rest of the data.
- Extracting bits of data can be done in the same way. Click the Extract sheet. In cell B2, type Alabama. Press Ctrl + E to place the data in the rest of the cells. The countries will be extracted from the dataset.
- Another brilliant example of using Flash Fill is to clean datasets. At times, you may wish to import a dataset that contains spaces at the beginning or end of data.
- Use Flash Fill by typing in what you wish to appear, then use Ctrl + E to fill in the rest of the list. Let’s give it a go. Select the Clean worksheet. Cells A2:A5 contain data with unnecessary spaces at the start and even end of the countries. Type the first country correctly without any extra spaces into cell B2, then use the Ctrl + E to fill in the rest of the cells, eliminating the spaces automatically for each:
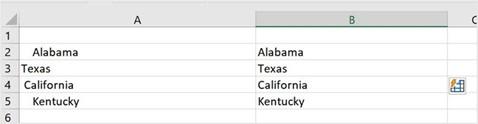
Figure 9.12 – Column A, including spaces before or after countries. Column B shows the result of using Flash Fill
Using Flash Fill to clean data is a great way to get rid of those unwanted spaces when you’re importing data. We will explore other ways to prepare data for manipulation later in this chapter, including using the CLEAN and TRIM functions.


