Using master slides and hiding slides
In this topic, you will learn to create, modify, and format a master slide, and be able to hide or show certain slides when delivering a presentation.
Creating master slides
The slide master stores information such as logos, styles, and fonts, which the user can set as a default for all slides in the presentation. For instance, a company logo could be set in a certain position on the slide with certain attributes. When placed on the slide master, all slides within the presentation—and any new slide inserted in the presentation—will display the logo in the same position with the same attributes.
Any elements placed onto the slide master will not be editable when creating the presentation unless the user is familiar with editing master slides or has been given permission to do so. Editing master slides for different presentation slide layouts is extremely popular when companies wish to lock down branding for all stationery within a business:
- For this example, we will create a new presentation based on the Quotable theme.
- Click to select View | Slide Master. The slide master view is now displayed on the screen.
- Depending on the theme and the slides you have within the presentation, you will be presented with different slide layouts and masters, but you should see a slide master and then different layout masters beneath that in Slide Pane.
- Note that you can also create master slides for handouts and notes, as well as many other master slide layout types.
- Once you have activated the slide master, the Slide Master ribbon will open up with a lot of different options for you to use to customize your master slides, as can be seen in the following screenshot:

Figure 7.35 – Slide Master tab showing options within PowerPoint 2021
- We will insert a picture onto the slide background. Make sure that the picture is visible on all masters—if not, copy and paste to the various slide masters visible in Slide Pane.
- Click on the Insert tab, and then choose Pictures.
- Locate the picture on your computer and insert it onto the slide master, where appropriate. For this example, we will use SafestSolutionsLogo.png.
-
Switch back to the Slide view to see whether the master has updated the slides in the presentation—notice that you are unable to select the picture, and all picture editing will need to happen in the Slide Master view.
- Click on the View tab and choose Normal.
- Click on the View tab and select Slide Master to return to master editing mode.
- Adjust the fonts, styles, colors, and effects, and add any text—such as footers—that you would like to appear on all slides as a master. We will update the font for the main titles to the Courgette font.
- Click on the Close Master View icon at the end of the ribbon to view the changes to the presentation.
- Experiment with the options available on the Slide Master tab to create the perfect presentation master for your requirements.
Hiding slides
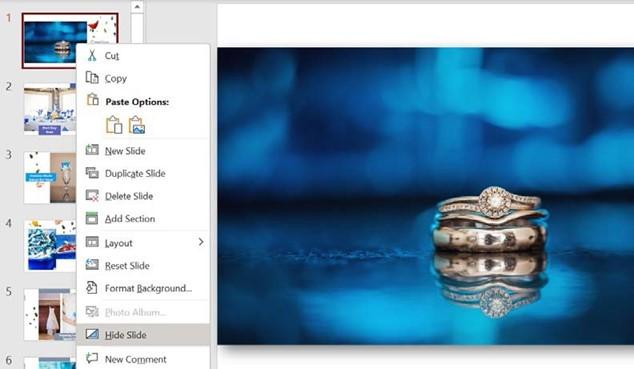
At times, certain slides in the final presentation might not be suitable for the presentation audience. It is possible to hide slides in Slide Pane or in Slide Sorter View:
- Right-click on a slide to hide it.
- From the shortcut menu choose Hide Slide, or click on the Slide Show tab and choose Hide Slide, or use the Slide Sorter view to hide a slide. The former option is illustrated in the following screenshot:

Figure 7.36 – Hide Slide option on the right-click menu
- An icon identifies hidden slides; this is located in the top-left corner of the slide (in Slide Sorter and Slide view).
- To unhide a slide, simply click on the Hide Slide icon again.
Summary
We have learned an abundance of skills in this detailed chapter, enabling the creation and modification of photo albums, and the ability to set up sections to create a presentation order and to hide slides, when appropriate. We have mastered the relevant presentation motions, effects, timing, transitions, and animations, and how they work with the final presentation output with the slide show options. Driving consistency with the use of slide masters to conserve company branding and productivity when creating presentations has been another important achievement in this chapter.
In the next chapter, we will focus on useful design and presentation principles to consider when creating professional presentations.
The following chapters will cover principles of presentation design, using clear messages and persuading an audience, as well as techniques to implement when adding visual impact.


