
Setting up the Presenter View
The Presenter View enables you to view speaker notes while presenting to an audience. The audience views the presentation on the main monitor, and the presenter views the presentation with access to speaker notes on another monitor. The Presenter View enables the presentation to be viewed on multiple monitors. In the Presenter View, you can also decide to darken or lighten the screen for the audience—for example, during a break or when a question-and-answer-type session is in progress:
- Open the presentation to set up viewing on multiple monitors. We will continue with the presentation from the previous topic.
-
Insert speaker notes to help you with presenting to the audience. To help you, click on a slide to add speaker notes, and then click on the Notes icon on the status bar to activate the Notes section below the slide. Type the following note: Welcome to our presentation on Safest Solutions Group Travels. We hope to entice you to explore more of our wonderful trips
on offer, including the appropriate cover for your journey.
- Click on Slide Show | Setup Slide Show.
- Locate the Use Presenter View checkbox, and then click to select it. If you have multiple monitors connected, the feature will automatically detect the primary and secondary monitors. Note that the Use Presenter View option is also present from the Monitors group on the Slide Show ribbon.
Often, we will need to make sure that timings are correct prior to presenting. Visit the next topic to learn how to set these up.
Setting up timings
You can rehearse your presentation to accommodate your slide advance timings. We will learn how to set the timings and set up the environment to use the timings. Make sure that the Using timings, if present option is selected if the presentation you are setting up has advanced slide timings selected throughout the presentation:
- Firstly, set the slide timings using the Advance Slide option on the Transitions tab
- Go to the Slide Show tab and select the Set Up Show icon to launch the dialog box.
- Under the Advance slides heading, make sure that Using timings, if present is selected. This option is illustrated in a previous screenshot under Setting up a slide show.
- Click on OK to commit the changes.
Let’s learn how to set up media controls on a slide.
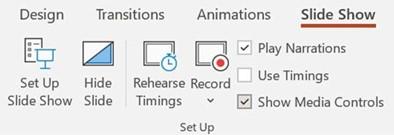
Showing media controls
The media controls are the icons that appear below the audio or video content inserted into the presentation:
- Click on the Slide Show tab on the ribbon.
- Locate the Set Up group.
- Make sure that the checkbox for Show Media Controls is selected, otherwise, the control buttons will not show when the presentation is being shown to an audience.
Figure 7.25 – Setting up media controls
Now that we are able to set timings and media controls, let’s visit the Custom Slide Show
options.


