
Adding headers and footers to slides
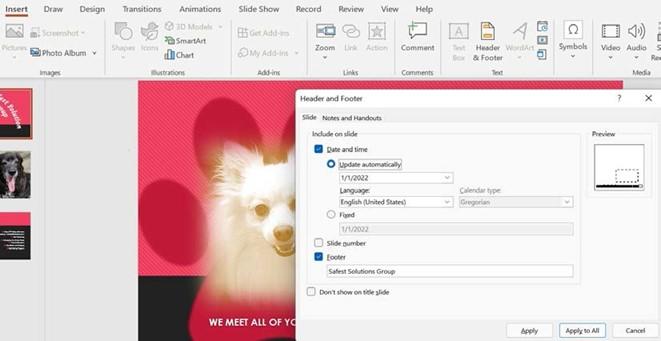
As discussed in the previous edition book, the footer is the area at the bottom of the slide. It has been constructed by way of placeholders that contain information that’s repeated on every slide in the presentation. The header or footer accepts information such as custom text, dates and times, and the slide number. Headers and footers can be applied to Notes and Handouts. The Notes and Handouts tab can be seen in the following screenshot, just on the right-hand side of the Slide tab:
- Open an existing presentation. For this example, we will use the Safest Solutions-Benefit.pptx presentation.
- Click on the Insert tab, and select Header and Footer from the Text group.
- In the Header and Footer dialog box, select the option that best suits your presentation:
Figure 6.11 – The Header and Footer dialog box
- Select the Slide tab at the top of the dialog box to view the options to include on the slides.
- Click on the Date and time checkbox and choose whether to add a static fixed date or whether you want this to Update automatically (this option will update the date to the current date every time the presentation is opened).
- You can include a Slide number setting and also a static Footer setting. This option is located just under the Fixed date option.
- Sometimes, we might want to exclude a header from the title slide of the presentation. Select this option by clicking on the checkbox provided to activate it.
- Please note that at the bottom of the dialog box, you can choose whether to Apply changes to the current slide or whether to choose Apply to All to commit the changes to the entire presentation. Also, note that there is no header section on the Slides tab.
-
The Notes and Handouts tab contains many of the same options as the Slide tab, but it includes a Header section so that you can create a static custom header for only setting notes and handouts.
Formatting textboxes
In this section, you will learn how to format textboxes by adding, manipulating, and applying styles and effects to them.
A textbox is a shape that is drawn onto a presentation slide that you can type text into. The Text Box feature is located in the Insert tab, under the Text group:

Figure 6.12 – Insert | Text Box
Draw a textbox onto the slide by holding down the left mouse button and dragging it to the desired size. Alternatively, you can simply click on the slide’s background.
Once a textbox has been inserted into a slide, use the Shape Format tab to apply shapes, styles, text styles, text effects, and text alignment options:

Figure 6.13 – The Shape Format tab
Now that you are familiar with the Shape Format tab inside the ribbon, let’s focus on some of the groups and features within the tab.
Applying a theme fill color
To learn how to apply a theme fill color, follow these steps:
- Click on the textbox to apply a fill color.
- Click on Shape Format | Shape Fill (or Shape Outline, Shape Effects, or Shape Styles) and select a theme from the drop-down list:
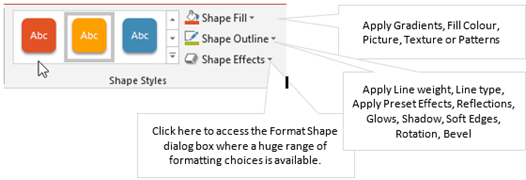
Figure 6.14 – The Shape Format tab to select a textbox shape style
-
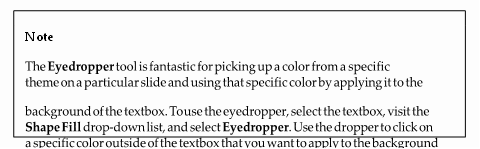
Now, click on a color or visit the More Fill Colors… option to access the color wheel or the Custom color area to set a specific Hue color (this is a new feature within Office 2021).
-
To remove a fill color from a textbox, click on the shape and then select No Fill
from the Shape Fill drop-down list.
Gradients are a blend of color progressions that you can apply to objects within Office 2021. Applying a gradient uses the same method as previous versions of Office.


