
Adding and modifying legacy form controls
If you want to create greater protection in terms of restricting users so that they can only access certain parts of the form or be guided only from one content control to the next, then legacy form controls are the way to go. Let’s take a look at an already prepared and protected form:
- Open the document named SampleForm.docx. This form has been protected so that the user can only fill in the required information and not amend the rest of the document. When you press the Tab key on the keyboard, the cursor moves from one content control to the next.
- To stop protection and edit the form, click Developer | Restrict Editing.
- The Restrict Editing pane will open to the right-hand side of the window. Click on the Stop Protection button to unprotect the form.
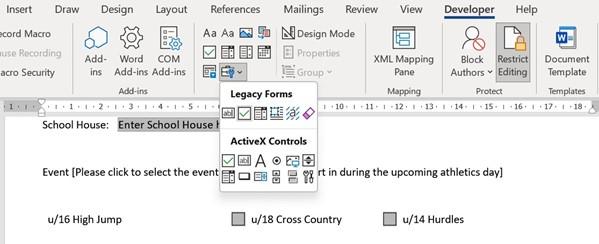
- Place the mouse pointer just after the School House: text and use the Legacy Forms icon to insert the Drop-Down Form Field from the Developer tab.
- Notice the gray field code that has appeared next to the School House: heading.
- Double-click on the gray field code to edit Drop-Down Form Field Options.
-
Add the text Enter School House here into the Drop-down item: fi ld, then click on the Add >> button. Repeat the step to add the names of the houses for
Emerald, Sapphire, and Ruby. Click on the OK button to commit to the changes.
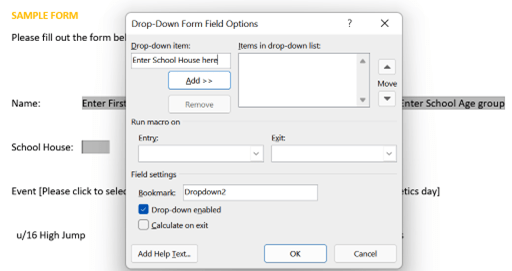
Figure 4.18 – Drop-down Form Field Options dialog box to edit field properties
- Place the mouse pointer before the text u/16 High Jump, then insert a Check Box Form Field from the Legacy Forms drop-down list.
Figure 4.19 – SampleForm document displaying the Restrict Editing pane
- Your form is now complete and ready to be protected so that users cannot edit the actual text on the form, and can only answer the questions. Let’s learn how to do protect the form in the next topic.
Protecting a form
There are two options available here to protect a form:
- Formatting restrictions: These allow you to customize which styles can be edited by the form user.
- Editing restrictions: These options allow the form initiator to decide which fields require protection from amending by the form user.
Take the following steps to learn how to protect the form:
- We will continue to use the form we created in the previous section. Make sure the
Developer tab is selected, then click Restrict Editing under the Protect group.
- Under the Editing restrictions heading, select the checkbox for Allow only this type of editing in the document:
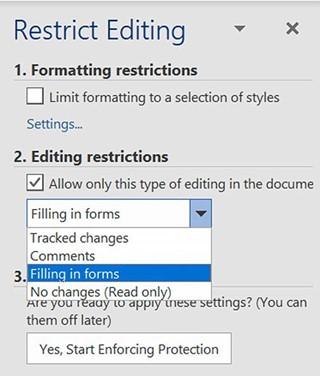
Figure 4.20 – Restrict Editing pane displaying the Filling in forms option under Editing restrictions
- From the drop-down list, choose Filling in forms.
- Under Step 3, click on Yes, Start Enforcing Protection.
- A dialog box will present itself, asking you to enter a password (this is optional).
- Click on OK to complete the protection process.
- If your form was protected correctly, the user should not be able to edit any part of the form except the fields you inserted.
- Click on File | Info. The Protect Document icon indicates that this document has protection applied.
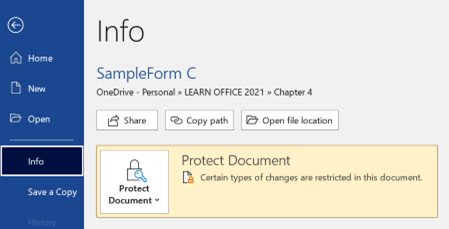
Figure 4.21 – File|Info screen confirming that the document is protected
- If you need to make changes to the form, you will need to unprotect the form first. Visit the Stop Protection icon at the bottom of the Restrict Editing pane, then enter the password to unprotect the form and make the form accessible for editing. Do not forget to protect the form again before sharing it with others.
Now that you are able to protect a form, practice this skill by adding appropriate content controls to the form named SaferSolCharity.docx, then protect the form so that we ensure the users are not able to edit the form we created in a previous topic.
Once the form has been protected, you are now able to upload the form to the website of your choice, SharePoint, or Teams collaboration area for colleagues/users to complete. You can also create forms using Microsoft Forms; we will learn about this method in the next section.


