
Styles, Referencing, and Media
In this chapter, we will touch on making enhancements to existing features and learn how to become more comfortable when working with styles by refining the layout. After that, we will cover some tips and tricks. Building on your existing knowledge from the previous chapters is key to this chapter, where we will troubleshoot more than one table of contents within a document and look at cross-referencing. A section on working with media content and drawing elements will also be provided.
The following topics will be covered in this chapter:
- Managing the styles environment
- Word referencing features
- Creating media and drawing elements
Technical requirements
To complete this chapter, you should be able to work with and create styles. Knowledge of the basics related to inserting and generating a table of contents, as well as working with graphical elements, is encouraged – these features were dealt with in detail in the first edition of this book.
The examples for this chapter can be found at the following GitHub URL: https:// github.com/PacktPublishing/Learn-Microsoft-Office-2021-Second-
Edition.
Managing the styles environment
In the previous edition of this book, Learn Microsoft Office 2019, we learned how to create and edit styles. In this section, we will build on our skillset by looking at ways to manage the Word environment so that we can work with styles more efficiently.
To set the Style pane, we need to be in the Draft or Outline view. Let’s do this so that we can see the Style pane.
Viewing a document in the Draft view
By default, a document will open in the Print Layout view. We can change the view to the Draft view when we need to see any additional marks in the document and when we would like to view document styles (marks such as paragraph markers, spaces, and tabs). When working in the Draft view, we won’t able to see any images, only text.
If you would like to follow the steps provided in the next section to view a document in the Draft view and add the Style pane, open the Butterfly Agreement.docx file. Click the View tab, then select Draft from the Views group.
Once the document is in Draft view, we can add the Style pane.
Adding the Style pane
When we work with long documents that contain several built-in or custom styles, it is sometimes necessary to see the style names that already exist in lines or paragraphs in the document. This is especially relevant when you’re receiving documents from outside your organization as you may need to make amends, but then continue using the same style set throughout the document to maintain uniformity. Adding the Style pane to the left-hand side of the document window allows you to see all the styles that have been applied to a document:
- Click the File tab.
- Select Options.
- Click the Advanced category from the left-hand side of the dialog box.
- Scroll down until you locate the Display heading.
- Locate the Style area pane width in Draft and Outline views: option.
- Enter 2cm into the space provided:\
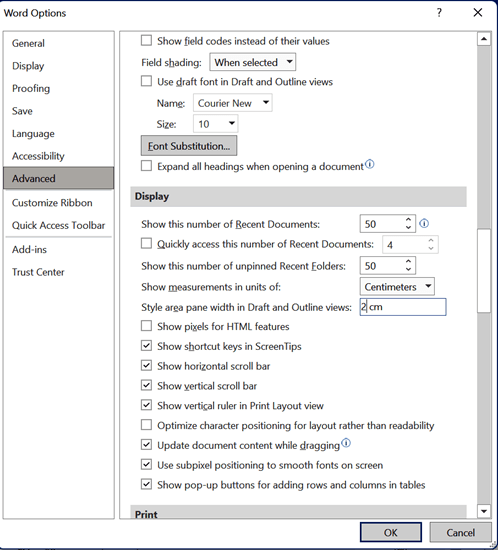
Figure 3.1 – The Word Options dialog box displaying the Style pane’s width in the Draft and Outline views
- Click OK at the bottom of the dialog box to confirm your selection.
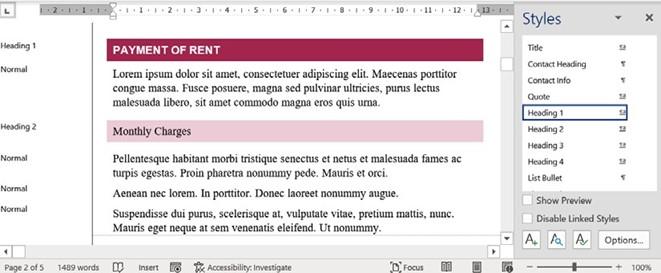
- To the left-hand side of the document window (in the margin area to the left-hand side of the document), you will now see the Styles pane. This pane contains all of the styles that have been applied throughout the document:
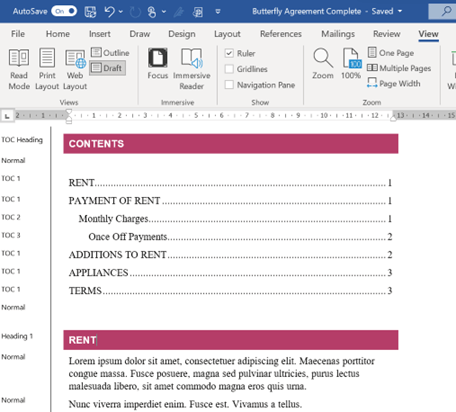
Figure 3.2 – The Styles pane’s width of 2 cm to the left-hand side of the document window
- Now that we have the Styles pane on the left, we can add it to the right of the document window. This way, you can see all the existing styles on the left and all the available style sets to the right.
- Click the More button to the right of the Styles group on the Home tab:
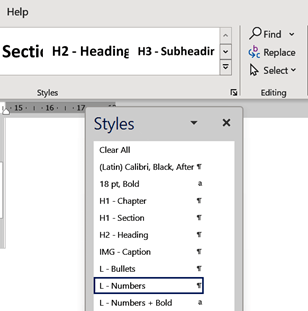
Figure 3.3 – Using the More button to launch the Styles pane
- Double-click the Styles pane’s header area to dock the Styles pane to the right-hand side of the Word document:
Figure 3.4 – The Styles area width pane and the Styles pane
- Now, you have the perfect styles arrangement. Working in the Draft view with both panes available lets you do the following:
- See styles at a glance that have already been applied to different headings, paragraphs, lines, and numbering throughout the document. This can be seen on the left-hand side.
- Copy styles from one part of the document to another using the Format Painter button.
- Select parts of the document and visually see the style that’s been applied in the right pane.
- Apply new styles to selected paragraphs using the right pane.
- Add the Show/Hide button (via the Paragraph group on the Home tab) to display spaces, tabs, indents, and paragraph markers throughout the document.
- Have quick access to create new styles, modify existing styles, or update existing styles.
Now that you can arrange your environment more efficiently when working with styles, let’s learn how to keep styles intact when sharing outside our organization, for instance.


