
Blocks in AutoCAD
In this chapter, you will learn to do the following:
Create and insert Blocks
Create Annotative Blocks
Explode, purge Blocks
Use the Divide tool
Use the Design Center and Tool Palettes to insert Blocks
Insert Multiple Blocks
Edit Blocks
Create Blocks using the Write Block tool
Define and insert Attributes
Work with Xrefs
Introduction
In this chapter, you will learn to create and insert Blocks and Attributes in a drawing. You will also learn to attach external references to a drawing. The first part of this chapter deals with Blocks.
A Block is a group of objects combined and saved together. You can later insert it in drawings. The second part of this chapter deals with Attributes. An Attribute is an intelligent text attached to a block.
It can be any information related to the block such as description, part name, and value and so on. The third part of the chapter deals with the Xrefs (external references). External references are drawing files, images, PDF files attached to a drawing.
Creating Blocks
To create a block, first you need to create shapes using the drawing tools and use the BLOCK
command to convert all the objects into a single object. The following example shows the procedure to create a block.
Example:
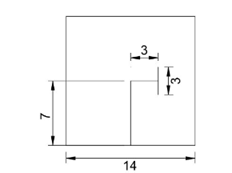
Create the drawing as shown below. Do not apply dimensions. Assume the missing dimensions.
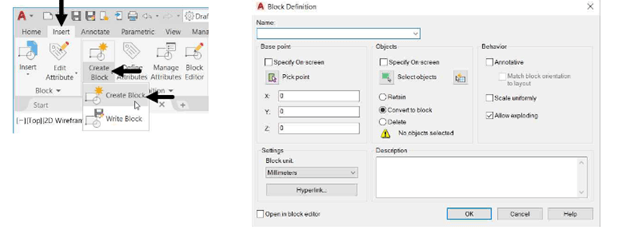
Click Insert > Block Definition > Create Block on the ribbon; the Block Definition dialog box appears.
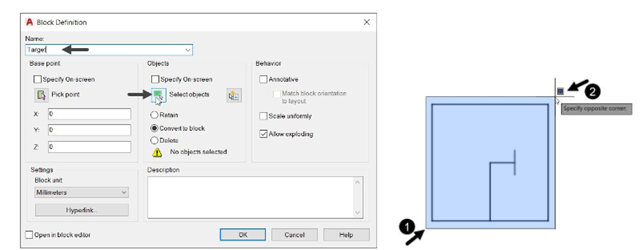
Enter Target in the Name field of dialog box.
Click the Select Objects button of the dialog box. Drag a window and select all the
objects of the drawing, as shown.
Right-click to accept; the dialog appears again.
You can choose to retain or delete the objects after defining the block. The Retain option
under the Objects section retains the objects in the drawing window after defining the block.
The Convert to Block option deletes the objects and displays the block in place of them. The
Delete option completely deletes the objects from the drawing window.
Select the Delete option under the Objects section.
Click the Pick point button on the dialog box.
Select the midpoint of the left vertical line. The selected point will be the insertion point
when you insert this block into a drawing.

You can also add description to the block in the Description box. In addition to that, you can
set the behaviour of the block such as scalability, annotative and so on using the options in
the Behavior section. The options in the Settings area can be used to set the units of the block
and link a website or other files with the block.
Click OK on the dialog box; the block will be created and saved in the database.


