Linking in Excel
As discussed in Chapter 1, the definition of financial modeling is that when the inputs change, the outputs change as well. Linking in Excel is what makes this happen. If you’re just typing numbers into formulas, such as =453*12, that’s not financial modeling. You need to create a formula that links to a cell or cells so that when the cell changes, the result of your formula will change as well.
There are two types of links in Excel: internal links (links within the model) and external links (links to other files). So far, in this chapter, I’ve been performing links on the same page. Almost every financial model involves multiple pages, though, so it’s almost always necessary to link to other sheets within the same file.
In this section, you have some simple profit-and-loss calculations, and you’re going to create a summary report by linking between sheets. Follow these steps:
-
Download File 0602.xlsx from www.dummies.com/go/financialmodeling inexcelfd
and select the tab labeled IS.A completed version is also available in File 0603.xlsx, which you can download and use to compare your work.
-
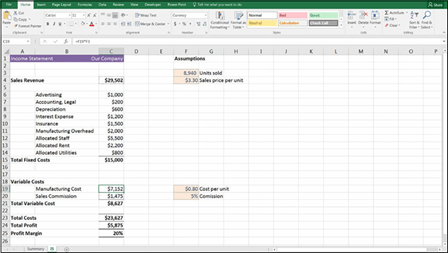
On the IS worksheet, select the cell C4 and calculate the sales revenue by entering the formula =F3*F4.
The calculated result is $29,502.
-
Go to cell C19 and calculate the manufacturing cost by entering the formula =F19*F3.
The calculated result is $7,152.
-
Go to cell C20 and calculate the sales commission by entering the formula
=F20*C4.
The calculated result is $1,475.
-
Excel will sometimes put additional decimal places automatically, so change the number formatting to currency with no decimal places if necessary.
You can do this by pressing the Decrease Decimal icon in the Number section of the Home tab of the Ribbon.
-
Check that the profi margin is calculating correctly.
The calculated result in cell C25 is 20%.
-
Compare your results to Figure 6-12.
Now you have your detailed P&L and you can create a summary on the fi
worksheet (Summary) using links.
 FIGURE 6-12:
The completed
income statement.
- On the Summary worksheet, select cell B5.
-
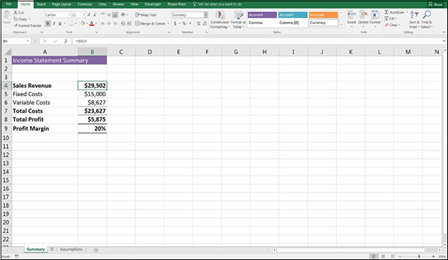
Link through the fi costs by entering the formula =’IS’!C15.
Do not type this out. Instead, click cell B5, type =, and select the next tab using the mouse. Click cell C15 on the IS tab using the mouse, and press Enter.
- Similarly, select cell B6 on the Summary worksheet and link through the variable costs by adding the formula =’IS’!C21.
-
Go to cell B4, and link through the sales revenue by adding the formula
=’IS’!C4.
- Compare your results to Figure 6-13.
 FIGURE 6-13:
The completed
income statement summary.
A good layout for a fi model is to have assumptions together on a single page, usually at the back. Let’s move the assumptions to a separate sheet at the back of the model. Don’t worry — this is a lot easier than it sounds!
- Insert a new sheet by clicking the plus sign behind the last tab.
- Double-click the tab name, and change Sheet1 to Assumptions.
- Go back to the IS worksheet and highlight the area of the sheet that contains the assumptions (cells F1:G20).
- Press Ctrl+X to cut the data onto the clipboard.
- Go to the Assumptions worksheet, select cell A1, and press Ctrl+V or press Enter to paste the data to the new sheet.
 When you have data on the Clipboard, pressing Enter will paste the data and remove it from the Clipboard. Pressing Ctrl+V will leave the data on the Clipboard in case you want to paste it again. Either technique will work in this case.
The formulas in this model work in exactly the same way as they did before we moved the assumptions to the new sheet. It’s important that you used cut and paste here, not copy and paste, or the links would not have worked properly.
- Go back to the Assumptions worksheet and tidy it up. Remove the blank rows 5 through 18 by highlighting the rows, right-clicking, and pressing Delete.
Now you have a simple but tidy model. It links, it’s clear, it’s straightforward, and it’s easy for someone else to understand.
So far, I’ve only been looking at creating links from one cell to another, either on the same sheet or on a different sheet within the same file. Sometimes, however, the data you want to link to exists in another file, so you need to link from one file to another. These are called external links. They’re created in a very similar way to internal links; simply type = and then select the cell in the file you want to link to, and press Enter. Working with external links isn’t as straightforward as working with internal links, however, so it does require a lot more care.
External links can be the cause of many problems, such as broken links, incorrect data, and error messages. Your model will be much simpler if you can avoid exter- nal links, but if you decide to include them, you should do so with caution. Most problems happen when users
» Change fi or move the fi to another location.
» Change the source fi sheet name when the fi linking to it is closed.
» Insert rows or columns in the source fi when the fi linking to it is closed.
» Email fi that contain links.
Improving external links with named ranges
One of the main issues with linking to external files is that if users insert or delete rows or columns in the source file, or change tab names, this causes errors in the files that are linking to it. If you’re lucky, it will show a #REF! error, which you can easily find and correct. If you’re not so lucky, it will show a value that looks as though it is correct, but is in fact completely wrong.
Imagine that you want to use an interest rate in your financial model, which is being generated in another model. This interest rate frequently changes, so you decide to create a link, rather than hard-coding the number. This will save you time having to update it every time. You create a link from your financial model to another source file, using the following link:
=’C:\Plum Solutions\Clients\Transactions\Files\[Interest Calculations.xlsx] Sept’!$D$23
If both files are open at the same time, and you insert a row in the Interest Calculations.xlsx file, the link will automatically update from $D$23 to $D$24. However, if your file is closed, your model will not update. This means that the next time you open it, your model will be picking up the wrong cell!
The way around this issue is to create a named range in the source file (for exam- ple, the word interest), and then if that cell moves in the source file, the cell will still retain its name, and the formula in your model will still be correct. See the section on “Creating a named range” earlier in this chapter for how to do this:
=’C:\Plum Solutions\Clients\Transactions\Files\[Interest Calculations.xlsx] Sept’!interest)
The next time your model tries to update the link, it will look for the name inter- est, rather than $D$23, and the integrity of the link will be maintained. This is why using named ranges when dealing with external links is considered best practice: It’s a much more robust way of linking files together.
 Don’t use formulas in external links. When linking to an external file, use a simple, direct formula such as =’C:\Work\Plum Solutions\Clients\Transactions\Files\Interest Calculations.xlsx’!interest. Using more complex formulas, such as SUMIF, can mean that the links show errors unless the files are both open at the same time.
Finding and editing external links
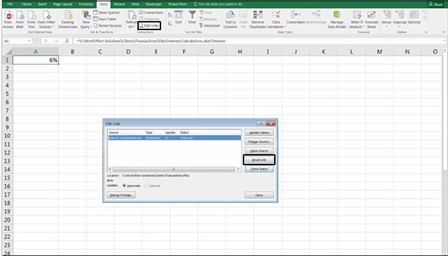
In the Connections group on the Data tab, click Edit Links. The Edit Links dialog box, shown in Figure 6-14, appears. Click the Change Source button to tell your model the new location of the file it has been linked to.

 Another handy use for Edit Links is to break all links in a file. If you’re emailing a file, it isn’t recommended that you leave links in it. You could paste the cell values one by one, but breaking links will convert every single formula in the entire file to their hard-coded values. Click Edit Links, and you’ll be able to select the exter- nal files and click the Break Links button.
 FIGURE 6-14:
The Edit Links dialog box.
 Sometimes your model will have links that simply won’t break! These “phantom links” are most commonly the result of links contained in named ranges. Deleting the names that contain external links from the Name Manager will remove them from your file. If that doesn’t work, other possible reasons could be links in con- ditional formatting, charts, objects, or PivotTables.


