
Getting Started with Excel Macros
This Part is a primer on Excel macros, covering everything you need to know about Excel macros and VBA
to get started with the 101 macros throughout the rest of this book.
In This Part
Becoming Familiar with Macro Recording Basics
Comparing Absolute and Relative Macro Recording
Recording macros with absolute references
Recording macros with relative references
Looking at Other Macro Recording Concepts
Macro-enabled file extensions
Macro security in Excel 2010
Trusted locations
Storing macros in your Personal Macro Workbook
Assigning a macro to a button and other form controls
Placing a macro on the Quick Access toolbar
Working In the Visual Basic Editor
Activating the VBE
Understanding VBE components
Working with the Project window
Adding a new VBA module
Removing a VBA module
Working with a Code Window
Minimizing and maximizing windows
Getting VBA code into a module
Customizing the VBA Environment
The Editor tab
The Editor Format tab
The General tab
The Docking tab
Discovering the Excel Object Model
Understanding objects
Understanding collections
Understanding properties
Understanding methods
Taking a Brief Look at Variables
About the Macros in This Book
Getting the sample files
Using the sample files
Things to keep in mind
You need not be a power user to create and use simple VBA macros. Even casual users can simply
turn on Excel’s macro recorder.
Recording a macro is like programming a phone number into your cell phone. You first manually dial and
save a number. Then when you want, you can redial those numbers with the touch of a button.
Just as with numbers on a cell phone, you can record your actions in Excel while you
perform them. While you record, Excel gets busy in the background, translating your keystrokes and
mouse clicks to written VBA code. After you’ve recorded a macro, you can play back those actions
anytime you wish.
This Part serves as an introduction to Excel Macros and VBA in general. Here, we give you a concise
summary of how VBA works with Excel, giving you the basic foundation you need to work with the 101
macros listed in this book.
Becoming Familiar with Macro Recording Basics
To start recording your first macro, you need to first find the Macro Recorder, which is on the
Developer tab. Unfortunately, Excel comes out of the box with the Developer tab hidden — you may
not see it on your version of Excel at first. If you plan to work with VBA macros, you’ll want to make
sure that the Developer tab is visible. To display this tab
1. Choose Office➜Excel Options.
2. In the Excel Options dialog box, select Customize Ribbon.
3. In the list box on the right, place a check mark next to Developer.
4. Click OK to return to Excel.
Now that you have the Developer tab showing in the Excel Ribbon, you can start up the Macro Recorder
by selecting Record Macro from the Developer tab. This activates the Record Macro dialog box, as shown
in Figure 1-1.
Getting Started with Excel Macros
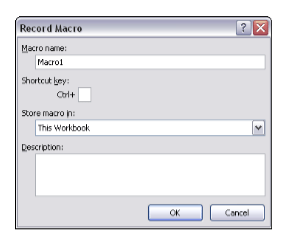
Figure 1-1: The Record Macro dialog box.
Here are the four parts of the Record Macro dialog box:
➤ Macro Name: This should be self-explanatory. Excel gives a default name to your macro,
such as Macro1, but you should give your macro a name more descriptive of what it actually
does. For example, you might name a macro that formats a generic table as FormatTable.
➤ Shortcut Key: Every macro needs an event, or something to happen, for it to run. This event can
be a button press, a workbook opening, or in this case, a keystroke combination. When you
assign a shortcut key to your macro, entering that combination of keys triggers your macro to
run. This is an optional field.
➤ Store Macro In: This Workbook is the default option. Storing your macro in This Workbook
simply means that the macro is stored along with the active Excel file. The next time you
open that particular workbook, the macro is available to run. Similarly, if you send the work-
book to another user, that user can run the macro as well (provided the macro security is
properly set by your user — more on that later in this Part, in the section titled “Looking at
Other Macro Recording Concepts”).
➤ Description: This is an optional field, but it can come in handy if you have numerous macros
in a spreadsheet or if you need to give a user a more detailed description about what the
macro does.
With the Record Macro dialog box open, follow these steps to create a simple macro that enters your
name into a worksheet cell:
1. Enter a new single-word name for the macro to replace the default Macro1 name. A good
name for this example is MyName.
2. Assign this macro to the shortcut key Ctrl+Shift+N by entering uppercase N in the edit box
labeled Shortcut Key.
3. Click OK to close the Record Macro dialog box and begin recording your actions.
4. Select any cell on your Excel spreadsheet, type your name into the selected cell, and then
press Enter.
5. Choose Developer➜Code➜Stop Recording (or click the Stop Recording button in the
status bar).
Examining the macro
The macro was recorded in a new module named Module1. To view the code in this module, you
must activate the Visual Basic Editor. You can activate the VB Editor in either of two ways:
➤ Press Alt+F11.
➤ Choose Developer➜Code➜Visual Basic.
In the VB Editor, the Project window displays a list of all open workbooks and add-ins. This list is
displayed as a tree diagram, which you can expand or collapse. The code that you recorded previ-
ously is stored in Module1 in the current workbook. When you double-click Module1, the code in the
module appears in the Code window.
The macro should look something like this:
Sub MyName()
‘
‘ MyName Macro
‘
‘ Keyboard Shortcut: Ctrl+Shift+N
‘
ActiveCell.FormulaR1C1 = “Michael Alexander”
End Sub
The macro recorded is a Sub procedure that is named MyName. The statements tell Excel what to do
when the macro is executed.
Notice that Excel inserted some comments at the top of the procedure. These comments are some of
the information that appeared in the Record Macro dialog box. These comment lines (which begin
with an apostrophe) aren’t really necessary, and deleting them has no effect on how the macro runs.
If you ignore the comments, you’ll see that this procedure has only one VBA statement:
ActiveCell.FormulaR1C1 = “Michael Alexander”
This single statement causes the name you typed while recording to be inserted into the active cell.
Testing the macro
Before you recorded this macro, you set an option that assigned the macro to the Ctrl+Shift+N shortcut
key combination. To test the macro, return to Excel by using either of the following methods:
➤ Press Alt+F11.
➤ Click the View Microsoft Excel button on the VB Editor toolbar.
When Excel is active, activate a worksheet. (It can be in the workbook that contains the VBA module
or in any other workbook.) Select a cell and press Ctrl+Shift+N. The macro immediately enters your
name into the cell.
Editing the macro
After you record a macro, you can make changes to it (although you must know what you’re doing).
For example, assume that you want your name to be bold. You could re-record the macro, but this
modification is simple, so editing the code is more efficient. Press Alt+F11 to activate the VB Editor
window. Then activate Module1 and insert the following statement before the End Sub statement:
ActiveCell.Font.Bold = True
The edited macro appears as follows:
Sub MyName()
‘
‘ MyName Macro
‘
‘ Keyboard Shortcut: Ctrl+Shift+N
‘
ActiveCell.Font.Bold = True
ActiveCell.FormulaR1C1 = “Michael Alexander”
End Sub
Test this new macro, and you see that it performs as it should.


