

Managing junk mail and automatic message content
In this section, you will learn about the junk mail options, such as allowing a
specific message to not be junk; filtering junk mail with an option that never blocks the sender; viewing a list of safe senders; and learning how to block a sender.
You’ll learn how to create and manage signatures; assign a signature to an email message manually; specify font options for new HTML messages; set options for replying to and forwarding mail messages; and, lastly, set a default theme for all HTML messages.
Allowing a specific message (not junk)
Sometimes, email messages are sent to the Junk Email folder by mistake. To mark the message as not junk, do the following:
- From the Navigation Pane, click on the Junk Email [1] folder, as shown in the following screenshot:
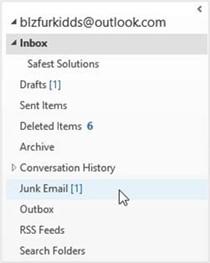
Figure 14.3 – The Junk Email folder in Outlook
- From the Message pane to the right, click a message that you want to mark as not junk. Then, click on Home | Junk | Not Junk.
- A dialog box will notify you that the message will be moved back to the Inbox folder and that messages from that recipient will always be trusted, as shown in the following screenshot:
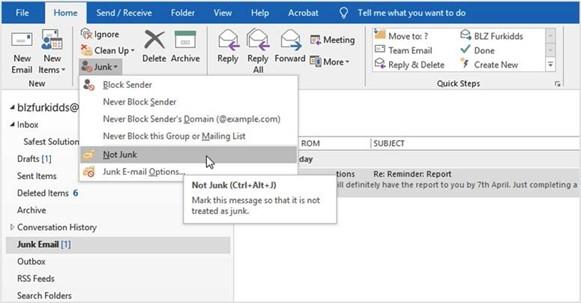
Figure 14.14 – Specifying messages as Not Junk
An email message that is sent to the Junk Email folder is saved as plain text, and all the links contained in it are removed. Moving a message out of the Junk Email folder restores the message to its format and links.
Filtering junk mail with Never Block Sender
It is possible to mark a recipient in your inbox as a safe sender. If you do not want to allow just a single email address from a large company and would prefer to allow receipt of all user addresses from a company, then use the Never Block Sender’s Domain option (for example, @packt.com). In addition, if you belong to a mailing list, you can add this to the safe senders’ list too. The steps are the same for each of these options, and are illustrated here:
- From the Message pane, click on a message that’s been received from a recipient you trust. Click on Home | Junk | Never Block Sender, as shown in the following screenshot:
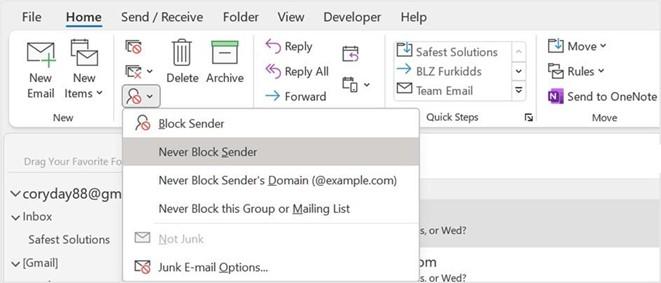
Figure 14.15 – The Never Block Sender feature
- A dialog box will appear, informing you that the sender of the chosen message has been added to the Safe Senders list.
- Click on OK to confirm.
Viewing the Safe Senders list
- Click on Home | Junk Email Options….
- In the dialog box that appears, select the Safe Senders tab, as shown in the following screenshot:
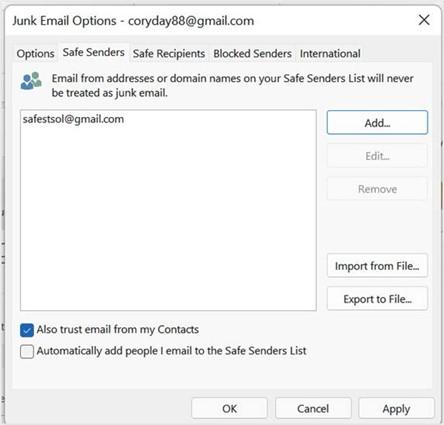
Figure 14.16 – The Safe Senders tab
- The addresses of safe senders will be shown in the list. You can add and edit the list from there.
Blocking senders
If you receive messages in your inbox that look suspicious or are spam, you can ensure that you don’t receive such messages in the future by marking the recipient as blocked. Follow these steps:
- From the Navigation Pane, click on a message from a recipient you trust. Then, click on the Home | Junk | Block Sender option
- A dialog box will appear, informing you that the sender of the selected message has been added to the blocked senders’ list and moved to the Junk Email folder.
- Click on OK to continue.
Managing signatures
A personal business card can be added automatically to every email message you send, or manually to the messages you choose. Th s is called a signature. It contains contact information that will appear in the body of each new email message you create in Outlook 2021.
Creating a signature
- Open a new email message, then click on Signature. You will see any existing signatures.
- To create a new signature, choose Signatures… from the drop-down list, as shown in the following screenshot:
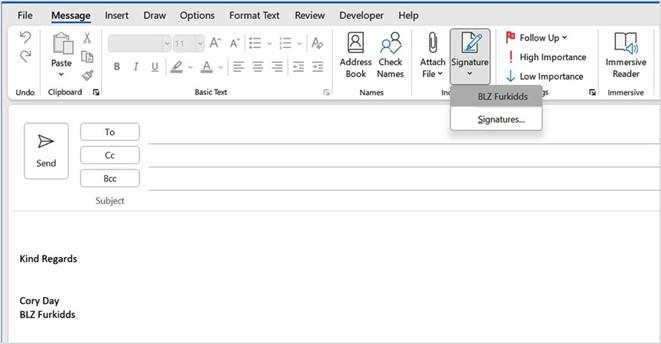
Figure 14.17 – The Signature feature in Outlook
- Click on the New icon to create a new signature. In the textbox that appears, enter a name for the signature. The name of the signature is not going to appear in the email; it is just a name that’s given to the signature to identify it.
- Click on OK when you’re done.
- In the Edit signature text body area, type in the relevant contact details and format the text using the options provided. Note that you can also insert a picture and a hyperlink, as well as a business card. These options can be seen in the following screenshot:
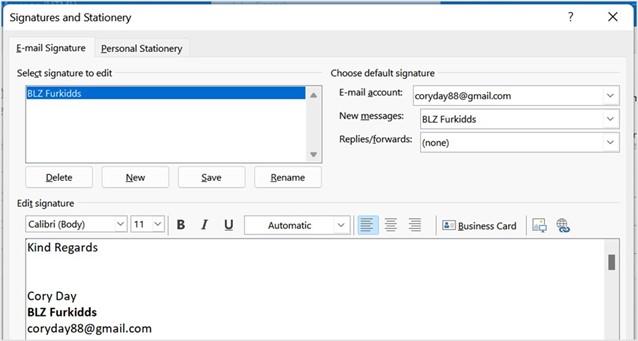
Figure 14.18 – The Signatures and Stationery dialog box
-
To the right of the dialog box, you will see the Choose default signature heading. If you do not want to add the signature you have just created to every new email message you compose, then you will need to change the option in the drop-down list next to New messages: to (none). This can also be changed by going to File
| Options | Mail | Signatures. You can set a separate signature for the Replies/ forwards: option as well.
- Click on OK to confirm.
Specifying the font for new HTML messages
You can specify the fonts for traditional-style documents – namely, the HTML-
type message as a default in Outlook 2019. By traditional-style documents, we mean those that contain bullet points, fonts, colors, and images. Plain text messages are also available but, of course, will not support bold, italics, or any formatting.
- Click on File | Options. Then, in the Outlook Options dialog box, make sure you are on the Mail category to the left to access the available options.
- Under the Compose messages heading, click the Stationery and Fonts… button.
- Click on the Font… icon under the New mail messages heading to specify the font for new HTML messages.
-
In the Font dialog box, choose the formats you would like to apply to every new mail message by default. In this example, the font face and font color have been changed. For reference, font face refers to the font type that you choose from the Font: drop-down list.
The following screenshot shows the preceding information:
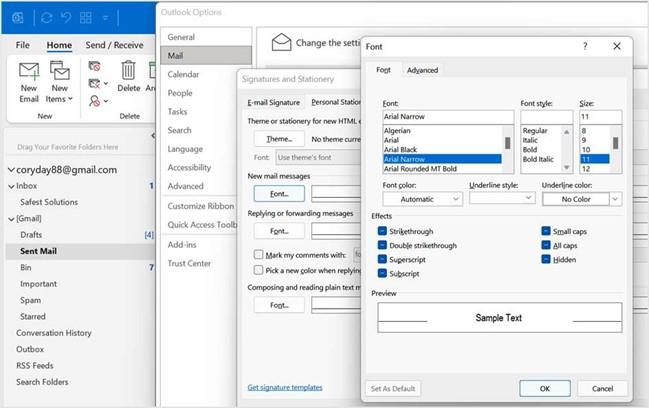
Figure 14.19 – The Font… button for New mail messages
-
Click on OK to confirm, then OK again, and once again to exit the dialog box. The sample text will be updated in the preview window, and, when typing in a new mail message, the changes will be noted.
Specifying options for replies and forwards
You can set a different font and attributes for replying to and forwarding messages as follows:
- Click on File | Options. Then, in the Outlook Options dialog box, make sure you are on the Mail category to the left to access the available options.
- Under the Compose messages heading, select the Stationery and Fonts… button.
- In the Signatures and Stationery dialog box, locate the Replying or forwarding messages heading.
- Click on the Font… button to change the attributes. Then, click on OK when you’re done. Note that two other options in the dialog box are related to replying to and forwarding messages.
Setting a default theme for all HTML messages, stationery, and fonts
- Click on File | Options | Mail | Signatures and Stationery.
-
In the Signatures and Stationery dialog box, locate the Theme… icon on the
Personal Stationery tab.
- In the Theme or Stationery dialog box, select a theme to apply to all messages by default. Choose whether you wish to display background graphics at the bottom left-hand corner of the dialog box. Click on OK to confirm your choices. This is shown in the following screenshot:
Figure 14.20 – Theme or Stationery options
- Click on OK to confirm.


