
Exploring Presenter Modes
When we share content with an audience, we can present it using multiple Presenter Modes. These modes offer more engagement possibilities when sharing content through meetings. The following modes are available:
- Content only
- Standout
- Side-by-side
- Reporter
Let’s learn about these options while we walk through the steps to activate them:
- Join the meeting as usual, then click on the Share button at the top of the meeting.
-
In the Share content drop-down, notice the Presenter mode heading. Underneath this heading are four views, as explained at the beginning of this section.
The first view is Content only, which is the default view. Always ensure this option is selected if you don’t want to show your video to the audience while presenting:
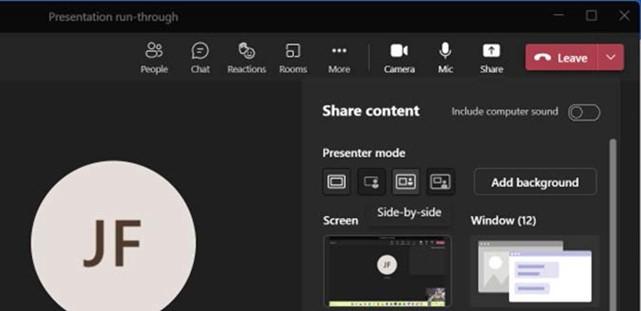
Figure 17.10 – Presenter mode
The second button is for Standout mode. This mode will place the video over the slide content to the right.
The next is Side-by-Side, followed by Reporter mode. We can select the relevant mode from the Share drop-down list, or after we have chosen the relevant Window or Screen from which to present.
- Once we are viewing the presentation to the audience, we can select the relevant mode to present from the meeting controls at the top of the screen. Move your mouse pointer to the top of the screen to view the meeting controls.
- The following screenshot shows the different modes at the top of the screen, as well as an Edit your view mini screen over the presentation. Only the presenter can see this mini screen. Use the mini screen view to customize the options for the mode you have selected, such as its size and position. The presenter can minimize the mini screen.
- Click each of the modes at the top of the screen to see how they will be displayed to the audience:
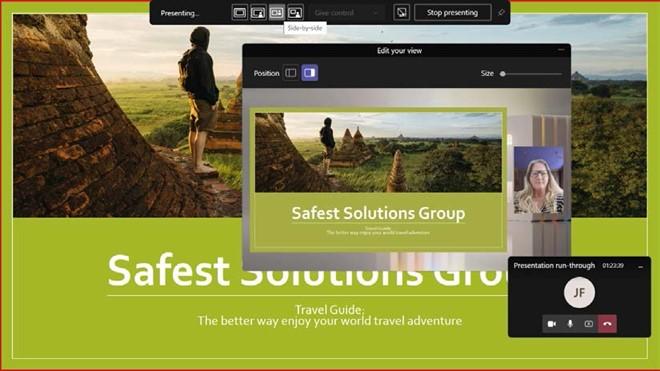
Figure 17.11 – Presenter modes and the mini screen to set options
- Once you are done presenting, click the Stop presenting button at the top of the screen, or select the Stop sharing button on the mini-meeting controls to the bottom-right of your Windows desktop. You will then return to the meeting to engage with the audience.
- Note that should you wish to show a video with sound while in Presenter mode, be sure to click the required audio when presenting, and click the Include computer sound button on the meeting controls:

Figure 17.12 – The Include computer sound button on meeting controls
In the next section, we will learn a little more about meeting options.
Functionality in Teams Meetings
The Teams environment is a great learning curve with lots of options to customize. In this section, we will look at a few more customizations you may want to consider adding to the mix when you are regularly using the meeting feature in Teams.
Activating Spotlight
Adding Spotlight for everyone to a meeting allows the participant or host video to be the main video that everyone sees when presenting. The host can action this for different participants as they need to be in the spotlight. To activate this, click on the People icon when the meeting starts, then navigate to the participant in the Participants pane to the right. Click the ellipsis, then choose Spotlight for everyone. Click on Spotlight
for everyone.
Downloading attendance
We can download the attendance list from the Participants area before leaving the meeting. Click the ellipsis next to the Participants heading, then click Download attendance list. The list will download to the Downloads folder on your local computer or to a default location specified by your organization:
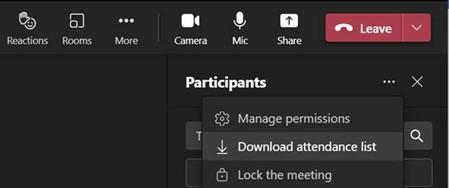
Figure 17.13 – Download attendance list
Meeting attendance can also be downloaded through the Teams app’s Calendar. Click to access the meeting, then click Edit to open its contents. Select Attendance at the top of the screen, where you can view its details, or click on Download attendance:

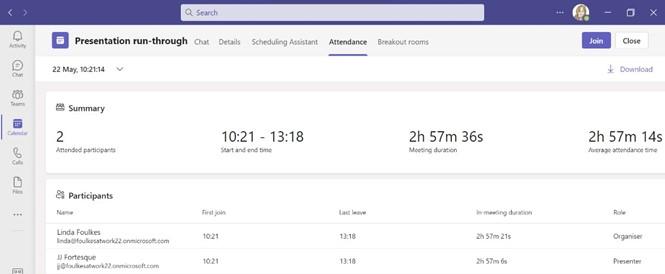
Figure 17.14 – The Calendar app showing the Attendance tab
The Meeting Attendance Report will appear in the Channel, as well as the meeting appointment in the Teams Calendar, which is also available in the meeting chat. The Attendance Report will be downloaded in .csv format, after which it can be saved as an Excel workbook.
Raising a hand
When participants use the Raise hand feature, the host is notified on-screen but is also able to get back to those participants who have raised their hands to ask a question in the order they were asked. Being fair when responding to questions in a meeting is important, especially if you have many participants:
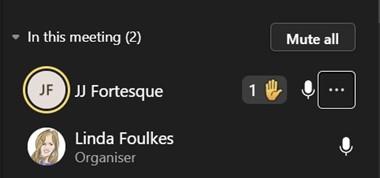
Figure 17.15 – The Raise hand feature with the order displayed
Hosts can identify the order in which participants raised their hands and respond accordingly.
Recording video
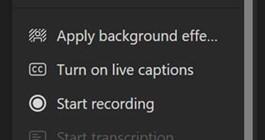
Hosts can activate the Start recording feature once the meeting starts so that the meeting is recorded. Click on the More… action at the top of the meeting to view the available drop-down options. Select Start recording from the list:
Figure 17.16 – Start recording
Be sure to let everyone in the meeting know that you would like to record the meeting. The record button will be displayed at the top left of the screen. Recordings are also displayed in the meeting’s Chat and on the Participants screens. To stop the recording, go to the More… option and select Stop recording. The recording will download and be displayed in the meeting’s Chat and as a Recordings folder in the Teams Channel Files area.
Be sure to check out the Start transcription feature, as well as the ability to Turn on live captions. This is a great feature to use if audio is an issue.


