
Setting triggers and adding bookmarks
The Triggers option is also available from the Advanced Animation group. This feature is useful if you need to create an action on click of a certain element on a slide, such as when audio starts playing an animation must start and continue for the duration. You can set up some creative actions within PowerPoint by setting up a bookmark to highlight a certain part of a video, for instance, and then use a trigger to action an animation when the video lands on the bookmark.
For this example, let’s first set up the Bookmark so that we can action the bee animation when the bookmark is reached in the video:
- Click on Insert | Video | Stock Videos… and locate the leaves video.
- Re-arrange the objects on the slide so that the video becomes the background, and the bee and flower animations are placed in front of the video.
- Select the video, then play the video until you decide at which point on the timeline you would like the bee to animate. We have selected 00:04:02. Click on Playback | Add Bookmark. You will now see a yellow dot along the timeline, indicating the bookmark.
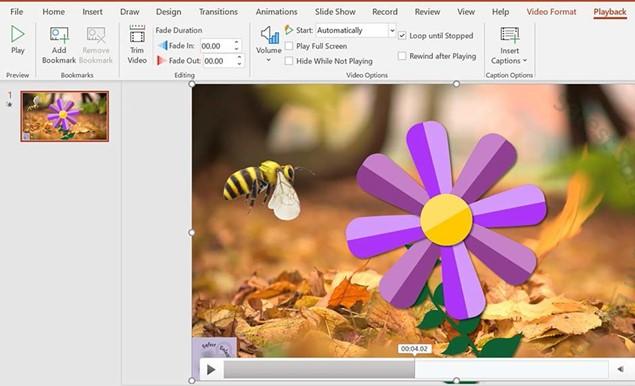
Figure 7.13 – Setting a bookmark along the video timeline
We are now ready to set the trigger:
- Select the object to set the action on.
- Click on Trigger, then select either On Click of or On Bookmark. For the On Bookmark feature to be active, you must have set up the bookmark on an object prior to the previous instructions. From the sub-menu, select the bookmark, namely Bookmark 1, within the video on which to action the bee.
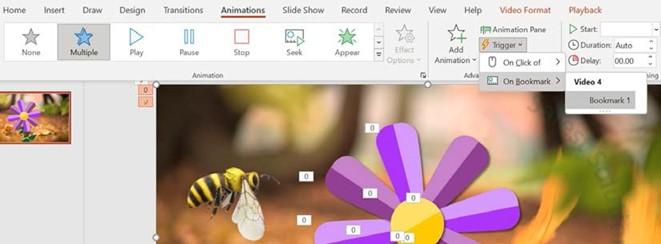
Figure 7.14 – Adding a trigger to a bookmark
- Play the slide show or preview the animation, and make any adjustments if necessary.
We can also use the Animation Painter to pick up applied animations and apply them to other objects on the slide. Let’s see how this is achieved.
Using the Animation Painter features
The Animation Painter feature is much the same as the Format Painter icon from within the Office programs. It allows you to copy animations from one object and apply them to another object. Single-clicking on the Animation Painter icon enables you to copy the animation from one object to another object. Just like the Format Painter, double-clicking on the Animation Painter icon enables you to copy the animation from one object to multiple objects:
- We will use the SSG-Planner.pptx presentation to demonstrate this example.
- Select an object on the slide and apply an animation to it. For this example, select the textbox on slide 1 and apply the following attributes:
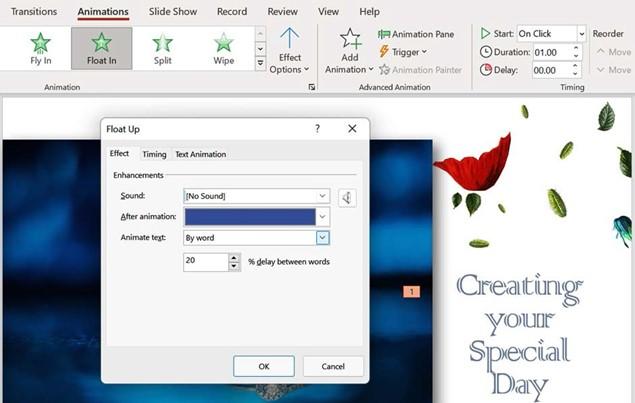
- Select the Float In animation effect.
- Select the Float In animation effect.
- Set the animation to Dim to another blue color after the animation, and then choose the By word option from the Animate text drop-down list, applying a 20% delay between words. This process can be seen in the following screenshot:
Figure 7.15 – Float In animation with customized effect options
- Make sure the textbox is selected on slide 1, and then single-click on the Animation Painter icon located on the Animations tab (in the Advanced Animation group) to copy once to another object, or double-click to copy multiple objects.
- The Painter icon will appear as the mouse pointer.
- Click on another object to paste the animation to it—we will copy the animation to all the textboxes throughout the presentation slides.
- The object that now contains the animation will indicate this by displaying the animation number positioned in the top-left corner of the object, and Animation Pane will update to reflect the new object animation.
-
Press the Animation Painter icon to stop pasting the animation, or press the Esc
key on the keyboard.


