
Applying animations and transitions
In this section, we will recap adding an animation to multiple objects on a slide and use Animation Pane to configure, set triggers, modify transitions, and look at the advanced morphing technique. Animation types have not been updated within PowerPoint 2021.
As we already know, animations can be applied to pictures, charts, tables, SmartArt graphics, shapes, clip art, and many other objects in PowerPoint. We must always remember that animations can be extremely distracting if applied to many objects of the same slide. No more than 20% of your slide content should be animated.
Using Animation Pane
Animation Pane provides access to animation start options, timing, and effect options, as well as the ability to remove animations from objects. These options are explained
throughout this chapter using other methods, so we will concentrate on each individually, in those sections
Setting up advanced animations
You can apply more than one animation to a single object on a slide, as follows:
- Select an object on a slide that already has an animation applied.
- Click on the Add Animation icon located in the Advanced Animation group. Remember that applying another animation to an already animated object using the normal animation effect options will replace the animation. The Add Animation feature allows you to add more than one animation to a single object.
- Select an animation from the drop-down list provided.
- The animation is applied to the object and becomes the second animation applied, as illustrated in the following screenshot:
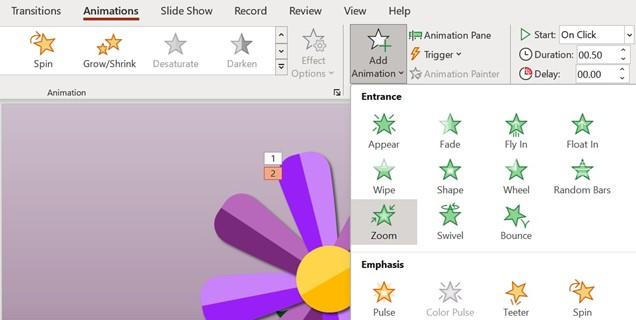
Figure 7.5 – Adding animation using the advanced Animation group
- Preview the animation. The first animation will play, followed by the second animation.
-
To preview animations automatically, click on the Preview icon to the very left of the Animation ribbon, and then select AutoPreview from the drop-down list.
Every time you apply an animation or animation effect option, the preview will automatically play the changes without having to click on the Preview icon each time.
Setting animation timing
Animation timing can be set by using either Animation Pane or the Timing group.
Animation Pane is a great way to visualize changes to these options.
Setting start options
In the petal example that we have been working with, the petals have the same animation effect applied and when previewed, the animations all happen at the same time. Let’s change the start options so that each petal appears independently.
- Select an object to set when you would like an animation effect to start. We will now change the start options so that each petal plays after the previous petal, and so on. Let’s get started by selecting the first petal on slide 1.
- Locate the Timing group on the Animation tab.
- Use the Start drop-down list to set how the animation should begin.
-
For this example, we will set the petals to start after each other, using the
Aft r Previous start option.
- Continue to do the same to each petal of the flower, this time using Animation Pane.
-
Select the next petal, and then click on the Animation Pane option from the
Advanced Animation group.
- Click on the arrow to the right of a group and select Start After Previous. Notice that the visual representation here is easier to follow due to the yellow thumbnails that appear next to each animated group, as can be seen in the following screenshot:
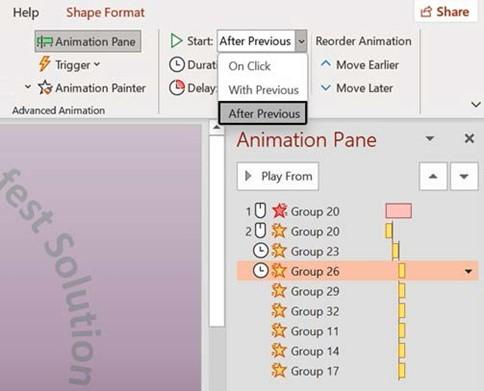
Figure 7.6 – Animation Pane showing petal animations
-
Repeat this process until all the petals have been set with the Start After Previous
option.
- Preview the animation when complete.
Selecting delay or duration options
Setting a delay on an animation effect means that you will essentially pause an animation for a period of time before it should start playing. If you would like an animation to play for a certain amount of time, then you need to set the duration of the animation. You can do this in the following way:
-
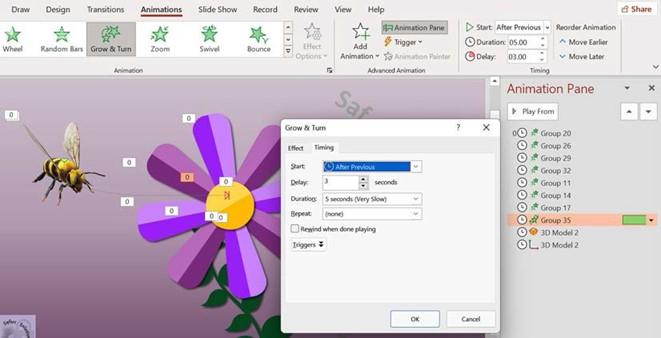
Select an object on a slide that has an animation effect applied. For this example, we will select the center of the flower and apply the Grow & Turn animation effect, and then set a delay.
- Locate the Timing group on the Animation tab.
- Use the Duration text area to set the animation duration, or the Delay text area for the number of seconds the animation must wait until it starts.
- Launch Animation Pane by selecting the appropriate icon from the Advanced Animation group.
- Click on the arrow to the right of the animated object in Animation Pane.
- From the drop-down list, select Timing…, as illustrated in the following screenshot:

Figure 7.7 – Setting Timing… from Animation Pane
- Set the delay options in the Eff ct dialog box.
- Click on the OK command when complete and commit to the changes made, and then play the animation. The center of the flower should play 3 seconds after the previous animation has ended, as illustrated in the following screenshot:
Figure 7.8 – Working within the Timing dialog box to set animation-delay
- Play the animation. The center of the flower should take 3 seconds to play from start to finish.
Now that we have recapped animations using PowerPoint 2021, let’s look at how we work with 3D models and cube animations.


