Macro 58: Selectively Hide AutoFilter Drop-down Arrows
It goes without saying that the AutoFilter function in Excel is one of the most useful. Nothing else
allows for faster on-the-spot filtering and analysis. The only problem is that the standard AutoFilter
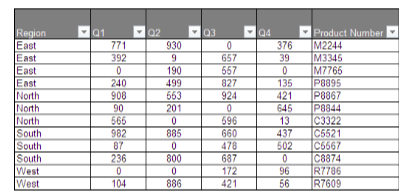
functionality applies drop-down arrows to every column in the chosen dataset (see Figure 5-4). This
is all right in most situations, but what if you want to prevent your users from using the AutoFilter
drop-down arrows on some of the columns in your data?
The good news is that with a little VBA, you can selectively hide AutoFilter drop-down arrows, as
shown in Figure 5-5.

Figure 5-4: The standard AutoFilter functionality adds drop-down arrows to all of the columns in your data.

Figure 5-5: With a little VBA, you can choose to hide certain AutoFilter drop-down arrows.
How it works
In VBA, we can use the AutoFilter object to turn on AutoFilters for a specific range. For instance:
Range(“B5:G5”).AutoFilter
After an AutoFilter is applied, we can manipulate each of the columns in the AutoFilter by pointing to it.
For example, you can perform some action on the third column in the AutoFilter, like this:
Range(“B5:G5”).AutoFilter Field:3
You can perform many actions on an AutoFilter field. In this scenario, we are interested in making the
drop-down arrow on field three invisible. For this, we can use the VisibleDropDown parameter.
Setting this parameter to False makes the drop-down arrow invisible.
Range(“B5:G5”).AutoFilter Field:3, VisibleDropDown:=False
Here is an example of a macro where we turn on AutoFilters, and then make only the first and last
drop-down arrows visible.
Sub Macro58()
With Range(“B5:G5”)
.AutoFilter
.AutoFilter Field:=1, VisibleDropDown:=True
.AutoFilter Field:=2, VisibleDropDown:=False
.AutoFilter Field:=3, VisibleDropDown:=False
.AutoFilter Field:=4, VisibleDropDown:=False
.AutoFilter Field:=5, VisibleDropDown:=False
.AutoFilter Field:=6, VisibleDropDown:=True
End With
End Sub
How to use it
To implement this macro, you can copy and paste it into a standard module:
1. Activate the Visual Basic Editor by pressing ALT+F11 on your keyboard.
2. Right-click the project/workbook name in the Project window.
3. Choose Insert➜Module.
4. Type or paste the code.


