Macro 47: Perform the Text to Columns Command on All Columns
When you import data from other sources, you may sometimes wind up with cells where the number
values are formatted as text. You typically recognize this problem because no matter what you do,
you can’t format the numbers in these cells to numeric, currency, or percentage formats. You may
also see a smart tag on the cells (see Figure 5-1) that tells you the cell is formatted as text.

Figure 5-1: Imported numbers are sometimes formatted as text.
It’s easy enough to fix this manually by clicking on the Text to Columns command on the Data tab (Figure
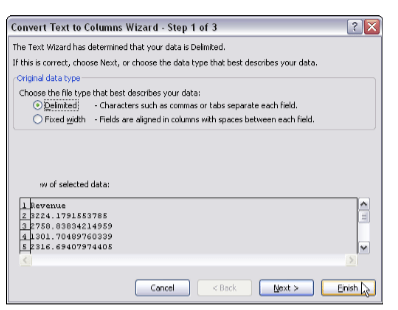
5-2). This opens the Text to Columns dialog box shown in Figure 5-3. There is no need to go through all the
steps in this Wizard; simply click the Finish button to apply the fix.
 Figure 5-2: Click on the Text to Columns command.

Figure 5-3: Clicking finish on the Text to Columns dialog box corrects incorrectly formatted numbers.
Again, this is a fairly simple action. The problem, however, is that Excel doesn’t let you perform the
Text to Columns fix on multiple columns. You have to apply this fix one column at a time. This can be
a real nuisance if you’ve got this issue in many columns.
Here is where a simple macro can help you save your sanity.
How it works
In this macro, we use two Range object variables to go through our target range, leveraging the
For Each statement to activate each cell in the target range. Every time a cell is activated, we simply
reset the value of the cell. This in effect does the same thing as the Text to Columns command.
Sub Macro47()
‘Step 1: Declare your variables
Dim MyRange As Range
Dim MyCell As Range
‘Step 2: Save the Workbook before changing cells?
Select Case MsgBox(“Can’t Undo this action. ” & _
“Save Workbook First?”, vbYesNoCancel)
Case Is = vbYes
ThisWorkbook.Save
Case Is = vbCancel
Exit Sub
End Select
‘Step 3: Define the target Range.
Set MyRange = Selection
‘Step 4: Start looping through the range.
For Each MyCell In MyRange
‘Step 5: Reset the cell value.
If Not IsEmpty(MyCell) Then
MyCell.Value = MyCell.Value
End If
‘Step 6: Get the next cell in the range
Next MyCell
End Sub
1. Step 1 declares two Range object variables, one called MyRange to hold the entire target
range, and the other called MyCell to hold each cell in the range as the macro enumerates
through them one by one.
2. When you run a macro, it destroys the undo stack. This means you can’t undo the changes a
macro makes. Because the macro is actually changing data, we need to give ourselves the
option of saving the workbook before running the macro. This is what Step 2 does. Here, we
call up a message box that asks if we want to save the workbook first. It gives us three
choices: Yes, No, and Cancel. Clicking Yes saves the workbook and continues with the macro.
Clicking Cancel exits the procedure without running the macro. Clicking No runs the macro
without saving the workbook.
3. Step 3 fills the MyRange variable with the target range. In this example, we are using the
selected range — the range that was selected on the spreadsheet. You can easily set the
MyRange variable to a specific range such as Range(“A1:Z100”). Also, if your target
range is a named range, you can simply enter its name: Range(“MyNamedRange”).
4. Step 4 starts looping through each cell in the target range, activating each cell as we go
through.
5. After a cell is activated, the macro uses the IsEmpty function to make sure the cell is not
empty. We do this to save a little on performance by skipping the cell if there is nothing in it.
We then simply reset the cell to its own value. This removes any formatting mismatch.
6. Step 6 loops back to get the next cell. After all cells in the target range are activated, the
macro ends.
How to use it
To implement this macro, you can copy and paste it into a standard module:
1. Activate the Visual Basic Editor by pressing ALT+F11 on your keyboard.
2. Right-click the project/workbook name in the Project window.
3. Choose Insert➜Module.
4. Type or paste the code.


