Macro 39: Select and Format All Formulas in a Workbook
When auditing an Excel workbook, it’s paramount to have a firm grasp of all the formulas in each
sheet. This means finding all the formulas, which can be an arduous task if done manually. However,
Excel provides us with a slick way of finding and tagging all the formulas on a worksheet. The macro
in this section exploits this functionality to dynamically find all cells that contain formulas.
How it works
Excel has a set of predefined “special cells” that you can select by using the Go To Special dialog box.
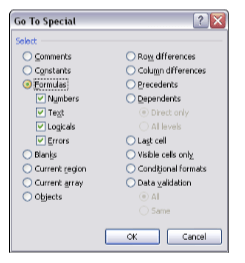
To select special cells manually, go to the Home tab on the Ribbon and select Go To Special. This
brings up the Go To Special dialog box shown in Figure 4-4. Here, you can select a set of cells based
on a few defining attributes. One of those defining attributes is formulas. Selecting the Formulas
option effectively selects all cells that contain formulas.

Figure 4-4: The Go To Special dialog box.
This macro programmatically does the same thing for the entire workbook at the same time. Here,
we are using the SpecialCells method of the Cells collection. The SpecialCells method
requires type parameter that represents the type of special cell. In this case, we are using xlCell-
TypeFormulas.
In short, we are referring to a special range that consists only of cells that contain formulas. We refer
to this special range using the With…End With statement. This statement tells Excel that any
action you perform applies only to the range to which you’ve pointed. Here, we are coloring the inte-
rior of the cells in the chosen range.
Sub Macro39()
‘Step 1: Declare your Variables
Dim ws As Worksheet
‘Step 2: Avoid Error if no formulas are found
On Error Resume Next
‘Step 3: Start looping through worksheets
For Each ws In ActiveWorkbook.Worksheets
‘Step 4: Select cells and highlight them
With ws.Cells.SpecialCells(xlCellTypeFormulas)
.Interior.ColorIndex = 36
End With
‘Step 5: Get next worksheet
Next ws
End Sub
1. Step 1 declares an object called ws. This creates a memory container for each worksheet the
macro loops through.
2. If the spreadsheet contains no formulas, Excel throws an error. To avoid the error, we tell
Excel to continue with the macro if an error is triggered.
3. Step 3 begins the looping, telling Excel to evaluate all worksheets in the active workbook.
4. In this Step, the macro selects all cells containing formulas, and then formats them.
5. In Step 5, we loop back to get the next sheet. After all of the sheets are evaluated, the macro
ends.
How to use it
The best place to store this macro is in your Personal Macro Workbook. This way, the macro is always
available. The Personal Macro Workbook is loaded whenever you start Excel. In the VBE Project win-
dow, it’s named personal.xlb.
1. Activate the Visual Basic Editor by pressing ALT+F11.
2. Right-click personal.xlb in the Project window.
3. Choose Insert➜Module.
4. Type or paste the code.
If you don’t see personal.xlb in your project window, it doesn’t exist yet. You’ll have to record a
macro, using Personal Macro Workbook as the destination.
To record the macro in your Personal Macro Workbook, select the Personal Macro Workbook option
in the Record Macro dialog box before you start recording. This option is in the Store Macro In
drop-down list. Simply record a couple of cell clicks and then stop recording. You can discard the
recorded macro and replace it with this one.


