
Managing a data gateway
Once the gateways have been installed and configured, standard mode gateways can be managed via the Power BI service. To manage a standard mode gateway, do the following:
- Log into the Power BI service.
-
Click the gear icon at the top right and choose Manage gateways, as shown in the following screenshot. Depending on your screen resolution and level of zoom, you may need to click on the ellipses (…) to the right of the Search box, then Settings, and then Manage gateways:
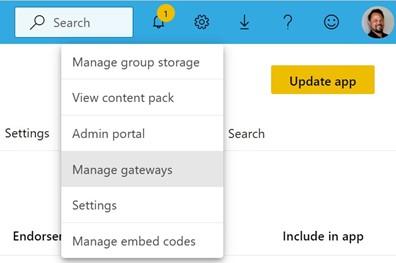
Figure 11.16 – Accessing the Manage gateways link
Now, let’s look at the gateway cluster settings and administrators.
Gateway cluster settings and administrators
After selecting the Manage gateways link from the gear icon in the Power BI service, the
Gateway Cluster Settings page will be displayed, as shown in the following screenshot:
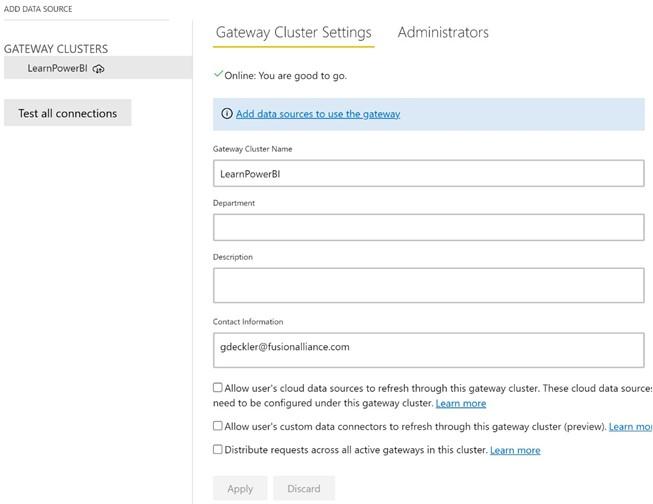
Figure 11.17 – The Gateway Cluster Settings page
The left-hand side of this page lists any gateway clusters that have been installed in standard mode that the user has administrator access to. These gateway clusters are listed under GATEWAY CLUSTERS. Note that only gateways that were installed in standard mode are listed on this page. Gateways that were installed in personal mode are not listed. Second, it may seem strange that even if only a single gateway is installed that the gateway appears under GATEWAY CLUSTERS. However, the installation of even a single gateway creates a gateway cluster, with that single gateway then added to the cluster. Additional gateways can be added to the cluster for redundancy and load balancing purposes. You simply need to install a gateway on another computer and select the Add to an existing gateway cluster option during installation. The Power BI service handles all the aspects of the gateway cluster, including failover between gateways and load balancing.
The first four settings that are listed under Gateway Cluster Settings are primarily informational. These include Gateway Cluster Name, Department, Description, and Contact information. However, it is important to understand the three checkboxes after these four informational fields, which are as follows:
- The first checkbox is Allow user’s cloud data sources to refresh through this gateway cluster. These cloud data sources do not need to be configured under this gateway cluster. This setting is used when you wish to have a single Power Query that merges or appends both cloud and on-premises data sources. It is a good idea to enable this setting since, if this setting is not enabled, any queries that merge with both cloud and on-premises data sources within a single query will fail to refresh.
- The second checkbox is Allow user’s custom data connectors to refresh through this gateway cluster. This setting allows custom data connectors to be refreshed through this gateway. Note that the custom data connector must be installed in the gateway’s custom data connector’s folder, as specified on the Connectors page of the gateway configuration application. You should only enable this checkbox if you’re using custom data connectors.
-
The last checkbox is Distribute requests across all gateways in this cluster. Installing a gateway creates a single gateway cluster. If additional gateways are installed within that single cluster, the load balancing across gateways within the cluster is random by default. Checking this box forces refresh requests to be distributed evenly across all of the gateways in the cluster. Only enable this
checkbox if you’re using multiple gateways in a single cluster and you wish for the load balancing to not be random.
The Administrators tab allows you to designate other administrators for the gateway besides yourself. Simply enter an email address of someone within your Power BI tenant and click the Add button, as shown in the following screenshot:
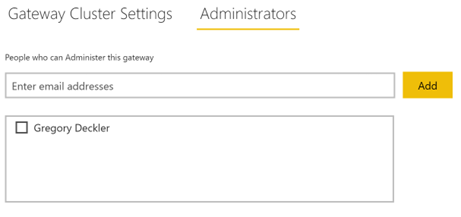
Figure 11.18 – Administrators page
Gateway administrators can also be removed by checking the box next to their name and then clicking the Remove button.
Removing a gateway and adding data sources
Even if you uninstall a gateway from a computer or turn off the computer that a gateway is installed on, the gateway cluster remains registered in the Power BI service. To remove the gateway cluster, do the following:
- Hover over the gateway’s name.
- Click the ellipsis (…) that appears to the right of the gateway name. Note that this ellipsis is quite easy to miss at first glance. This ellipsis menu provides you the REMOVE option for the gateway cluster, as shown in the following screenshot:
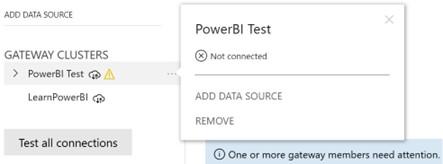
Figure 11.19 – Gateway ellipsis menu
- In addition to being able to remove the gateway cluster, the ellipsis menu also provides you with the ADD DATA SOURCE option. Choosing this option creates a new data source beneath the gateway cluster and brings the user to the Data Source Settings page, as shown in the following screenshot:
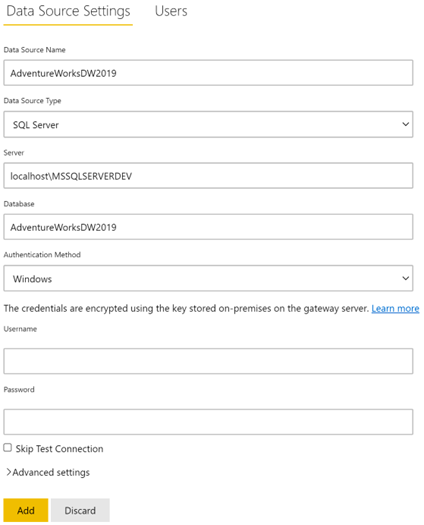
Figure 11.20 – Manually adding a data source
This page varies, depending on the Data Source Type parameter that’s selected. However, in general, this page allows the gateway administrator to manually define a data source that can be refreshed using the gateway, as well as Users that are allowed to use that data source connection to refresh their data. The settings here mimic the information that must be entered when you’re creating a query on the desktop. However, as we will see in the next section, there is a far easier way to create data sources for a gateway.
Refreshing datasets
Now that a gateway has been installed and configured, it is time to enable our dataset so that it can automatically refresh. This means that if we add or replace the data to/in our file or database, the Power BI service can automatically refresh that data within the published dataset so that the associated dashboards and reports are kept up to date.
Scheduling a refresh
To schedule a refresh for a dataset, do the following:
- Log into the Power BI service.
- Navigate to your workspace using the Navigation pane.
- Under the Datasets heading, hover over your dataset and then click the three vertical dots to see a fly-out menu, similar to the one shown in the following screenshot:
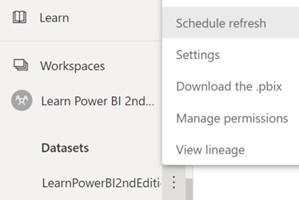
Figure 11.21 – Accessing the Schedule refresh option for a dataset
- Choose Schedule refresh from the menu to display the dataset’s settings page, as shown in the following screenshot:
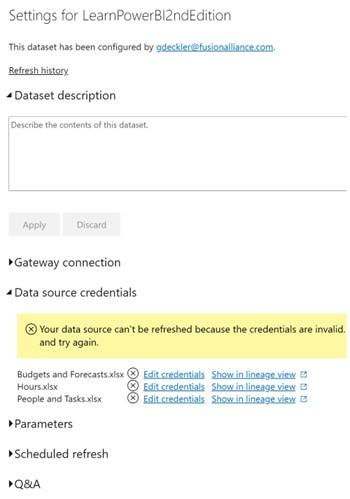
Figure 11.22 – The dataset’s settings page
- Expand the Gateway connection section, as shown here:
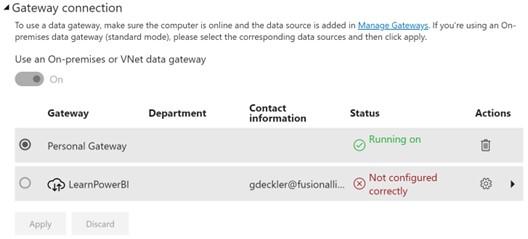
Figure 11.23 – Gateway connection section
Note that any installed Personal Gateway, as well as any standard mode gateways that you have access to, appear under this section. As shown in the preceding screenshot, the personal mode gateway displays green text and indicates that the gateway is running. However, the standard mode gateway displays red text and indicates that the gateway is Not configured correctly. This is because the data sources that are used by the dataset haven’t been added to the gateway. This is an important distinction between the different modes of the gateway. Gateways that are installed in personal mode do not require data sources to be added to the gateway and managed, but gateways that are installed in standard mode require additional steps to be used. If you’re using Personal Gateway, skip to Step 12; otherwise, continue with Step 6.
- Standard mode only: To add the data sources to our standard mode data gateway, click the right arrow icon beneath Actions. This displays a list of Data sources included in this dataset, as shown in the following screenshot:
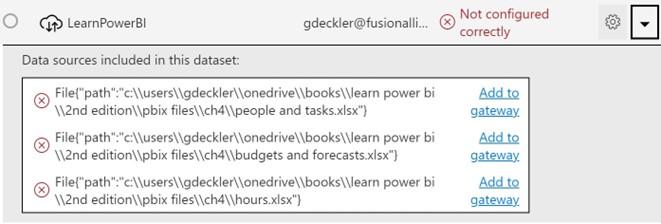
Figure 11.24 – Data sources included in this dataset
- Standard mode only: To add data sources to the data gateway, simply click the Add to gateway link next to the data source. This will transport you to the Data Source Settings page for the gateway, as shown in the following screenshot:
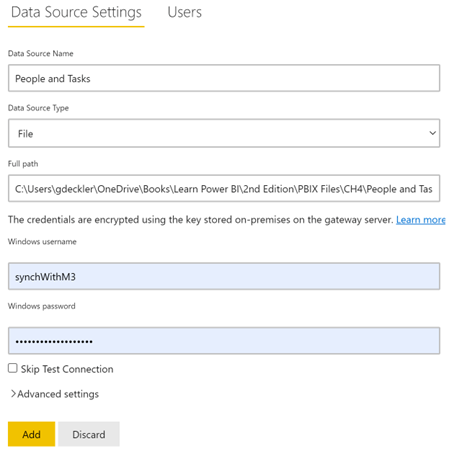
Figure 11.25 – Adding a data source to the gateway
Again, this page will vary, depending on the type of data source, but by default, Data Source Type and some other information will already be filled in on the page. Complete any other required information; in this case, provide a more descriptive Data Source Name than the default value of New data source, as well as your Windows username and Windows password. When you’re finished, click the
Add button.
-
Standard mode only: After clicking the Add button, if the data source has been set up and tested successfully, you will be transported back to the dataset’s settings
page. Expand the Gateway connection section and click the right arrow icon in the
Actions area for the standard mode gateway, as shown in the following screenshot:
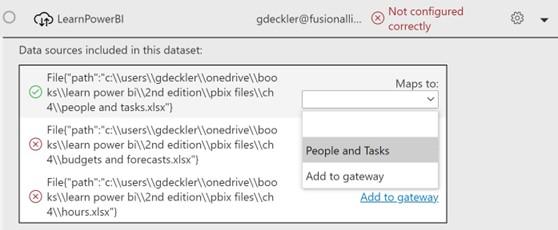
Figure 11.26 – Mapping a data source
-
Standard mode only: This time, you should have a green checkmark instead of a red x next to your first data source. In addition, instead of an Add to gateway link, there should be a Maps to drop-down box. Click this drop-down box and
note that the name of your newly created gateway data source definition appears, which, in this case, is People and Tasks. This is why it is important to provide good, descriptive names when defining data sources for a gateway!
- Standard mode only: Repeat Step 5 and Step 7 for the two additional data sources. When you are fi shed, your standard mode gateway should show green text and a status of Running on. In addition, your data sources should display green checkmarks and have Maps to drop-down boxes, as shown in the following screenshot:
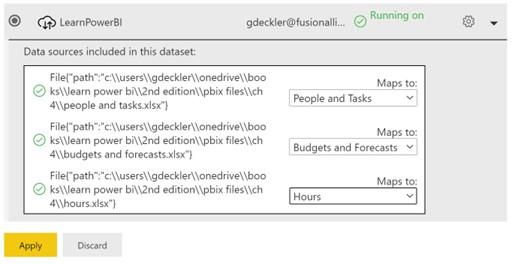
Figure 11.27 – Successfully added and mapped data sources
- Standard mode only: Map each of the data sources to their corresponding gateway data source definitions using the Maps to drop-down menu and click the Apply button. Note that, in the Data source credentials section, the yellow warning banner goes away and that you are no longer required to enter your credentials. This is because the credentials have been defined as part of the gateway data source definition. Skip to Step 13.
-
Personal mode only: If you’re using a gateway in personal mode, you must enter the authentication credentials that will be used to access the data in the Data source credentials section. Any data source that has an X icon next to the Edit credentials link must have credentials entered for it. To do this, click the Edit credentials link next to a data source and sign in. Repeat this for each data source. Note that the X icon disappears once the data source has been correctly
confi ed. Once all of the data sources have been correctly confi ed, the yellow warning banner will disappear:
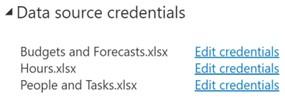
Figure 11.28 – Correctly configured credentials for a personal mode gateway
- Now that the appropriate gateway and credentials have been confi ed, it is time to confi e the refresh schedule. Expand the Scheduled refresh section, as shown here:
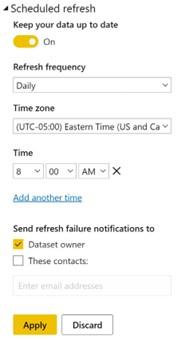
Figure 11.29 – Scheduled refresh
- Toggle Keep your data up to date to On. You can set Refresh frequency to either Daily or Weekly, as well as set your Time zone. Click Add another time under the Time area.
- Use the drop-down boxes to set the desired Time for the refresh. If you’re using a Weekly refresh schedule, you can also select the days of the week when refreshes will occur. Multiple times can be added to keep a dataset refreshed by clicking the Add another time link. Up to eight scheduled refreshes can be configured per day with Power BI Pro and up to 48 refreshes per day with Power BI Premium or Premium Per User.
- Once you’ve finished adding the specified refresh times, you can add an email address that notifications will be sent to if there is a problem with the data refresh. Then, you can click the Apply button.
With that, you have finished learning about the basics of how to keep your data refreshed!
Summary
This chapter was all about how to configure Power BI to keep datasets that are published to the Power BI service up to date automatically. We learned how to download, install, and configure the on-premises data gateway in both standard (enterprise) and personal modes. We also learned how to manage gateways within the Power BI service, as well
as configure data sources for use in gateways. Finally, we learned how to schedule the datasets for automatic refresh by the Power BI service.
You have now learned all of the basic skills that you will need when working with Power BI, which has opened the door to an entirely new and exciting world. In the next chapter, we dive deeper into the world of deploying, governing, and adopting Power BI.
Questions
As an activity, try to answer the following questions on your own:
- What is the purpose of the on-premises data gateway?
- In what two modes can the data gateway be installed?
- What must you do to ensure that the data gateway starts after rebooting the computer that the gateway is installed on?
- What feature allows for redundancy and load balancing when you’re refreshing data?
- What two methods can be used to add a data source to a data gateway?
- How many times can a dataset be refreshed per day?
Further reading
You can check out the following links for additional information regarding this chapter’s topics:
- Installing an on-premises data gateway: https://docs.microsoft.com/ en-us/data-integration/gateway/service-gateway-install
- What is an on-premises data gateway?: https://docs.microsoft.com/ en-us/power-bi/service-gateway-onprem
- On-premises data gateway in-depth: https://docs.microsoft.com/en-us/ power-bi/service-gateway-onprem-indepth
-
On-premises data gateway architecture: https://docs.microsoft.com/ en-us/data-integration/gateway/service-gateway-onprem-
indepth
- Using personal gateways in Power BI: https://docs.microsoft.com/ en-us/power-bi/service-gateway-personal-mode
- Troubleshooting gateways – Power BI: https://docs.microsoft.com/ en-us/power-bi/service-gateway-onprem-tshoot
- Getting started with data connectors: https://github.com/Microsoft/ DataConnectors
- Data refresh in Power BI: https://docs.microsoft.com/en-us/ power-bi/refresh-data
- Configuring a scheduled refresh: https://docs.microsoft.com/en-us/ power-bi/refresh-scheduled-refresh
