
Creating and using apps
Apps are a method of bundling multiple dashboards and reports into a single object that is then published and shared within the organization. Hence, instead of sharing individual dashboards and reports or granting permissions to an entire workspace, apps allow the author to choose exactly what content to bundle and share, providing an effective means of organizing shared content and controlling access.
Creating an app
Before we create an actual app, let’s add some content to our workspace so that we can understand how workspace objects can be included and excluded from our app. We will create an additional dashboard and report within our workspace by simply duplicating our existing dashboard and report.
To create a copy of the existing dashboard, follow these steps:
-
Navigate to the existing dashboard by expanding the workspace in the Navigation
pane and clicking on the dashboard that appears under the Dashboards heading.
- From the File menu, click Save a copy.
-
Leave the dashboard name, Learn Power BI 2nd Edition (copy), as is and click the
Duplicate button.
- Note that the new dashboard appears under the Dashboards heading in the Navigation pane and is selected. A small colored bar appears to the immediate left of the dashboard name, indicating which dashboard is being displayed.
- From the Edit menu, choose Dashboard theme, change the theme to Dark, and click the Save button.
- From the Edit menu, choose Dashboard theme, change the theme to Dark, and click the Save button.
Now that we have a copy of the dashboard and can distinguish between the two versions, we can create a copy of the existing report. Follow these steps:
- Navigate to the existing report by expanding the Navigation pane and clicking on the report that appears under the Reports heading.
- From the File menu in the ribbon, choose Save a copy.
- For the name of the report, enter Copy of report and click the Save button.
-
Note that the new report appears under the Reports heading in the Navigation pane. A small colored bar appears to the immediate left of the dashboard name, indicating which dashboard is being displayed.
- Click Edit in the ribbon to edit the report.
- Click on one of the visuals to select it and then press the Del key on your keyboard to delete the visual.
- Click on the File menu in the ribbon and choose Save.
Now that we have additional content, we can create an app by following these steps:
- Click on the workspace name under Workspaces in the Navigation pane to display the workspace interface, which defaults to listing all of the content within the workspace, as shown in the following screenshot:
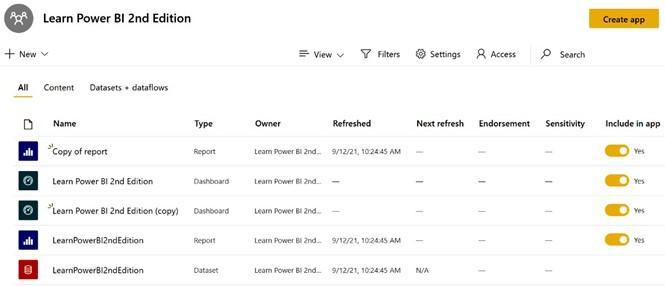
Figure 10.9 – Workspace interface
- For the copy of the dashboard, click the Included in app slider to turn it off. Content that has this setting turned off will not be published in the app we create.
- For Copy of report, click the Included in app slider to turn it off.
- Click the Create app button to display the app’s publishing interface, as shown in the following screenshot:

Figure 10.10 – App publishing interface: the Setup tab
- The app publishing interface consists of three tabs: Setup, Navigation, and Permissions. The Setup tab is displayed initially. You must fill in the App name and Description fields and can optionally include a Support site website URL, change the default App logo option provided by uploading an image, and change the App theme color option.
- Click on the Navigation tab. This tab is shown in the following screenshot:
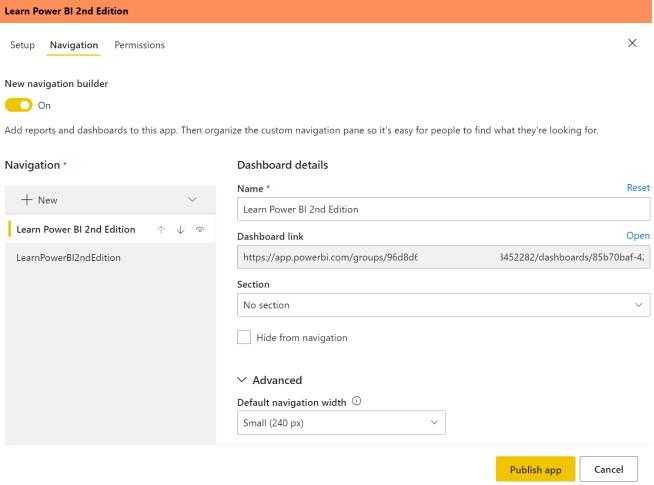
Figure 10.11 – App publishing interface: the Navigation tab
-
By default, the New navigation builder experience is turned On. This new experience allows for the creation of navigation sections for the app, which you can do by clicking on the New menu. Navigation sections are simply groups of links.
A link is any web URL. In addition, this interface allows the author to rename navigation elements and adjust which section links appear in. Finally, the author can also adjust the Default navigation width value. Note that only the content we specified is included in the app.
- Click on the Permissions tab. This tab is shown in the following screenshot:
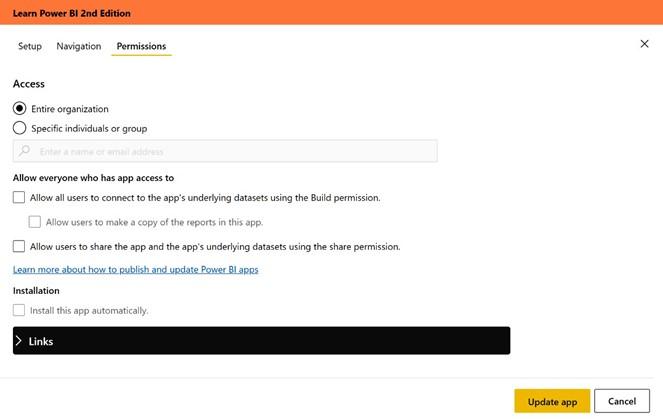
Figure 10.12 – App publishing interface: the Permissions tab
-
Click on the radio button next to Entire organization to share the app with the whole organization. The Permissions tab also allows sharing with groups,
distribution lists, internal users, and external users, although your organization may disable sharing with external users.
- Click on the Publish app button to publish the app.
- The app publishing dialog is displayed, as shown in the following screenshot:

Figure 10.13 – App publishing dialog
-
Click the Publish button.
When successfully published, the Successfully published dialog is displayed, as shown in the following screenshot. You can either copy the link to the app and email the link to users or direct authorized users to get the app by using the Apps link in the Navigation pane:
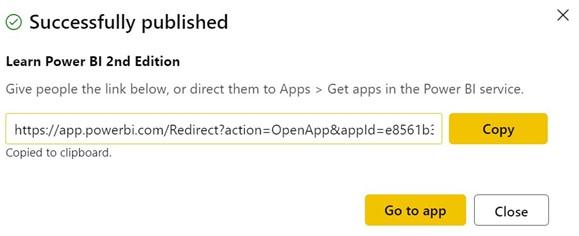
Figure 10.14 – Successfully published dialog
- Finally, click on the Close button.
Now that we have created and published an app, let’s explore how to deploy and use the app.
Getting and using apps
Once an app has been published, the app can be accessed directly through the link that’s provided when publishing the app. Alternatively, you can follow these steps:
- Click on Apps in the Navigation pane. The Apps dialog is displayed on the canvas, listing any existing apps you have installed.
312 Understanding Dashboards, Apps, Goals, and Security
-
Click the Get apps button that appears in the upper-right corner of the canvas. The
Power BI apps dialog is displayed, as shown in the following screenshot:
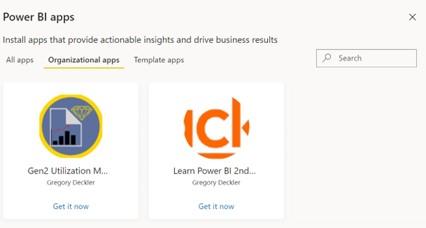
Figure 10.15 – Power BI apps dialog
- Note that apps are a unified concept across Power BI, Dynamics 365, Office 365, and other Microsoft products. Hence, many other types of apps can be accessed besides those that are published by your organization.
-
Ensure that the Organizational apps tab is selected and click the Get it now link for the desired app. The app is displayed in the browser, as shown in the following screenshot:
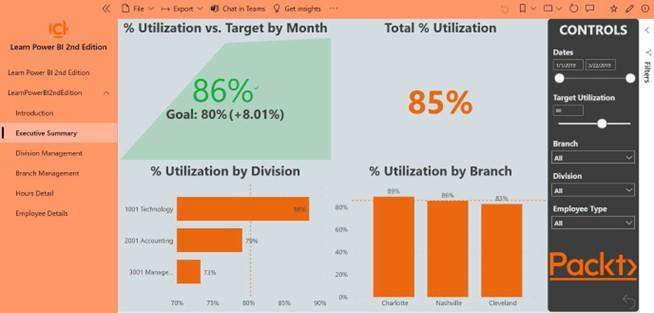
Figure 10.16 – The app
This app functions like an independent application with much of the functionality of the Power BI service, including Comments, Subscribe, Bookmarks, and other functionalities.
We are now done exploring apps in the service. Let’s move on to looking at goals and scorecards.
