
Working with views, filtering, and printing
Here, you will become confident in using built-in search folders, and search and filter facilities. In addition, you will learn to print attachments, calendars, multiple messages, contact records, tasks, and notes.
Changing the view type
A few main built-in views are located within the View tab that can be managed or saved as a new view in order to customize the layout of your Outlook application. As a default, you may see IMAP Message, Hide Messages, Group Messages, and Preview. Here’s how you can change the view type:
- To change the current view, click on the View tab and select Change View, as illustrated in the following screenshot:
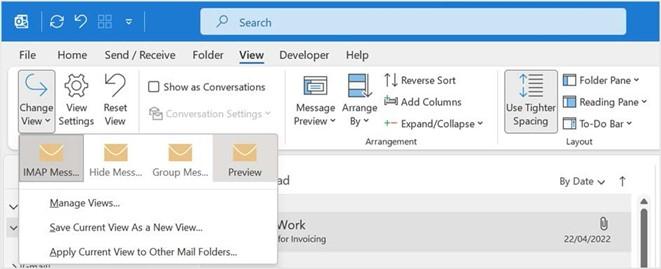
Figure 13.24 – Change View option in Outlook
-
From the drop-down list, select a view to see the change on the screen. Each view has a certain arrangement of fields that can be modified using the Manage Views… icon. Explore this option to find the view that works best for you. The View Settings icon will drive the views you see listed in the Change View area, as you are able
to customize what you see as columns, filters, and sorts in your mail view. Use Other Settings…, for example, to customize the column and row font size of email messages, or the message preview font too.
Using the Focused Inbox option
If you are using an Exchange Server mailbox or an email that flows through a Microsoft account, you will see the additional Focused Inbox option in Outlook. This allows you to view the most important emails in a separate view. The Inbox is separated into two tabs, one for Focused items and one for Other items, as illustrated in the following screenshot:
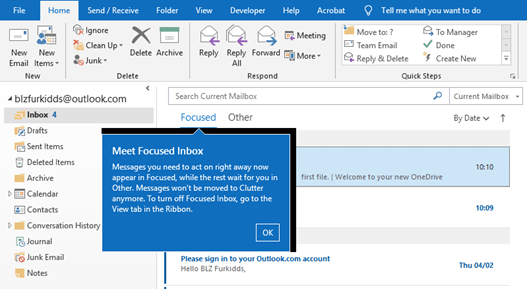
Figure 13.25 – Focused Inbox
Show Focused Inbox is set as the default, but you can toggle the Show Focused Inbox
icon off and on to suit your requirements.
To move important messages into Focused Inbox, simply right-click on the message you would like to move from the Other folder, then choose the Move to Focused option, as illustrated in the following screenshot:
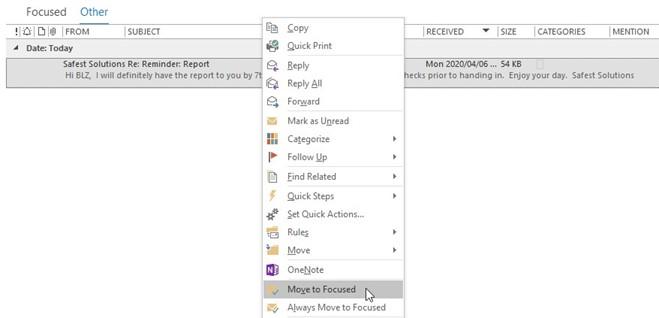
Figure 13.26 – Moving items to Focused Inbox
- The message is moved to Focused Inbox.
Using the Reminders Window
The Reminders Window opens (pops up on screen) while you are working to remind yourself of important meetings and/or tasks you need to attend to. The Reminders Window can be manually opened by visiting the View tab and clicking on the Reminders Window, located under the Window group. These reminders are set on an item when creating a reminder flag for an item by right-clicking on an item. The Reminders Window button is located to the right of the View tab ribbon.
Once the Reminders Window pops up on your screen, you can open an item to view its content, snooze the item for a further selected time period, or dismiss the reminder, as illustrated in the following screenshot:
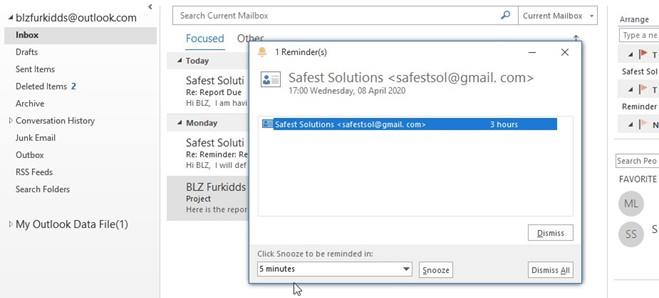
Figure 13.27 – Reminders Window

We will now look at ways to locate and filter for Outlook content in the next section.
Applying search and filter tools
To quickly find items in Outlook, you can use the Instant Search facility, which is a built-in search. This facility is available at the top of the Outlook environment along the
Title Bar. We can search our current mailbox, current folder, subfolders, or on every one of our Outlook items. Here’s how to do this:
- Click on a folder in the Navigation Pane in which to search—for instance, Mail, Calendar, Tasks, or People. In the Instant Search text area, enter the information you are looking for. Notice that there is a drop-down list to the right offering customization of search criteria. To the left of the Instant Search text area, there is a further dropdown where you can specify items to search. The Instant Search textbox can be seen in the following screenshot:
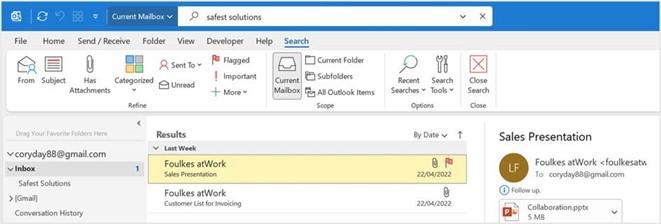
Figure 13.28 – Instant Search for “safest solutions” in Current Mailbox
- Once you have entered the search term—for example, safest solutions, as per the previous screenshot—press Enter to start your search.
-
The search results are highlighted in yellow in the Message pane. Notice that the ribbon has changed to reflect options to refine the search. The Search tab is now visible on the ribbon. Experiment with these options.
- The Recent Searches icon along the ribbon allows you to reuse a previous search. The Search Tools icon must also not be ignored as you will be able, for instance, to have located items displayed in a color other than yellow. Note that you will need to restart Outlook if you change these options for them to take effect. The Recent Searches icon can be seen in the following screenshot:

Figure 13.29 – Recent Searches, Search Tools, and the Close Search button
-
To clear a search, click on the X sign located on the right side of the Instant Search
box or click on Close Search at the right of the ribbon.
Printing Outlook items
You can print Outlook items such as attachments, calendars, tasks, contacts, or notes. The procedure for each option is very similar to choosing the Print facility within the relevant icon on the Backstage view. When working through this topic, please keep in mind that we only print when it is absolutely necessary to do so. Most work environments today are practicing paperless offices, so this feature is available, but it’s not something we would not normally do.
Printing attachments
To print an attachment, proceed as follows:
- Open the email containing the attachment, then click on the drop-down arrow to the right of the attachment. In the case of this example, we have an Excel document as an attachment. Notice the Attachments tab at the top of the window is now evident with a host of options.
- Choose Quick Print from the shortcut menu, after which you will receive a trust notifi ation warning, highlighting the importance of opening only trustworthy attachments. Click on OK to print the document to the default printer. If you prefer to save the attachment fi st to the computer and then print using the relevant application options, choose Save As from the drop-down list instead, or upload the file to an online storage facility such as OneDrive, as illustrated in the following screenshot:
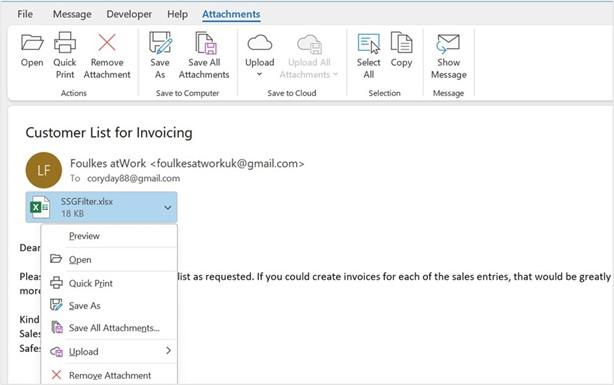
Figure 13.30 – Attachments tab and the right-click menu options
-
Please note that this option will use the current default printer as well as the default options, and will send the attachment straight to the printer without previewing the document or allowing you to set printing preferences.
Printing calendars
To print calendars, proceed as follows:
- Click on the Calendar icon located at the bottom of the Navigation Pane. Click on the File tab to access the Backstage view.
- Choose the Print icon from the menu. From the Backstage view, select a style for the Calendar printout.
- To access more options, click on the Print Options button, where you can customize the Print style to edit a particular print style if you would like to customize it and keep the changes for the next time the calendar is printed using the same style.
Printing tasks, notes, and contacts
Click on the relevant task, note, or contact icon on the Navigation Pane to open the item. Select items using the Ctrl + click method. Click on File | Print from the menu. In
Preview, select multiple pages so that you can see all tasks in the Preview pane. Set Print Options, and print as usual.
You will discover more about each one of the preceding items in the chapters that follow.
