
Modifying meeting requests and manipulating
the calendar pane
Now, you will learn how to set up a meeting request and look at the meeting response options. After sending out a meeting request, you can change the options to update or cancel a meeting, allowing recipients to propose a new time for the meeting. Next, we will look at how to view the tracking status and edit a meeting series. Additionally, this section will equip you with the skills to arrange your calendar views, change the calendar formats, display or hide calendars, and create a calendar group.
Setting the response options
Before sending a meeting request, you can set the response options. If you would like the recipient to be prompted to accept, reject, or tentatively accept the meeting request, then you need to check whether those options have been selected. Also, you can request a new time slot if the meeting time does not suit you. By default, both of these options should be activated in the Outlook program:
- Open your calendar and then select New Meeting from the New group. Once you have filled out the meeting details, you can set the response options:
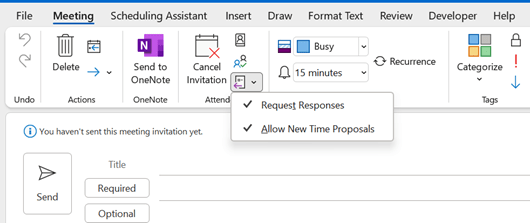
Figure 15.14 – The meeting response options
- From the Attendees group, select Response Options. You can choose Request Responses and/or Allow New Time Proposals. Both of these options are turned on by default.
Updating a meeting request
To update a meeting request, double-click on the appointment in your calendar. Once the appointment is open, change the details to update them. Once you are done, you need to click on the Send Update icon to resend the meeting to all of the recipients so that their calendars adjust accordingly.
Canceling a meeting or invitation
- Open the meeting that you need to cancel from your calendar.
- Click on the Cancel Meeting icon under the Meeting tab. Don’t forget to click on Cancel Meeting. Then, click on the Send Cancellation button to send an update to the recipients:
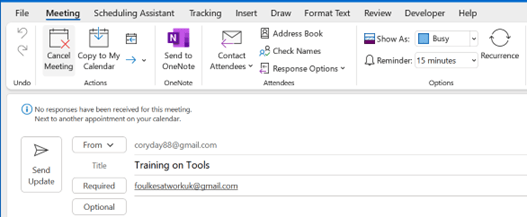
Figure 15.15 – Canceling a meeting and notifying the recipients
Next, let’s learn how to suggest another time slot for a meeting.
Proposing a new time for a meeting
If you are unable to make the time of a meeting request, a new time can be proposed and sent to the sender:
- Open the meeting request from your inbox.
- Click on the Propose New Time icon on the Meeting tab or from the Respond area of the meeting.
- Choose either Tentative and Propose New Time or Decline and Propose New Time to select a time that you are available:

Figure 15.16 – Proposing a new time for a meeting
-
Once you have selected a new proposed time using the drop-down arrows next to
Meeting start time and Meeting end time, or you have used the AutoPick Next
>> button to find the next available time slot, click on Propose Time to reply to the meeting request:
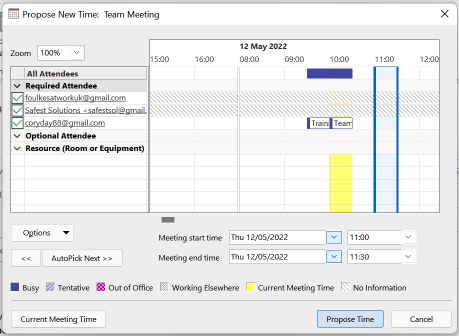
Figure 15.17 – Proposing a new time slot
- Once you have checked the invitation, click on Send to forward the email to participants to propose the new time slot.
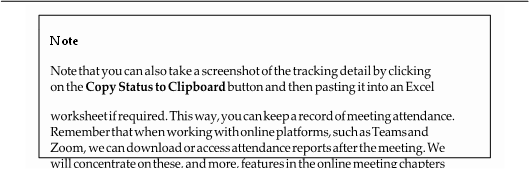
The next section is extremely valuable if you are working with calendar appointments, meetings, and events for the majority of your day. Even though the Teams and Zoom platforms allow you to view an online attendance record, it is good to see, at a glance, who has responded to your meeting request.
Viewing the tracking status of a meeting
If you have sent a meeting request to a number of attendees and would like to see whether they have responded without having to check your email countless times, the Tracking feature is a wonderful tool to use:
- Click on the meeting entry in your calendar.
- Locate the Tracking tab to view the individual responses from recipients of the invite:

Figure 15.18 – The Tracking tab when viewing a meeting
- At the bottom of the window, you will see a summary of who has and who hasn’t responded to your meeting request. Close the pane when you are finished.
Now, let’s learn how to edit a series of meetings in one go.
Editing a meeting series
If you have set a recurring appointment and wish to edit the entire series, simply open the appointment. A dialog box will prompt you to choose whether you would like to edit the series or just the appointment you clicked on:
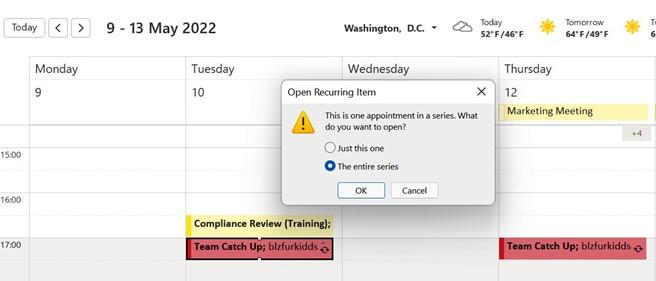
Figure 15.19 – Editing a recurring item in the calendar
Click on The entire series. Then, make the changes to the appointment. Click on Save & Close once you are done to update the series.
In the next section, we will look at how to quickly add participants or contacts to meetings.
Using the @ mention feature
To quickly add contacts to an email or meeting, simply type the @ sign followed by the name of the contact. A drop-down list will appear with matching contacts. Press Tab on the keyboard to automatically populate the contact. The contact is then automatically added as an attendee to the meeting:
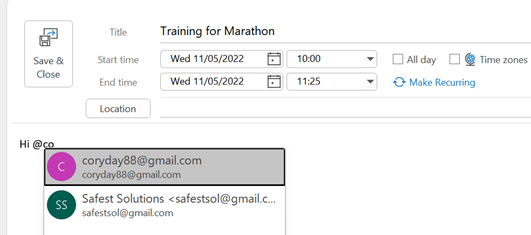
Figure 15.20 – The @ mention feature
In the next section, let’s investigate some calendar settings.
Manipulating the calendar pane
Just like any other view in Outlook, we can manipulate the calendar’s elements, such as the font settings and the color, and arrange the way the calendar entries are displayed. Let’s investigate these options in the following sections.
First, let’s look at how appointments and meetings are scheduled by default.
Setting the default meeting and appointment duration
We can set the default duration for meetings and appointments in Outlook. The default setting is set to 30 minutes. To change this setting so that all appointments and meetings are created with a 1-hour duration, visit the File | Options | Calendar settings in Outlook. Navigate to the Calendar options heading and then change the Default duration for new appointments and meetings setting to 1 hour. Click on the OK button to commit to
this change.
Create a new appointment in the calendar—note that the default duration is now set to 1 hour.
Microsoft 365 also offers the ability to End appointments and meetings early by adjusting the meeting time to allow meeting durations of less than 1 hour, or longer than 1 hour, to end earlier:
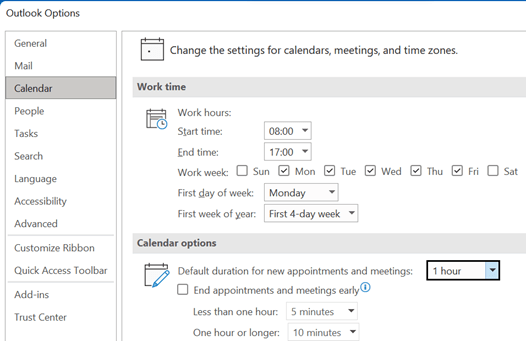
Figure 15.21 – The Outlook calendar options
This is a perfect setting to adjust when booking calendar appointments for conferences, for example, to allow participants to move to the next venue with enough time to make the next meeting.
This option is located just below the Default duration for new appointments and meetings option. Click on the End appointments and meetings early checkbox, then enter the appropriate duration into either the Less than one hour or One hour or longer drop-down list.
Once this setting has been applied, the appointment details for all activities in the calendar will update to the new end time accordingly. Take a look at the following screenshot:
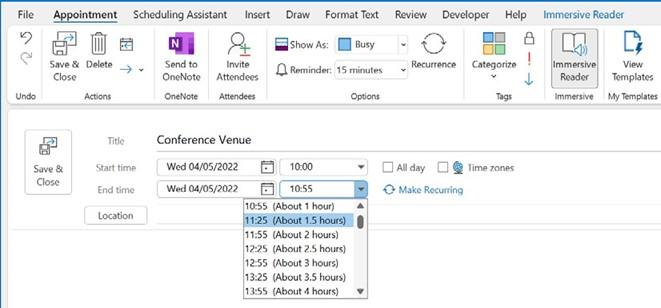
Figure 15.22 – Ending appointments and meetings early
In the next section, we will concentrate on learning about further calendar options.
Arranging the calendar view
The default calendar view in Outlook is set to Month. When you open the calendar from the bottom of the Navigation Pane, you will notice that the View tab is available for the Calendar arrangement. Click on Day, Work Week, Week, Month, or Schedule View to display the calendar in your preferred format.
Schedule View displays the calendar horizontally. You can use Schedule View when viewing multiple calendars, as this view allows more space on the interface window. The calendar arrangement options are also available under the Home tab.
Changing the calendar color
Applying color to the calendar elements is easy; simply use the Color button on the View tab. In addition, Conditional Formatting can be applied for more color-specific calendar changes. Let’s look at both of them:
- Click on the Calendar icon at the bottom of the Navigation Pane to access the calendar.
- From the Color group under the View tab, select the Color icon. A drop-down list of colors will appear. Select a color to apply to your calendar.
- The calendar will update to the chosen color. Additionally, the color of the calendar can be set in the Outlook Options dialog box.
Changing the calendar’s font settings
To change the calendar’s font settings and the other Day, Week, and Month view settings, click on the View Settings icon when viewing the calendar. Choose Other Settings… from the Advanced View Settings: Calendar dialog box that appears on your screen.
From the Format Calendar dialog box, choose Font… to apply changes to the font and size attributes. Note that you can also set Time scale for Day and Week View:
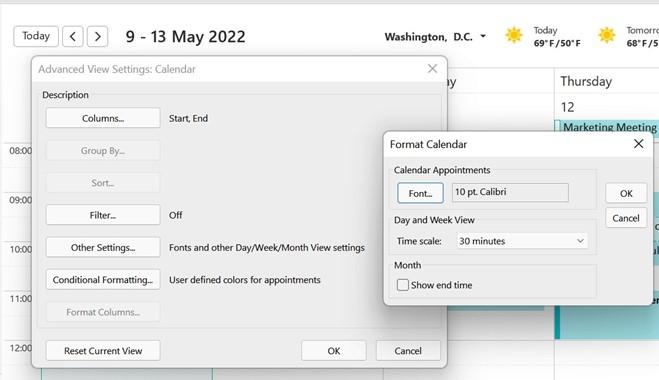
Figure 15.23 – Changing the calendar appointments’ font
In the next section, we will look at how to display and hide calendars.
Displaying or hiding calendars
It is extremely useful to be able to hide or show calendars when working with others from the same or external organizations. If you have access to someone’s calendar, you can show or hide it in your calendar view. You can send an invitation to others so that they can access your calendar in the contacts list within Outlook. This is only possible with an Exchange, Microsoft 365, or Outlook.com account:
- At the bottom of the calendar folder pane, you will notice a number of different calendar headings. The fi st is My Calendars, the second is Other Calendars, and the third is Shared Calendars. In the following screenshot, Calendar – blzfurkidds@ outlook.com is visible because that particular calendar has been selected:
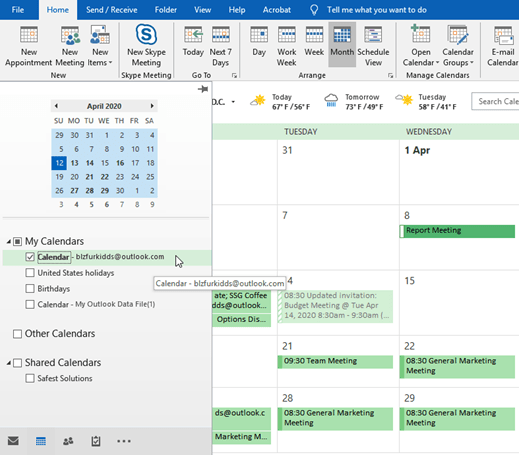
Figure 15.24 – The calendar categories in the Outlook Calendar view
- To view another calendar alongside your personal calendar, click on it from the Shared Calendars folder to view it. You will notice that you also have access to the Safest Solutions calendar, as it is listed under Shared Calendars:

Figure 15.25 – Shared Calendars
- Once you check a calendar to add it (in this example, Safest Solutions), the calendar is shown on the right-hand side of your personal calendar. At times, the calendar might be placed in Overlay mode.
- To hide the selected calendar, click on the x icon at the end of the Calendar tab, right-click on the tab, and choose Hide This Calendar. Alternatively, click on the name of the calendar under Shared Calendars to hide it from view:
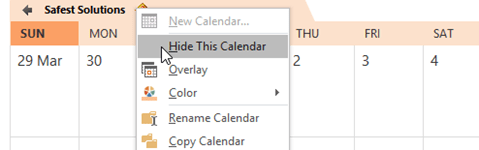
Figure 15.26 – The Hide This Calendar feature
- Calendars can also be set to Overlay. This is very useful when you want to view multiple calendars at the same time in one calendar view. Right-click on the Calendar tab and then choose Overlay.
- If you can’t see a calendar that you need under the Shared Calendars heading on the left-hand side of the calendar view, click on Open Calendar from the top-level ribbon. You can choose to open a calendar using the From Address Book…, Create New Blank Calendar…, From Room List…, From Internet…, or Open Shared Calendar… options:
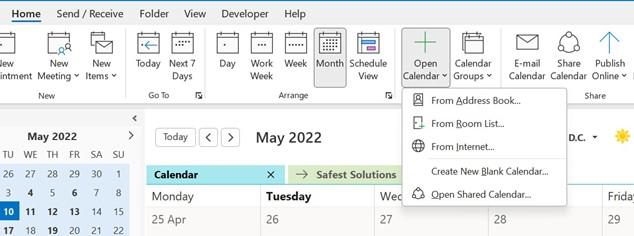
Figure 15.27 – The Open Calendar drop-down list
Note that certain calendars will require permission from the owner to open them.
Creating a calendar group
- Open the calendar view by clicking on the icon at the bottom of the Navigation Pane.
- From the Home tab, locate the Manage Calendars group.
- Click on Calendar Groups. Then, from the drop-down list, click on Create New Calendar Group:
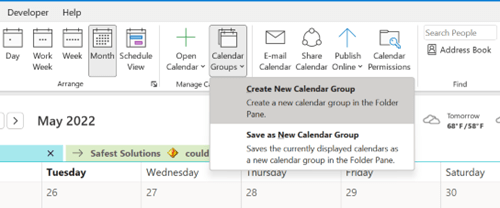
Figure 15.28 – The Create New Calendar Group option
- In the dialog box, type a name for the new calendar into the text area that is provided. For this example, we will create a calendar group called SSG Calendar. When you are done, click on OK:
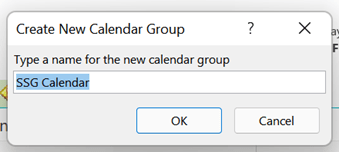
Figure 15.29 – SSG Calendar
- Select Contacts from the address book to view all of the available contacts. Double- click on each contact to add them to the Group Members section at the bottom of the dialog box. Click on OK when done.
- The calendar information will display on your screen. If someone from your group has not shared their calendar, then you will not be able to view it. Click on the Send a sharing request to see more details for this Calendar icon in the bottom-right corner of each of the contacts in the calendar to see more details in the calendar:
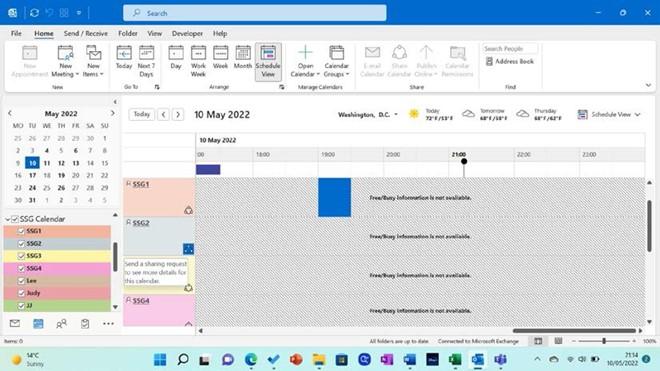
Figure 15.30 – The Send a sharing request button
Each person is displayed in a different color on the calendar, and you can hide or display individual calendars using the group list on the left-hand side under the folder pane.
