Transcribing meetings
In this section, we will take a brief look at the Transcribe feature as it is an important tool when you need to produce a transcript from an existing meeting recording or to create
a new meeting recording between individuals. Once you are done with the meeting, the recording will be transcribed in OneNote and produce an editable recording of the
meeting’s dialog. The editable recording will be readily available so that you can import it back into Microsoft Word.

- Locate Transcribe by clicking on the drop-down arrow next to the Dictation
button once you’ve signed into Microsoft 365:

Table 2.13 – The Transcribe tool in Word 365
- Start a new meeting recording between meeting participants by clicking on the Start Recording button from the Transcribe task pane to the right of the window. Alternatively, use the Upload audio feature to locate a previous meeting recording (either in .mp4, .m4a, .mp3, or .wav format).
-
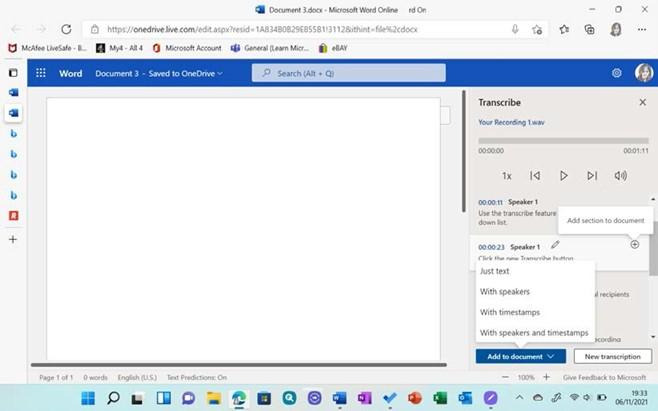
Once you start a recording, you can pause and resume it whenever you want. If you have finished recording the meeting, click the Save and transcribe now button to save the recording to OneDrive, after which the recording will appear at the top of the Transcribe task pane alongside the transcription. You can make amendments to the transcription as well as add the individual speaker transcriptions using the
+ button to the right of each speaker transcription. Alternatively, click the Add to document button for more options to insert the transcription directly into the current Word document:

Figure 2.14 – The Transcribe panel detailing the transcription, individual speaker scripts, and the Add section to document and Add to document options.

Now that you know how to create and upload using the Transcribe tool, let’s have a look at the Editor tool in Word. Note that the Editor tool sometimes takes a while to appear in your Office accounts, so you may not see it straight away in your Outlook or Word environments, especially if you signed up for a new account when purchasing the plan.


