Referencing features using Word 2021
In this section we will go through the steps to add multiple Table of Contents to a Word document.
Working with multiple ToCs
When you’re working with a long document that contains two or more sections, you may want to add a ToC per section. In the previous edition of this book, we learned how to create a ToC using Microsoft Word 2019. To insert a ToC in the previous edition,
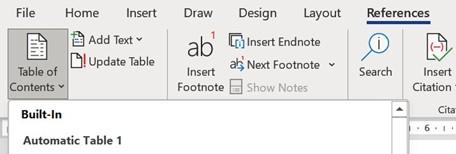
we visited the References tab, then selected the Table of Contents button to access the available options:

Figure 3.6 – Steps to generate a table of contents from the Reference tab in Word 2021
In this section, we will build on this skill.
To add multiple ToCs to a document, follow these steps:
- Open a document that contains multiple sections. We will be using the BestBean Coffee Plan TOC.docx file here. Open this document if you wish to follow along.
-
This document consists of two sections – BestBean Coffee Business Plan and BestBean Coffee Startup Costs. We would like to add a ToC for each of these sections within the same document.
- Before we use this method to add the ToCs to the document, it is important to note that the document headings are formatted using Heading 1 style. Format your headings to the Heading 1 style. You can change the format of the Heading 1 style to suit your font attributes before or after you have applied the style. This was explained in the first edition of this book, Learn Microsoft Office 2019.
- Locate the first section heading (INTRODUCTION) that you wish to add to the first ToC page. Click before the heading.
- Visit the Insert tab, then click the Explore QuickParts button. From the drop-down list, click Field…:
Referencing features using Word 2021 65


Figure 3.7 – Adding the \f switch using the Explore QuickParts button to access the Field… options
- In the dialog box that populates, we will add the \f switch, which will allow us to create multiple ToCs in a single document.
- Click on TC from the Field names: list.
-
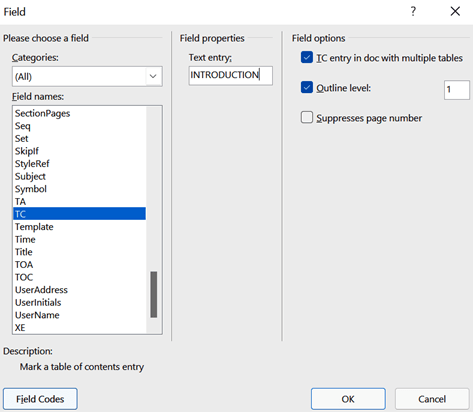
In the Text entry: field, enter the name of the first heading for the first ToC.
Check the Field options checkboxes so that the TC entry in doc with multiple tables option is enabled and Outline level: is set to 1. Selecting 1 here will format the ToC using the TOC1 style:

Figure 3.8 – Field properties for a ToC entry
- Click OK to confirm this.
- To see the ToC’s field code to the left of the INTRODUCTION heading in the document, click on the Show/Hide button on the Home tab.
-
You will see the field code in the document. This code consists of the \f switch, as mentioned previously.
-
We need to amend this code slightly so that we add an identifier to the \f switch. By amending the code, we can identify which ToC we are assigning the relevant headings to.
- Click to the right of the letter f, add a space, and type a. The identifier does not need to be any specific letter; it can be any identifier you wish:

Figure 3.9 – The \f switch code added before the first heading
-
Now, we need to copy the code for this particular \f switch identifier to the other headings in this section. This way, those marked with the same identifier will be pulled through to the same table of contents.
-
Select the ToC code, then copy the code and paste it before the next heading you wish to include in the section’s ToC:

Figure 3.10 – Copying the ToC code
- Repeat this for all the headings you wish to include in the first section’s ToC, changing the name of the heading’s text each time.

Referencing features using Word 2021 67

- Once you have copied the code to all the headings, click where you would like the first section’s ToC to be placed inside the document.
- Click the References tab, then click the Table of Contents button.
- Select Custom Table of Contents… from the list provided.
- Click the Options… button.
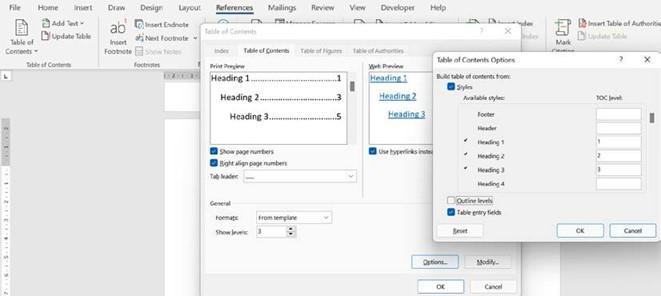
- At the bottom of the Table of Contents Options dialog box, ensure that Table entry fields is selected. Outline levels should be unchecked:

Figure 3.11 – Table of Contents Options detailing the Table entry fields option
- Click OK to confirm this.
- The ToC field code will be inserted into the document, but the table headings won’t be pulled through yet. The code states that No table of contents fields found.
- Press Alt + F9 to update the code.
- The identifier reference needs to be added so that it can pull the correct headings into the ToC. Type a after the \f switch, as shown in the following screenshot:

Figure 13.12 – The \f switch code displaying the addition of the a identifier
-
Press Alt + F9 to update the ToC code. The first section’s ToC will appear. If you make any changes in the document at some point, remember to update the ToC again by right-clicking and selecting Update Field. The shortcut key to update a ToC is F9:

Figure 3.13 – The ToC when changes are made
-
You will need to repeat these steps to populate the second ToC in the second section of the document. Start by copying the code to the separate headings in the second section of the document. Then, remember to add a different \f switch identifier
for the second TOC and change the headings in the code so that they match the relevant headings throughout.
Now that you can generate multiple ToC within a Word document, let’s learn about the new Table of Contents feature for Word for the web.


