Drawing Rectangles
A Rectangle is a four-sided single object. You can create a rectangle by just specifying its two
diagonal corners. However, there are various methods to create a rectangle. These methods are
explained in the following examples.
Example:
In this example, you will create a rectangle by specifying it corner points.
Open a new file.
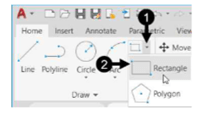
Click Home > Draw > Rectangle on the ribbon or enter RECTANG or REC in the command
line; the message, “Specify first corner point or [Chamfer Elevation Fillet Thickness Width]:”
appears in the command line.
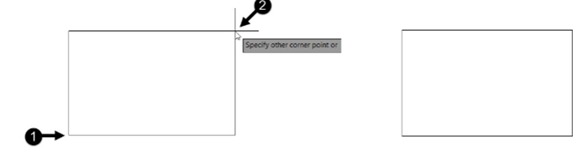
Pick an arbitrary point in the drawing window; the message “Specify other corner point or
[Area Dimensions Rotation]:” appears in the command line.
Move the cursor diagonally toward right and click to create a rectangle.
Example:
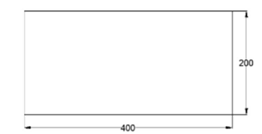
In this example, you will create a rectangle by specifying its length and width.
Click Home > Draw > Rectangle on the ribbon, or enter RECTANG or REC in the command line.
Specify the first corner of the rectangle by picking an arbitrary point in the drawing window.
Follow the prompt sequence given next:
Specify other corner point or [Area Dimensions Rotation]: Select the Dimensions option from
the command line
Specify length for rectangles: Type 400 and press
ENTER. Specify width for rectangles: Type 200 and
press ENTER.
Specify other corner point or [Area Dimensions Rotation]: Move the cursor upwards and click
to create the rectangle.
Example:
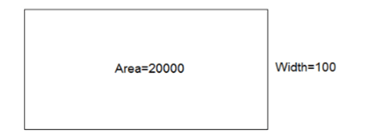
In this example, you will create a rectangle by specifying its area and width.
Click Home > Draw > Rectangle on the ribbon, or enter RECTANG or REC in the command line.
Specify the first corner of the rectangle by picking an arbitrary point.
Follow the prompt sequence given next:
Specify other corner point or [Area Dimensions Rotation]: Select the Area option from the
command line
Enter area of rectangle in current units: Type 20000 and press ENTER.
Calculate rectangle dimensions based on [Length Width] <Length>: Select the Width option from
the command line.
Enter rectangle width: Type 100 and press ENTER; the length will be calculated automatically.
Example:
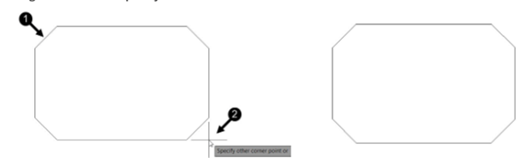
In this example, you will create a rectangle with chamfered corners.

Click Home > Draw > Rectangle on the ribbon or enter RECTANG or REC in the command line.
Follow the prompt sequence given next:
Specify first corner point or [Chamfer Elevation Fillet Thickness Width]: Select the Chamfer
option from the command line.
Specify first chamfer distance for rectangles: Type 20 and press
ENTER. Specify second chamfer distance for rectangles: Type 20 and
press ENTER.
Specify first corner point or [Chamfer Elevation Fillet Thickness Width]: Click at an arbitrary
point in the drawing window to specify the first corner.
Specify other corner point or [Area Dimensions Rotation]: Move the cursor diagonally toward
right and click to specify the second corner.
Example:
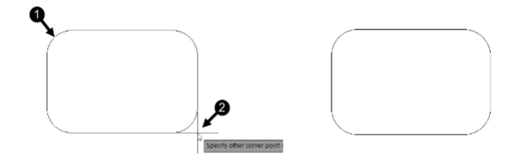
In this example, you will create a rectangle with rounded corners.

Click Home > Draw > Rectangle on the ribbon or enter RECTANG or REC in the command line.
Follow the prompt sequence given next:
Specify first corner point or [Chamfer Elevation Fillet Thickness Width]: Select the Fillet option from
the command line.
Specify fillet radius for rectangles: Type 50 and press ENTER.
Specify first corner point or [Chamfer Elevation Fillet Thickness Width]: Click at an arbitrary point
in the drawing window to specify the first corner.
Specify other corner point or [Area Dimensions Rotation]: Move the cursor diagonally toward
right and click to specify the second corner.
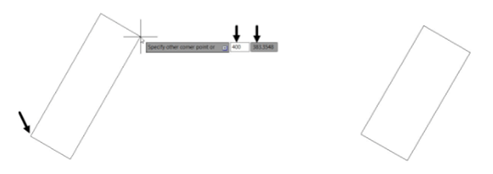
Example:
In this example, you will create an inclined rectangle.

Click Home > Draw > Rectangle on the ribbon or enter RECTANG or REC in the command line.
Specify the first corner of the rectangle by picking an arbitrary point.
Follow the prompt sequence given next:
Specify other corner point or Dimension Rotation]: Select the Rotation option from the [Area command line.
Specify rotation angle or [Pick points]: Type 60 and press ENTER.
Specify other corner point or [Area Dimensions Rotation]: Enter 400 and press TAB and then 300 in the Dynamic Input boxes.